
9.0 HP StorageWorks P4000 VSA Installation and Configuration Guide


• Power on the VSA and set the IP address and host name of the VSA.
Configuring a data disk
When you configure the data disk, use Table 2 to determine the proper size for the disk. The maximum
disk size on the ESX Server is limited by the block size used to format the datastore.
Table 2 Relationship of disk size to datastore block size
Max VMDKBlock Size
256 GB1 MB
512 GB2 MB
1024 GB4 MB
2048 GB8 MB
To configure the data disk:
1. In the VI Client, navigate to the Inventory Panel.
2. Click Add at the bottom of the Hardware tab.
3. Select Hard Disk as the type of device you want to add and click Next.
4. Select Create a new virtual disk and click Next.
5. In the Disk Capacity section, designate a capacity that is suitable for the amount of storage
available on your ESX Server.
6. In the Location section, select Store with Virtual Machine, and click Next.
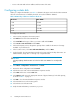
7. For the first disk, select the Virtual Device Node to be SCSI 1:0 from the drop-down menu. For
additional disks, assign SCSI 1:1 through 1:4, in sequential order.
CAUTION:
Selecting anything other than SCSI 1:0 for the first disk causes RAID to be unconfigurable
later.
8. Select Mode > Independent > Persistent and click Next.
9. Review the device configuration and click Finish.
10. Click the Resources tab on the Virtual Machine Properties window.
11. Select CPU and reserve at least 2000 MHz.
12. Select Memory and reserve the appropriate amount of physical memory for the disk capacity,
as shown in Table 1 on page 9.
13. Click OK to close the Virtual Machine Properties window.
14. Select the ESX Server in the inventory panel.
15. Select the Resource Allocation tab.
16. Verify the CPU and Memory reservations you just set.
Installing the VSA for ESX Server10