
9.0 HP StorageWorks P4000 VSA Installation and Configuration Guide


4 Getting started with the P4000 SAN
Installing the CMC
Install the CMC on the computer or virtual machine that you use to administer the P4000 SAN Solution.
You administer the entire network of VSAs from this CMC. To obtain the CMC, you must download
the HP StorageWorks P4000 Management Software for Microsoft Windows. Find the DVD image at
www.hp.com/go/p4000downloads.
Prerequisite
For the Central Management Console complete installation, 35 MB disk space and 50 MB RAM
during runtime.
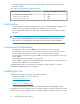
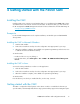
Installing the CMC in Microsoft Windows
1. Start the CMC installer.
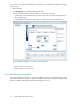
2. At the Choose Install Set window, select the configuration most appropriate for your setup.
3. When the installation completes, HP is added as a separate Program Group and a shortcut icon
is added to the Microsoft Windows desktop.
To start the CMC:
• Double-click the icon on your desktop, or
• From the Start menu, select All Programs > HP > P4000 > HP P4000 Centralized Management
Console.
Installing the CMC in Linux
You must be running X Windows in order to run the application.
1. Click the CMC installer.
2. At the Choose Install Set window, select the configuration most appropriate for your setup.
3. When the installation completes, HP is added as a separate Program Group.
To start the CMC:
From the directory into which you installed the files, run the script ./Console.
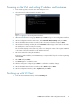
Getting started with the CMC
The CMC is configured to find all systems on the subnet on which it is installed. The first time you
open the CMC, it automatically finds all the storage systems and they appear in the Navigation pane.
P4000 VSA Installation and Configuration Guide 17