
9.5.01 HP P4000 SAN Solution User Guide (AX696-96168, February 2012)


11. Select No, I am done, unless you plan to install another Failover Manager, and click Next.
If you want to install another Failover Manager, the wizard repeats the steps, using information
you already entered, as appropriate.
12. Finish the installation, reviewing the configuration summary, and click Deploy.
When the installer is finished, the Failover Manager is ready to be used in the HP P4000
SAN Solution.
Next, use the Find function in the CMC to discover the Failover Manager, and then add it to a
management group. See “Adding a storage system to an existing management group” (page 115)
for more information.
Installing the Failover Manager using the OVF files with the VI Client
1. Begin the installer one of the following ways:
• Insert the in the DVD drive.
• Double-click the executable that you downloaded to start the installation.
2. Click Agree to accept the terms of the License Agreement.
3. Click the link for OVF files to open a window from which you can copy the files to the ESX
Server.
Configure the IP address and host name
1. In the inventory panel, select the new Failover Manager and power it on.
2. Select the Console tab and wait for the Failover Manager to boot.
3. When the Failover Manager finishes booting, enter Start and press Enter to log in to the
Configuration Interface.
4. On the main menu, tab to Network TCP/IP Settings and press Enter.
5. On the Available Network Devices window, tab to the network interface and press Enter.
6. On the Network Settings window, tab to the Hostname field and enter a host name for the
Failover Manager. Use backspace to erase an entry if necessary.
This host name displays in the only. It does not change the name of the original .VMX file or
the name of the virtual machine in the VMware interface.
7. Tab to the method for setting the IP address.
If entering a static IP address, note that Gateway is a required field. If you do not have a
gateway, enter 0.0.0.0.
8. Tab to OK and press Enter.
9. Press Enter again to confirm the action.
10. After the settings are configured, press Enter to confirm the IP address change.
11. On the Available Network Devices window, tab to Back and press Enter.
12. On the Configuration Interface, tab to Log Out and press Enter.
Finishing up with VI Client
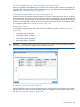
1. In the VI Client Information Panel, click the Summary tab.
2. In the General section on the Summary tab, verify that the IP address and host name are
correct, and that VMware Tools are running.
NOTE: If VMware Tools show “out of date” or “Unmanaged,” they are running correctly.
The “out of date” or “Unmanaged” status is not a problem. VMware Tools are updated with
each SAN/iQ software upgrade.
124 Using specialized managers