HP Integrity BL860c Server Blade Linux Installation White Paper Red Hat Enterprise Linux and SUSE Linux Enterprise Server HP Part Number: 5991-8659 Published: March 2007 Edition: 1.
© Copyright 2007 Hewlett-Packard Development Company, L.P. Legal Notice Confidential computer software. Valid license from HP required for possession, use or copying. Consistent with FAR 12.211 and 12.212, Commercial Computer Software, Computer Software Documentation, and Technical Data for Commercial Items are licensed to the U.S. Government under vendor's standard commercial license. The information contained herein is subject to change without notice.
Table of Contents About This Document.........................................................................................................4 Intended Audience.................................................................................................................................4 Typographic Conventions......................................................................................................................4 Related Information..........................................................
About This Document This document describes how to install supported Linux distributions on HP Integrity BL860c Server Blades. Intended Audience The intended audience for this document are Linux System Administrators who want to become familiar with how to install Linux on the HP Integrity BL860c Server Blades. Typographic Conventions This document uses the following typographical conventions: A percent sign represents the C shell system prompt.
Related Information The following documents and resources contain useful and related information: • Installation Guide: HP Integrity BL860c Server Blade located at: http://docs.hp.com/en/AD217-9003A/index.html • Support Notes for Red Hat Enterprise Linux ES v.4 Update 4 for HP Integrity Servers located at: http://www.docs.hp.com/en/5991-5519/index.html • Support Notes for SUSE LINUX Enterprise Server 10 for HP Integrity Servers located at: http://www.docs.hp.com/en/5991-6409/index.
Introduction Abstract The HP Integrity BL860c Server Blade introduces the advantages of HP Integrity servers to the HP BladeSystem c-Class series technology. This white paper describes how to install the supported Linux distributions on HP Integrity BL860c Server Blades. The supported Linux distributions are: • Red Hat Enterprise Linux 4 Update 4 (RHEL4U4) • Novell SUSE Linux Enterprise Server 10 (SLES10) Both Linux distributions support installations using physical media or a network repository.
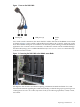
Figure 1 Ports on the SUV Cable 1 Serial port 2 USB ports (2) 3 Video port For a serial console connection, first attach the SUV cable to the front of the BL860c server blade as shown in Figure 2. Next, attach a null-modem serial cable to the "Console" serial port on the SUV cable and the serial port of a terminal or an external system running a terminal emulation application.
Installation Boot Media The Linux installation boot kernel for the BL860c server blade on the Linux distribution installation media, can be booted using an external USB DVD drive, a remote iLO 2 virtual media, or a network connection using either a Pre-Boot Execution Environment (PXE) network connection or Dynamic Host Configuration Protocol (DHCP) server.
Using CD/DVD Media Follow the steps described in “Using an External USB DVD Device” (page 8) or “Using iLO 2 Virtual Media” (page 8) to make the Linux distribution media available using external USB or vMedia respectively. Using a Local Hard Disk Partition Copy the Linux distribution ISO images to a local hard disk partition that will not be modified by the installation process. Using a Network Repository Installing from the network requires the creation of a network repository.
Booting Linux on the BL860c Server Blade The following sections explain how to make the installation media ready for use and the various methods that can be used to boot the BL860c server blade. Making the Installation Media Available Use one of the methods to provide access to the OS installation media so that you can boot the server: Using the USB Attached DVD To boot from a USB attached DVD device, perform the following steps: 1.
Figure 3 iLO 2 MP Network Interface 2. Select the Virtual Devices tab. The iLO 2 Advanced GUI changes as shown in Figure 4. Figure 4 iLO 2 Virtual Devices Tab 3. Click the Virtual Media link. The iLO 2 Virtual Devices Tab changes as shown in Figure 5.
Figure 5 iLO 2 Virtual Devices Tab–Virtual Media Selected 4. Click Launch to start the vMedia applet. Following the acceptance of server certificates and acknowledgment of security measure, a Java™ applet window is displayed as shown in Figure 6. Figure 6 iLO vMedia Window 5. Select either a physical device or a disk ISO image stored on the local system, and then click Connect. The virtual media is now available to the BL860c server blade.
6. Select Removable Media Boot [Internal Bootable DVD]. The elilo.efi boot loader is automatically executed. Either a selection of boot kernel and kernel parameters is displayed or the Linux kernel will begin loading, depending on how elilo.conf is configured. 7. Interrupt the boot process by pressing any key during the 2 second delay prior to the kernel loading to enter additional kernel parameters.
linux askmethod ethtool="speed=1000, duplex=full, autoneg=off" • To avoid encountering a problem when installing RHEL4U4 to a Fibre Channel connected drive, include the nostorage kernel parameter when booting then add the correct drivers as follows: a. When prompted with Would you like to select drivers now?, select Yes. b. Select Add Device. c. Add any devices you have added to the BL860c server blade in the following order: i. LSI Logic Fusion MPT SAS Driver (mptsas) ii.
1. Supply any additional kernel parameters as follows: • If you are using the Ethernet Pass-Thru Interconnect Module, include the following kernel parameter: ethtool=eth[0-3]="speed 1000 duplex full autoneg off" • If installing from the network, specify the installation method using the install=URI as follows: install=nfs://repository.server/path/to/repository • By default only the serial console is detected so it does not need to be specified. If you want to specify it, use console=ttyS1.
Using Physical Media: a. b. On the BL860c server blade with the DVD device already connected and Linux booted, insert the media containing the tg3-3.71b-1.src.rpm file. To mount the media making the files available, enter: mount /media/dvdrom Using vMedia; a. On the system hosting the vMedia device, choose one of the following: Insert and mount the media containing the tg3-3.71b-1.src.rpm file. Or Create an ISO file that contains the tg3-3.71b-1.src.
Using PXE/DHCP Boot: NOTE: 4. # cd /boot/efi You may need to mount the DVD device. Install the tg3 source RPM file, enter: # rpm -ivh tg3-3.71b-1.src.rpm 5. Build the binary RPM for the tg3 driver, choose one of the following: RHEL4U4 # cd /usr/src/redhat # rpmbuild -bb SPECS/tg3.spec SLES10 # cd /usr/src/packages # rpmbuild -bb SPECS/tg3.spec If an error during the build process is displayed, you may not have correctly installed the kernel source and development tools.
The basic PXE boot process is as follows: – The PXE firmware broadcasts a DHCP discovery packet on the network – Upon receiving the DHCP discovery packet, the DHCP server negotiates with the client to ultimately issue an IP address lease, determined by the DHCP configuration, and the path to a startup file on the TFTP server. – The client then downloads and executes the startup file.
field), a menu, and prompt field for entering kernel parameters. For more details, see the textmenu_chooser.txt documentation provided with the elilo source code. After selection of one of the boot images, elilo uses tftp to retrieve the kernel image identified in the image field and the initrd file identified in the initrd field, which is located relative to the directory from which elilo was retrieved. The kernel is then started with any kernel parameters specified in the append field of the elilo.
Scripting Linux Installations for Large Deployments HP Rapid Deploy Pack (RDP) 3.50 and HP SmartSetup Scripting Tookit (SSTK) 2.5 provide you the means to script network-based RHEL4U4 installations for environments with large numbers of systems. All supported features of RDP and SSTK are available to BL860c server blades in BladeSystem c-Class enclosures that do not use the Ethernet Pass-Thru Interconnect Module for network connections (for example, chassis-based switch modules).
Appendix A: Instructions for Installing a New tg3 Driver for Ethernet Pass-Thru Interconnect Module Users The following contents are found in the tg3-3.71b-1.src.rpm RPM file that is used to install the ethernet pass-thru interconnect module: FILE NAME: tg3-3.71b-1.src.rpm TITLE: HP Broadcom TG3 Driver for Linux VERSION: 3.
the README.TXT and TG3.TXT files located under the following directories For Red Hat: /usr/share/doc/tg3- For SLES: /usr/share/doc/packages/tg3 For more background regarding installing Linux on the BL860c, please consult the "HP Integrity BL860c Server Linux Installation White Paper" at http://www.docs.hp.com/en/5991-8659/index.html.
selection and select just the following packages underneath the "Development Tools" selection: elfutils, gcc, kernel-devel, libtool, make, redhat-rpm-config, rpm-build. After the install completes and you are logged into Linux, then change the CD/DVD to the one with tg3-.src.rpm. Then do the following to mount this CD/DVD file from Linux: mount /dev/cdrom /media/cdrom/ Proceed to the 'Installing the RPM Package' step.
RPM package something like the following will probably work: rpm -ivh /boot/efi/tg3-.src.rpm Red Hat Enterprise Linux 4 AS/ES Installation via Virtual Media =============================================================== On a Linux system that will be the client of the iLO, get the RHEL4U4 .iso install image and the tg3-.src.rpm file. This client will provide the .iso images that can be used by the iLO and the associated system to install Linux.
Proceed to the 'Installing the RPM Package' step. When installing the RPM package something like the following will probably work: rpm -ivh /media/tg3-3.71b-1.src.rpm SUSE LINUX Enterprise Server 10 Installation via PXE ==================================================== Install the tg3-.src.rpm onto your PXE server to enable you to easily copy it over to your new system using the EFI tftp command.
mkisofs -J -o tg3.iso tg3-.src.rpm On the same client system, connect to the iLO and connect the vMedia system to the SLES10 image. Now start the install on the BL860c using the vMedia interface. Go thru the SLES10 install and select the packages that you need plus the package(s) to be able to build the tg3 driver.
# rpm -ivh RPMS//tg3-..rpm --force The driver will be installed in the following path: 2.4.x kernels; /lib/modules//kernel/drivers/net/tg3.o 2.6.x kernels: /lib/modules//kernel/drivers/net/tg3.ko 5. Configure your network setting and address. You may need to refer to your Linux vendor documentation. Helpful network configuration tools such as "yast2" in SLES or linuxconf/redhat-config-network/netconfig in Red Hat exist for easy configuration.
b) 'ethtool -s' parameters can be specified in the ifcfg-ethX scripts using the ETHTOOL_OPTS keyword. Example: /etc/sysconfig/network-scripts/ifcfg-ethX: ETHTOOL_OPTS="wol g speed 100 duplex half autoneg off" For SuSe Linux a) Modify /etc/sysconfig/network/config file to have following options set to 'yes'. GLOBAL_POST_UP_EXEC="yes" GLOBAL_PRE_DOWN_EXEC="yes" b) Create a script file (E.g, ethtool-settings) in /etc/sysconfig/network/if-up.d directory with required ethtool commands. E.
# rpm -e tg3- (C) Copyright 2002, 2003 - 2007 Hewlett-Packard Development Company, L.P.
*5991-8659* Printed in the US