
HP StorageWorks LUN Configuration and Security Manager XP user guide for the XP12000/XP10000/SVS200 (T1714-96008, June 2006)

142 Preparing to use Volume Manager or Custom Volume Size
NOTE:
• To exit Volume Manager, click the button (Exit) on the upper right of the Command View XP or XP
Remote Web Console main pane or end the Web browser.
• The initial Command View XP or XP Remote Web Console main pane appears in View mode. To
implement any changes for Volume Manager or CVS, you must change the operation mode to Modify
mode. For more information, see ”Changing to Modify mode” on page 142.
Changing to Modify mode
To implement any changes for Volume Manager or CVS, you must be in Modify mode. The array
information icons (Figure 83 and Figure 85) are on the upper right of the pane. These icons are described
in detail in the HP StorageWorks Command View XP user guide for XP Disk Arrays or the
HP StorageWorks XP Remote Web Console user guide for XP12000/XP10000/SVS200. To change
from View mode to Modify mode and back, two icons are important.
• Exclusive lock icons indicate the operation mode of all currently logged-in users. If all users are
operating in View mode, the Unlocked icon ( ) appears. If a user is operating in Modify mode, or if
array maintenance or SNMP operations are being performed, the Locked icon ( ) appears.
• Mode Changing icons allow users to change the operation mode between View mode ( ) and
Modify mode ( ).
NOTE: Only one user at a time can be in Modify mode.
1. You must have write permission for Volume Manager. For more information about assigning write
permission to a user ID, see the HP StorageWorks Command View XP user guide for XP Disk Arrays or
the HP StorageWorks XP Remote Web Console user guide for XP12000/XP10000/SVS200.
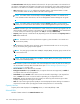
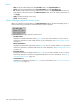
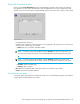
2. Verify that the array is unlocked. If all users are operating in View mode, the Unlocked ( ) and View
Mode ( ) icons appear (Figure 83). If a user is operating in Modify mode or if array maintenance is
being performed, the Locked icon ( ) appears and you cannot change to Modify mode.
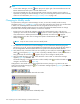
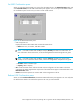
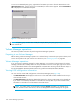
3. Select the Mode Changing icon ( ), which should be in View mode. A confirmation message
appears (Figure 84). Click OK.
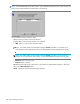
The Mode Changing icon changes from View mode to Modify mode ( ), and the Unlocked icon ( )
changes to the Locked icon ( ) (Figure 85).
Change back to View mode once you have applied the necessary changes. To go back to the View
mode, select the Mode Changing icon ( ). If a confirmation message appears (Figure 84), click OK. You
are back to View mode.
Figure 83 Icons showing Unlocked status and View mode
Figure 84 Mode changing confirmation message
Figure 85 Icons showing Locked status and Modify mode