
HP Insight Global Workload Manager 6.0 Software: User Guide

NOTE: You must be logged in as root on the systems where you run the mxstart, gwlmcmsd,
and gwlmagent commands mentioned below. In HP SIM, you must be logged in as root or have
authorizations for “All Tools” or “VSE All Tools.”
1. Start the gWLM agent daemons on vpar1 and vpar2:
# vpar1> /opt/gwlm/bin/gwlmagent
# vpar2> /opt/gwlm/bin/gwlmagent
Alternatively, you can start the agents through HP SIM, as discussed in the VSE Management
Software Installation and Update Guide.
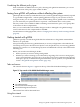
2. Connect to HP SIM by pointing your web browser to:
http://hostname:280
where hostname represents the hostname of the CMS, in this case, vpar3.
3. Create a gWLM SRD containing the two vpars by following the steps given in “Getting
started with gWLM” (page 17).
a. For hosts, enter the names of the two vpars separated by a space in the field beneath
the table.
b. Ensure when setting the SRD properties that the mode is Managed.
c. Use an OwnBorrow policy for the vpar1 workload and for the vpar2 workload.
An OwnBorrow policy has a name of the form:
Owns_4-Max_8
Ideally, the sum of the cores owned by the workloads will equal the total number of
cores in the SRD when using this type of policy. (You might need to edit policies to
achieve this equality.)
d. Confirm and finish the SRD creation. (You are then placed on the Shared Resource
Domain View, showing the newly created SRD and its workloads.)
4. Select the vpar1 workload.
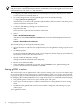
5. View gWLM’s real-time reports to show CPU resource allocation for vpar1 by selecting in
the VSE Management menu bar:
Report→gWLM Real-time Reports...
You can also view the reports by clicking the workload’s bar graph.
6. Click the Policy graph radio button to see a graph of vpar1’s CPU resource allocation.
7. Start a CPU resource-intensive workload in vpar1.
If you already have such a workload configured in vpar1, start it now.
If you need such a workload, the following command prints its PID (24379 in this case) and
then just consumes CPU resources:
# perl -e ’print "$$\n";while (1) {};’ &
[1] 24379
This command consumes most of a single core. Start multiple copies of the command to
consume additional cores.
8. Wait a few minutes, then look at the “Policy Request and Workload Allocation” graph from
Step 6 to see how the policy for vpar1’s workload is requesting CPU resource allocations
and how gWLM is granting them.
9. Kill the workloads you started in vpar1.
10. Set the Workload dropdown near the top of the screen to the vpar2 workload and repeat
Step 7 through Step 9 to see gWLM move cores to vpar2.
Seeing gWLM in action 19