
HP Integrity Virtual Server Manager 6.2 User Guide
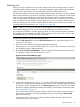

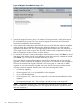
Table Of Contents
- HP Integrity Virtual Server Manager 6.2 User Guide
- Contents
- 1 Introduction
- 2 Installing Integrity Virtual Server Manager
- 3 Accessing and Navigating Integrity Virtual Server Manager
- 4 Using Integrity Virtual Server Manager views and tabs
- 5 Using Integrity Virtual Server Manager menus
- 6 Working with VMs or vPars
- Working with VMs
- Planning VMs
- Creating VMs
- Modifying VMs
- Starting VMs
- Stopping VMs
- Restarting VMs
- Deleting VMs
- Migrating VMs
- Suspending VMs
- Resuming VMs
- Moving suspend files
- Creating virtual switches
- Starting, stopping, and deleting virtual switches
- Deleting network or storage devices
- Opening iLO console
- Opening virtual iLO remote console
- Deleting virtual iLO remote console
- Deleting DIOs
- Adding DIOs
- Replacing DIO H/W path
- Replacing DIO MAC address
- Working with vPars
- Creating vPars
- Modifying vPars
- Booting vPars
- Stopping vPars
- Resetting vPars
- Creating virtual switches
- Starting, stopping, and deleting virtual switches
- Deleting network or storage devices
- Deleting vPars
- Opening iLO console
- Opening virtual iLO remote console
- Deleting virtual iLO remote console
- Adding DIOs
- Replacing DIO H/W path
- Replacing DIO MAC address
- Deleting DIOs
- Working with VMs
- 7 Collecting and viewing utilization data
- 8 Viewing logs and version information
- 9 Support and other resources
- Information to collect before contacting HP
- How to contact HP
- Security bulletin and alert policy for non-HP owned software components
- Subscription service
- Registering for software technical support and update service
- How to use your software technical support and update
- HP authorized resellers
- New and changed information in this edition
- Related information
- Typographic conventions
- 10 Documentation feedback
- A Error messages, status indicators, and troubleshooting
- Glossary
- Index

1. From the VSP General tab, select the VSP Virtual Servers tab (or any tab that allows you to
select one or more VMs).
2. Select one or more VMs to start by clicking the appropriate check boxes.
Alternatively, you can access the VM Properties view, in which case no selection is necessary;
the VM being viewed is implicitly selected.
3. Select Tools→Start Virtual Machine... from the Integrity Virtual Server Manager menu bar. A
page similar to that shown in Figure 59 is displayed.
Figure 59 Start Virtual Machine page
4. In the example shown in Figure 59, one VM will be started. The Note column indicates that
one of the selected VM is already started. The Command Preview area shows the commands
that Integrity VM will perform to start the VM.
Click OK to start the VM.
When a VM is started, it is in the On state (powered on). You can then perform the functions you
want.
NOTE: Depending on the settings in the VM's Extensible Firmware Interface (EFI), starting a VM
might not boot the operating system. For more information, see “Creating VMs” (page 83).
Once a VM is started, the resources assigned to the VM are allocated for its use. The VSP ensures
that the resources required by the VM are available in the current VSP system environment. If the
VM cannot be started, Integrity Virtual Server Manager displays messages indicating which
resources cannot currently be provided.
For information about possible reasons that a VM might not start, see “Troubleshooting VM or vPar
problems” (page 138).
Stopping VMs
To stop one or more VMs, perform the following steps. This action allows you to stop the virtual
hardware for a VM. When stopped, a VM enters an Off state (powered off) and the VM is halted.
Once a VM is stopped, the resources assigned to it no longer are allocated and are now available
for use by other VMs.
Working with VMs 91