Building Disaster Recovery Serviceguard Solutions Using Metrocluster with 3PAR Remote Copy HP Part Number: 698667-001 Published: December 2013
Legal Notices © Copyright 2013 Hewlett-Packard Development Company, L.P. Confidential computer software. Valid license from HP required for possession, use, or copying. Consistent with FAR 12.211 and 12.212, Commercial Computer Software, Computer Software Documentation, and Technical Data for Commercial Items are licensed to the U.S. Government under vendor’s standard commercial license. The information contained herein is subject to change without notice.
Contents 1 Introduction...............................................................................................7 Overview of HP 3PAR concepts..................................................................................................7 Remote Copy pairs .............................................................................................................7 Remote Copy volume groups ................................................................................................
Configuring the storage device for complex workload at the target disk site...............................34 Configuring the storage device using CFS or SG SMS CVM................................................34 Configuring the storage device using VERITAS CVM..........................................................34 Configuring the storage device using SLVM .....................................................................35 Configure the identical complex workload stack at the recovery site........
Logs and files....................................................................................................................60 Cleaning the site to restart the Site Controller package............................................................61 Identifying and cleaning MNP stack packages that are halted.................................................62 Understanding Site Controller package logs..........................................................................
Deleting nodes online on the primary site where the RAC database package stack is running........................................................................................................................96 Deleting nodes online on the site where the RAC database package stack is down................97 Starting a disaster tolerant Oracle database 10gR2 RAC........................................................97 Shutting down a disaster tolerant Oracle database 10gR2 RAC...............................
1 Introduction This document describes the procedure to configure data replication solutions using HP 3PAR storage systems to provide disaster recovery for Serviceguard clusters over long distances. This chapter describes the HP 3PAR Remote Copy software and the additional files that integrate the HP 3PAR storage system with Metrocluster. Overview of HP 3PAR concepts The 3PAR storage systems are configured for use in data replication from one 3PAR storage system unit to another.
synchronization is manually initiated. If between two synchronizations, an area of the volume is written to multiple times, only the last write needs to be synchronized with the other storage system. Remote Copy target definitions As part of the Remote Copy setup process, you must create target definitions on each Remote Copy system. The target definitions are descriptions that exist on one system to identify a Remote Copy system.
• For each node in the site, there must be at least two alternately routed fibre channel paths to the local 3PAR storage system. • When you upgrade the HP 3PAR storage system to any of the following 3PAR OS versions, then it impacts the HP Metrocluster 3PAR package. ◦ 2.3.1 MU5 Patch35 ◦ 3.1.1 MU3 Patch27 ◦ 3.1.2 MU3 Patch16 After the upgrade to the patches is complete, a new self-signed 2048-bit RSA SSL Certificate is created on the HP 3PAR Array.
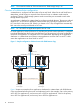
NOTE: The maximum number of SSH connections to a 3PAR storage array is 16. Overview of a Metrocluster configuration A Metrocluster is configured with the nodes at Site A and Site B. When Site A and Site B form a Metrocluster, a third location is required where Quorum Server or arbitrator nodes must be configured. There is a 3PAR storage system at each site and they are connected to each other through Remote Copy links. An application is deployed in a Metrocluster by configuring it at both the sites.
2 Configuring an application in a Metrocluster environment Installing the necessary software Before a Metrocluster can be configured, make sure the following software is installed on all nodes: • Serviceguard • Metrocluster with 3PAR Remote Copy • MCDR Enabler Toolkit For more information on the software, see the Metrocluster with 3PAR Remote Copy Release Notes and Serviceguard Disaster Recovery Products Compatibility and Feature Matrix (Metrocluster with 3PAR Remote Copy) available at http://www.hp.
Use the cmviewcl command to view the list of sites that are configured in the cluster and their associated nodes. Following is a sample of the command, and the output: # cmviewcl -l node SITE_NAME san_francisco NODE STATUS STATE SFO_1 up running SFO_2 up running ......... SITE_NAME san_jose NODE STATUS STATE SJC_1 up running SJC_2 up running You can configure either of these failover policies for both, the regular Metrocluster failover packages and Site Controller Packages.
simple way to deploy Metrocluster modules in supported toolkit applications. For detailed information about the Package Easy Deployment feature, see Using Easy Deployment in Serviceguard and Metrocluster Environments available at http://www.hp.com/go/hpux-serviceguard-docs —> HP Serviceguard. The advantage offered by the Package Easy Deployment feature is that you are not required to enter any of the Metrocluster module parameters in the modular package configuration file.
3. 4. 5. The source virtual volumes in the Remote Copy volume group must be presented to all the primary site nodes. The destination virtual volumes in the Remote Copy volume group must be presented to all the recovery site nodes. All the virtual volumes used by the package must belong to exactly one Remote Copy volume group. Setting up the replication using 3PAR Remote Copy Consider that you have already created one or more Serviceguard clusters for use in a disaster recovery configuration.
# ssh @system1 When using CLI, run the following command: # cli 2. Create a CPG on both primary and recovery 3PAR storage systems. Issue the following command: cli% createcpg -domain MC_CPG_RAID5 where: • MC_CPG_RAID5 is the name of the CPG. • is the name of the domain to which the newly created CPG will belong. If you are not using Domains, do not specify the option-domain otherwise, specify the name of an existing domain in your system.
# scsimgr -p get_attr all_lun -a device_file -a wwid 5. a. Create a synchronous Remote Copy volume group on the primary system and assign the created volume to that group. On primary storage system: cli% creatercopygroup –domain :sync cli% admitrcopyvv : where: • is the name of the Remote Copy volume group to be created. • is the recovery storage system.
Console Online Help. To create a user using HP 3PAR CLI commands, from any host that has SSH client, login to the HP 3PAR CLI using the following example: 1. Access the HP 3PAR CLI using SSH or CLI client with the 3PAR storage system user having super or edit privileges who has access to all domains. If 3PAR CLI client is installed on your system, then use cli command, otherwise use ssh command to connect to the storage.
/opt/cmcluster/toolkit/SG3PARRC/utils/setupMC3PARpasswdfile mc3parusr 3par001 Metrocluster 3PAR password file creation utility....
$ ssh–keygen –b 1024 –t dsa The ssh–keygen utility generates two files: id_rsa and id_rsa.pub (or id_dsa and id_dsa.pub). Generate the key without a passphrase. Ensure that only the root has access and read/write permission on the private key file, otherwise the SSH client refuses the key file. 2. Log on to a 3PAR storage system from the host using the new user. $ssh mc3parusr@system1 mc3parusr@system1 password: 3. Issue the setsshkey command.
4. Create the filesystem. # newfs -F vxfs /dev/vgname/rlvol 5. Deactivate and export the Volume Groups on the primary system without removing the special device files. # vgchange -a n # vgexport -s -p -m Make sure that you copy the mapfiles to all the host systems. 6. On the source disk site, import the VGs on all of the other systems that might run the Serviceguard package and backup the LVM configuration.
1. If the disk group is configured in asynchronous periodic mode, then to reflect disk group configuration done at the source disk site, you must synchronize the Remote Copy disk group from the 3PAR storage system of the source disk site. # cli% syncrcopy 2. Run the vxdisksetup command on the primary system to initialize the disks to be used with VxVM. # /etc/vx/bin/vxdisksetup -i disk3 3. Create a disk group to be used with the vxdg command on the primary system.
Repeat steps 2 through 7 on all nodes in the cluster that require access to this disk group. 8. Login to the source disk site's 3PAR storage system. Reverse the direction of replication to bring it back to its original direction. cli% setrcopygroup reverse cli% startrcopygroup Configuring Modular Packages A Metrocluster must be completed using Metrocluster 3PAR module dts/mc3parrc. NOTE: The maximum number of Metrocluster packages that can be configured is 16.
d. Specify the DNS resolvable name or IP address of the HP 3PAR storage system that resides in DC1. dts/3parrc/DC1_STORAGE_SYSTEM_NAME "3PAR001" e. Specify the DNS resolvable name or IP address of the HP 3PAR storage system that resides in DC2. dts/3parrc/DC2_STORAGE_SYSTEM_NAME “3PAR002” f. Specify the Remote Copy volume group name configured on the HP 3PAR storage system that resides in DC1, containing the disks used by the application. dts/3parrc/DC1_RC_VOLUME_GROUP “mcrcgroup” g.
RESYNC_WAIT_TIMEOUT expires and synchronization is still in progress, the package fails to start with an error and will not start on any node in the cluster. If the parameter RESYNC_WAIT_TIMEOUT is set to "no_timeout", then the package startup waits for the resync until it either completes or fails. NOTE: The RESYNC_WAIT_TIMEOUT value must not be greater than the value of run_script_timeout parameter specified in the package configuration.
3. On the Cluster’s Home Page, click the Configuration Tab, and then select Create A Modular Package option. Figure 2 Creating Modular Package 4. If the product Metrocluster with 3PAR Remote Copy is installed, you will be prompted to configure a Metrocluster package. Select the dts/mc3parrc module, and then click Next. Figure 3 Selecting Metrocluster module 5. You will be prompted next to include any other toolkit modules.
6. Enter the package name, and then click Next. Metrocluster packages can be configured only as failover packages. Make sure that this option is selected as shown in Figure 4. Figure 4 Configuring package name 7. Optional: Select additional modules required by the application. For Example, if the application uses LVM volumegroups or VxVM diskgroups, select the volume_group module. Click Next. Figure 5 Selecting additional modules 8.
Figure 6 Configuring generic failover attributes 9. Configure the attributes for a Metrocluster package. Make sure that you fill all the mandatory attributes (marked with *) accurately. Figure 7 Configuring the attributes for a Metrocluster package 10. Enter the values for other modules selected in step 7. 11. After you enter the values for all modules, review all the inputs given to the various attributes in the final screen, and then apply the configuration.
Figure 8 Applying the configuration 28 Configuring an application in a Metrocluster environment
3 Configuring complex workloads using SADTA Creating a Site Aware Metrocluster configuration Creating a Serviceguard cluster with sites configured To create a Serviceguard cluster with the sites configured: 1. Run the cmquerycl command to create a cluster configuration from any node. 2. Edit the created cluster configuration file to specify the site configuration. The following is a sample of the configuration file: SITE_NAME SITE_NAME NODE_NAME SITE ... . . .
# cmdeploycl -s siteA -n node1 -n node2 -s siteB -n node3 -n node4 -c site_cluster -q quorum.server.com -cfs This creates a cluster with two sites with the CVM infrastructure configured via the SG-CFS-pkg System Multi-node (SMNP) package. For additional information on cmdeploycl, see man page, cmdeploycl (1m). Setting up replication In SADTA, the data of the complex workload must be replicated between the disk arrays at each site.
NOTE: 6. Skip Step 5 if CFS is not required and SG SMS CVM will be used as raw volumes. Create a package configuration file. # cmmakepkg -m sg/cfs_all /etc/cmcluster/cfspkg1.ascii 7. Edit the following package parameters in the cfspkg1.
1. Create a package configuration file using the following modules: # cmmakepkg -m sg/multi_node -m sg/dependency -m\ sg/resource -m \ sg/volume_group .conf 2. Edit the configuration file and specify values for the following attributes: package_name package_type multi_node cvm_dg cvm_activation_cmd "vxdg -g \${DiskGroup} set activation=sharedwrite" 3.
6. On each node, ensure that the volume group to be shared is currently inactive on all nodes. # vgchange -a n /dev/ 7. On the configuration node, make the volume group shareable by members of the source disk site in the cluster: # vgchange -S y -c y /dev/ This command is issued from the configuration node only, and the cluster must be running on all nodes for the command to succeed. Note that, both the -S and the -c options are specified.
Preparing the replicated disk at the target disk site In the earlier procedures, the complex workload was created at the site with the source disk of the replication disk group. Now, an identical complex workload using the target replicated disk must be configured with the complex workload stack at the target disk site. Before creating an identical complex workload at the target disk site, the target disk must be in the Read/Write mode. To do this, login to the target disk site's 3PAR storage system.
IMPORTANT: VERITAS CVM disk groups must be configured in a dedicated modular multi-node package using the cvm_dg attribute. This modular MNP package must be configured to have a package dependency on the SG-CFS-pkg system multi-node package. Metrocluster SADTA does not support configuring Legacy style packages for managing VERITAS CVM disk groups.
1. 2. 3. “ Configuring an empty Site Controller package” (page 36) “Configuring the Site Safety Latch dependencies for a complex workload” (page 37) “Modifying Site Controller to manage complex workload” (page 37) Configuring an empty Site Controller package The following are the guidelines that you must follow while configuring an empty Site Controller package: • The default value of the priority parameter is set to no_priority.
When the Site Controller package configuration is applied, the corresponding Site Safety Latch is also configured automatically in the cluster. Use the resls command to view the Site Safety Latch resource on each node.
After applying the Site Controller package configuration, run cmviewcl to view the packages that are configured. Starting the complex workload in the Metrocluster To start the disaster tolerant complex workload: 1. Run cmviewcl command to view the complex workload configuration in a Metrocluster. 2. Enable all nodes in the Metrocluster for the Site Controller package. # cmmodpkg –e –n –n -n –n cw_sc 3. Start the Site Controller Package.
4 Metrocluster Features Cluster verification Starting HP Serviceguard version A.11.20, the cmcheckconf-v command validates the cluster and the package configuration. Starting March 2013 patch release, Metrolcuster uses this functionality to ensure the sanity of Metrocluster and the Site Controller package configuration. HP recommends that you set up a cron job to regularly run the cmcheckconf command.
Table 2 Validating Metrocluster package (continued) Cannot confirm if the disks are being replicated in case they are being used as raw disks or in case they belong to an Oracle ASM diskgroup. Skips this verify on VxVM diskgroups if the naming convention used by VxVM is legacy and if the controller ID is greater than 512 (This happens when VxVM uses an internal format to recognize devices that do not support legacy dsf format). Also skips the verify if the naming convention is enclosure based.
Table 2 Validating Metrocluster package (continued) Verify whether the nodes configured for cmcheckconf [–v] a given package belongs to DC1 or # cmcheckconf DC2. The following error is displayed, if the nodes configured for a given package neither belongs to DC1 nor DC2. ERROR: Node $host_name is not present in either DC1_NODE_LIST or DC2_NODE_LIST . Verify whether the Remote Copy volume cmcheckconf [–v] group exist on the storage system.
Table 3 Additional validation of Site Controller packages (continued) Check the managed and critical package types cmapplyconf # cmapplyconf -P Checks whether the managed or critical package type is either multi node or failover. cmcheckconf [-P/-p] # cmcheckconf -P # cmcheckconf -p Check if the Site values are valid cmapplyconf # cmapplyconf -P
5 Understanding failover/failback scenarios Failover/failback scenarios in a Metrocluster package The section describes a couple of rolling disaster scenarios. In the first scenario, the link had gone down previously and is now up. The data from primary Remote Copy volume group is being synced with remote Remote Copy volume group. The package has failed in the primary site and is now trying to start at the recovery site.
Table 4 Replication modes and failover scenarios (continued) Local RCVG Role Remote RCVG Role Replication State/Link Status Replication Mode Metrocluster Parameters Metrocluster Action happening from the remote storage system to the local storage system. Start the Remote Copy volume group manually before restarting the package.
Table 4 Replication modes and failover scenarios (continued) Local RCVG Role Remote RCVG Role Replication State/Link Status Replication Mode Metrocluster Parameters Metrocluster Action Error: The Remote Copy link is down and data in the local storage system may not be current. The user has set AUTO_NONCURDATA to "0” and has not created the FORCEFLAG file. To start the package forcefully using non current data, use FORCEFLAG file. Resolution in the location specified in the DTS_PKG_DIR parameter.
Site failover When the Site Controller package determines that a running package configuration of a disaster tolerant complex workload has failed in the Metrocluster, or that the site hosting has failed, it fails over to the remote site node and initiates a site failover from the remote node. The site failover starts the adoptive complex-workload package configuration by starting the packages configured on the remote site.
the storage on a site, it sets the Site Safety Latch to a transient state, which is displayed as INTERMEDIATE. When the Site Safety Latch is in the INTERMEDIATE state, the corresponding Site Controller package can be restarted only after cleaning the site where it previously failed to start. For more information on cleaning the Site Controller package, see “Cleaning the site to restart the Site Controller package” (page 61).
When the complex workload is mounted as read only or is idle or is completing read-only transactions when the replication link fails, it may not encounter any failure and continues to be available from the site. Site Controller package failure The Site Controller package can fail for many reasons, such as node crash, while the active complex-workload package stack on the site is up and running.
6 Administering a Metrocluster with 3PAR Remote Copy Administering a cluster that uses Metrocluster 3PAR Remote Copy While the package is running, a manual storage failover on Remote Copy volume group outside of Metrocluster with 3PAR Remote Copy software can cause the package to halt due to unexpected condition of the 3PAR Remote Copy virtual volumes. HP recommends that no manual storage failover be performed while the package is running.
Restoring replication after a failover When the Metrocluster package fails over to the remote site and the links are not up or the primary storage system is not up, Metrocluster issues the setrcopygroup failover command. This command changes the role of the Remote Copy volume group on the storage system in the recovery site from Secondary to Primary-Rev. In this role, the data is not replicated from the recovery site to the primary site.
1. Log in to the node where the Site Controller package is running, and then go to the Site Controller Package directory. # cd 2. Run the HP-UX touch command with the DETACH flag in the Site Controller package directory. # touch DETACH 3. Halt the Site Controller Package. # cmhaltpkg 4. Log in to the other node in the local site, and then start the Site Controller package.
For example, if you have CVM or CFS configured in your environment, remove the site safety latch (EMS resource) details from the package configuration file and re-apply the package managing the CVM/CFS diskgroups. 3. Delete Site Controller package. Run the cmdeleteconf command to delete the Site Controller package configuration on all the nodes. Starting a complex workload The complex workload in SADTA can be started in a Metrocluster by starting the Site Controller package.
Restarting a failed Site Controller package If the running Site Controller package fails because of transient error conditions, restart the Site Controller package on a node in the site where it was previously running. Steps to restart the failed Site Controller package as follows: 1. Determine the error message logged in the package log, and then fix the problem. The error messages, causes, and resolution are described in the chapter “Troubleshooting” (page 56). 2.
Figure 10 Rolling upgrade procedure for Metrocluster The subsequent sections describe the procedures for completing a rolling upgrade for Metrocluster configurations with SADTA. These sections describe upgrading HP Serviceguard, HP-UX, and Metrocluster Replication software in Metrocluster SADTA configurations. Upgrading Metrocluster replication software Steps to perform a rolling upgrade of Metrocluster software as follows: 1. Disable package switching for all Metrocluster packages. 2.
5. Verify that there are no Site Controller packages running on the node. # cmviewcl -l package -n `hostname` 6. 7. If SGeRAC is configured, halt the Oracle software (RAC, CRS, Clusterware, and OPS) on the selected node. Halt the node that is selected for upgrade. # cmhaltnode -f Instances of all MNP packages running on this node are halted and the failover packages move to the adoptive node. 8. Edit the /etc/rc.conf.d/cmcluster file to include the following line: AUTOSTART_CMCLD = 0 9.
7 Troubleshooting Troubleshooting Metrocluster To troubleshoot problems with Metrocluster with 3PAR Remote Copy, you must understand HP 3PAR Remote Copy environments. See the Remote Copy User Guide for more information on Remote Copy configuration and volume group states. CAUTION: Metrocluster with 3PAR Remote Copy cannot handle Remote Copy volume group states automatically and correctly, if they result from manual manipulations (either through HP 3PAR Management Console or CLI or through any other means).
Table 5 Error Messages and their Resolution (continued) Log Messages Cause file. The package is not allowed to start up. To start the package forcefully using non current data, use FORCEFLAG file. The Remote Copy volume group is in "Syncing" state and RESYNC_WAIT_TIMEOUT parameter is set to 0. The package is not allowed to start up. Resolution latest data in the local storage system. Restart the package.
Table 5 Error Messages and their Resolution (continued) Log Messages Cause Fix the problem to allow package • If you are using CLI client, then startup. To start the package forcefully, password files are not configured use FORCEFLAG file. to connect from nodes to the storage system for the corresponding user. Otherwise, Password less SSH is not configured from the node to the storage system.
Table 5 Error Messages and their Resolution (continued) Log Messages Cause Resolution Not able to determine the status of the local storage system. This may be because of SSH connectivity issues or because the local storage system is down. The role of remote Remote Copy volume group is “Primary”. This means that the role of local Remote Copy volume group can be either “Secondary” or “Primary-Rev”, or the local storage system is down. The package is not allowed to start up on this node.
Table 5 Error Messages and their Resolution (continued) Log Messages Cause Resolution • Passwordless SSH is not configured from the node to the storage system. • The Remote Copy volume group for DC1 or DC2 may not exist. Managing connections to 3PAR array The maximum number of SSH connections to a 3PAR storage array can be 16. Metrocluster configuration or package startup operations use SSH connections to get information about the remote copy groups from the storage array.
Consider the following guidelines: • The Site Controller package control log file can be specified using the following attribute script_log_file in the Site Controller package configuration file. Serviceguard defaults the Site Controller package logs to the default log destination. The default log destination for a given Site Controller Package is /var/adm/cmcluster/log .log.
The following information is displayed by this tool: • Number of critical and managed packages at each site. • Status of the Site Controller managed packages (halted or started). • Site Controller managed packages halted cleanly or not. • Site is active or passive. • Site Safety Latch value on each node. The value can be Close, Open, or Intermediate. For more information on using cmviewsc, see cmviewsc(1m).
Table 6 Error Messages and their Resolution (continued) Log Messages Unable to initiate site failover at siteB. Site Controller startup failed. Starting Site Controller (hrdb_sc) on siteB. Site safety latch at site siteA is open. Checking if site failover conditions are met. Cause Resolution 3. Enable node switching for the MNP package on the node. 4. Restart the Site Controller package.
Table 6 Error Messages and their Resolution (continued) Log Messages Cause Resolution Executing: cmrunpkg siteA_mg1 siteA_mg2 siteA_mg3. One of the packages managed by the Site Controller package does not have node switching enabled on its configured nodes at this site. 1. Check the log file of the package on the nodes where node switching is not enabled. 2. Clean any stray resources owned by the package, that are still online on the node. 3. Enable node switching for the package on the nodes. 4.
Table 6 Error Messages and their Resolution (continued) Log Messages Cause Warning: Site Controller reforming or because of not able to set transient error conditions. the Site Safety Latch value to on node . Resolution If the cmviewcl command fails because of a memory, network or CPU transient error condition, fix the issue. Check the Site Controller package log for more details.
Table 6 Error Messages and their Resolution (continued) Log Messages Cause Fix any issue reported in the package log files case, the remote site is and enable node switching for the packages on siteB. nodes they have failed. Reset the site siteA using cmresetsc command and start hrdb_sc again. Site Controller startup failed. Executing: cmrunpkg siteA_mg1 siteA_mg2. siteA_mg3. Unable to run package siteA_mg1 on node ccia6, the node switching is disabled.
Table 6 Error Messages and their Resolution (continued) Log Messages Cause Resolution or reformation or transient error conditions. If the cmviewcl command failure is due to memory, network or CPU transient error conditions, fix the issue and restart the Site Controller package. This message is logged because the CVM commands failed. Fix the issue that resulted in the failure of CVM commands, and then restart the Site Controller package.
A Checklist and worksheet for configuring Metrocluster with 3PAR Remote Copy. Disaster recovery checklist Use this checklist to make sure you have adhered to the disaster tolerant architecture guidelines for two main data centers and a third location configuration. Data centers A and B have the same number of nodes to maintain quorum in case an entire data center fails. Arbitrary nodes or Quorum Server nodes are located in a separate location from either of the primary data centers (A or B).
Member Timeout: _________________________________________________________ Network Polling Interval: _______________________________________________ AutoStart Delay: ________________________________________________________ Package configuration worksheet Use this package configuration worksheet either in place of, or in addition to the worksheet provided in the latest version of the Managing Serviceguard manual available at http://www.hp.com/go/ hpux-serviceguard-docs —> HP Serviceguard.
DC1 DC2 DC2 DC2 DC2 RC Target for DC2: ___________________________________________________ RC Volume Group: _____________________________________________________ Storage System User: _________________________________________________ Nodes List: __________________________________________________________ RC Target for DC1: ___________________________________________________ Worksheet for configuring SADTA Table 10 Site configuration Item Site Site Site Physical Location Name of the location Site Name One
Table 12 Configuring a CRS sub-cluster using CFS Item Site Site CRS Sub Cluster Name Name of the CRS cluster CRS Home Local FS Path for CRS HOME CRS Shared Disk Group name CVM disk group name for CRS shared disk CRS cluster file system mount point Mount point path where the vote and OCR will be created CRS Vote Disk Path to the vote disk or file CRS OCR Disk Path to the OCR disk or file CRS DG MNP package Path to the OCR disk or file CRS MP MNP package Path to the OCR disk or file CRS MNP package Path to
Table 13 RAC Database configuration (continued) Property Value Instance names for the database RAC data files file system mount point Mount Point for oracle RAC data files RAC data files CVM Disk group name CVM Disk Group name for oracle RAC data files file system RAC flash files file system mount point.
Table 14 Site Controller package configuration (continued) Name of the EMS resource name.
B Configuring Oracle RAC in SADTA Overview of Metrocluster for RAC The Oracle RAC database can be deployed in a Metrocluster environment for disaster tolerance using SADTA. This configuration is referred to as Metrocluster for RAC. In this architecture, a disaster tolerant RAC database is configured as two RAC databases that are replicas of each other; one at each site of the Metrocluster.
Figure 11 Sample configuration Multiple RAC databases can be configured using a separate Site Controller Package infrastructure for each RAC database. Each RAC database must have its own Site Controller Package, Site Safety Latch, RAC MNP package stack, and replication disk group in the Metrocluster. The site-specific Oracle Clusterware and CFS sub-clusters are common resources for all RAC databases.
NOTE: For more information on Serviceguard versions, see Serviceguard, SGeRAC, and SMS Compatibility and Feature Matrix, at: http://www.hp.com/go/hpux-serviceguard-docs ->HP Serviceguard. 2. Install Serviceguard extension for Oracle RAC. Install SGeRAC with CFS to use CFS/CVM. 3. Install the required Serviceguard and SGeRAC patches.
15. Configure client access for the RAC database. 16. Configure SGeRAC cluster interconnect subnet monitoring. The subsequent sections explain each of these steps with the following sample configuration. Sample configuration To explain the configuration procedures for SADTA, the subsequent sections describe the procedure to install and configure a site aware disaster tolerant Oracle Database 10gR2 RAC in a Metrocluster. The configuration procedure involves multiple steps across multiple nodes.
To configure SADTA: 1. Create two CRS sub-clusters; one at the Site A and the other at the Site B. 2. Install the Oracle Clusterware software at each site in the Metrocluster. 3. Configure the CRS daemons at the sub-clusters as a Serviceguard package using SGeRAC toolkit. 4. Install CRS Home on a file system that is local to a site. NOTE: The CRS voting and OCR disks must not be configured for replication. Table 15 lists the CRS packages and other resources that form the CRS sub-cluster at each site.
Table 16 Sample database configuration (continued) Site Details RAC flash area CVM Disk Group name RAC Database Name RAC Instances Instance @ Node RAC Home Site A Site B flashdg flashdg HRDB HRDB hrdb1@ SFO_1 hrdb1@ SJC_1 hrdb2@ SFO_2 hrdb2@ SJC_2 /opt/app/oracle/product/10.2.0/db /opt/app/oracle/product/10.2.
1. 2. Create a Serviceguard cluster with two sites. Configure the Cluster File System Multi-node Package (SMNP). Creating a Serviceguard cluster with sites configured To create a Serviceguard cluster with sites configured: 1. Run the following command to create a cluster configuration file from any node: # cmquerycl -v -C /etc/cmcluster/dbcluster.config -n SFO_1 -n SFO_2\ -n SJC_1 -n SJC_2 -w full -q quorum.abc.com where quorum.abc.com is the host name of the Quorum Server. 2.
NETWORK_INTERFACE NETWORK_INTERFACE STATIONARY_IP NETWORK_INTERFACE lan5 #SJC_CRS CSS HB standby lan1 # SJC client access 16.89.141.203 lan6 # SJC client access standby 3. Run the following command to apply the configuration file: # cmapplyconf -v -C /etc/cmcluster/dbcluster.config 4. Run the following command to start the cluster: # cmruncl After you start the cluster, run the cmviewcl command to view the site configuration.
16.89.140.202 SFO_1v.hp.com 16.89.140.204 SFO_2v.hp.com 2. SFO_1v SFO_2v Configure the appropriate host equivalence for the oracle user. When installing Oracle RAC and the database software, host equivalence for the oracle user must be configured only among the nodes in the same site. Add entries in the .rhosts file of the Oracle user for every network address of nodes in the site. Do not include the nodes in the other site. In this example, the following entries are included in the .
1. Initialize the disk that will be used for the CFS file system from the CVM master node at the site. # /etc/vx/bin/vxdisksetup -i c4t0d3 NOTE: This disk should be a non-replicated shared disk that is connected only to the nodes in the Clusterware sub-cluster site. 2. From the site CVM master node, create the CRS disk group. # vxdg –s init sfo_crsdg c4t0d3 3. Create the Serviceguard Disk Group MNP packages for the disk group. # cfsdgadm add sfo_crsdg sfo_crs_dg all=sw SFO_1 SFO_2 4.
This command starts the Oracle Universal Installer graphical user interface. Ensure that the DISPLAY environment variable is set appropriately. 5. 6. Provide appropriate values at each screen until you reach the Specify Cluster Configuration screen. On the Specify Cluster Configuration screen, do the following: a. Select only nodes that belong to the current site. b. Specify the site-specific Clusterware name as the Cluster Name.
Installing and configuring Oracle RAC The Oracle RAC software must be installed twice in the Metrocluster, once at each site. Also, the RAC software must be installed in the local file system in all the nodes in a site. To install Oracle RAC, use the Oracle Universal Installer (OUI). After installation, the installer prompts you to create the database. Do not create the database until you install Oracle RAC at both sites. You must create identical RAC databases only after installing RAC at both sites.
1. Initialize the source disks of the replication pair. # /etc/vx/bin/vxdisksetup -i c4t0d1 # /etc/vx/bin/vxdisksetup -i c4t0d2 2. Create a disk group for the RAC database data files. # vxdg –s init hrdbdg c4t0d1 c4t0d2 3. Create Serviceguard Disk Group MNP packages for the disk groups. # cfsdgadm add hrdbdg sfo_hrdb_dg all=sw SFO_1 SFO_2 4. Activate the CVM disk group in the local site CFS sub-cluster. # cfsdgadm activate hrdbdg 5. Create a volume from the disk group.
3. Create Serviceguard Disk Group MNP package for the disk group. # cfsdgadm add flashdg sfo_flash_dg all=sw SFO_1 SFO_2 4. Activate the disk group in the site CFS sub-cluster. # cfsdgadm activate flashdg 5. Create a volume from the entire disk group. # vxassist -g flashdg make flash_vol 4500m 6. Create a file system using the created volume. # newfs -F vxfs /dev/vx/rdsk/flashdg/flash_vol 7. Create mount points for the RAC database flash logs and flash area.
1. Halt the RAC MNP Stack on the replication source disk site node. # cmhaltpkg sfo_hrdb sfo_hrdb_mp sfo_hrdb_dg sfo_flash_mp sfo_flash_dg 2. Deport the disk groups at the replication source disk site nodes. # vxdg deport hrdbdg # vxdg deport flashdg Creating identical RAC database at the remote site In the earlier procedures, the RAC database was created at the site with the source disk of the replication disk group. A RAC MNP stack was also created at the site.
1. Copy the first RAC database instance pfile from the source site to the target site first RAC database instance node. In this example, copy the RAC database instance pfile from the SFO_1 node to the SJC_1 node. # cd /opt/app/oracle/product/10.2.0/db_1/dbs # rcp -p inithrdb1.ora SJC_1:$PWD The -p option retains the permissions of the file. 2. Set up the first RAC database instance on the target site. In this example, run the following commands from the SJC_1 node: # cd /opt/app/oracle/product/10.2.
9. Edit the tnsnames.ora file on the local nodes and modify the HOST = keywords to specify node names of this site. In this example, you must edit the tnsnames.ora file on the local nodes, SJC_1 and SJC_2. 10. Register the database with the CRS sub-cluster on remote site. # srvctl add database -d hrdb -o /opt/app/oracle/product/10.2.
7. 8. Edit the Metrocluster 3PAR attributes in hrdb_sc.config file. Apply the empty Site Controller Package configuration file. Ensure that there are no packages configured using the critical_package or managed_package attributes in the Site Controller Package configuration file. # cmapplyconf -P /etc/cmcluster/sc/hrdb_sc.config When the Site Controller Package configuration is applied, the corresponding Site Safety Latch is also configured automatically in the cluster.
managed_package managed_package sfo_flash_dg sfo_flash_mp site san_jose critical_package managed_package managed_package managed_package managed_package sjc_hrdb sjc_hrdb_dg sjc_hrdb_mp sjc_flash_dg sjc_flash_mp NOTE: 2. Do not add any comments after specifying the critical and managed packages. Reapply the Site Controller Package configuration. # cmapplyconf -v -P /etc/cmcluster/hrdb_sc/hrdb_sc.
PACKAGE hrdb_sc STATUS down STATE halted AUTO_RUN disabled NODE unowned 2. Enable all nodes in the Metrocluster for the Site Controller Package. # cmmodpkg –e –n SFO_1 –n SFO_2 -n SJC_1 –n SJC_2 hrdb_sc 3. Start the Site Controller Package. # cmmodpkg -e hrdb_sc The Site Controller Package along with RAC stack will start up on the local site (San Francisco). 4. Check the Site Controller Package log file to ensure clean startup.
) ) Configuring SGeRA cluster interconnect subnet monitoring SGeRAC provides a feature to monitor the Oracle Clusterware interconnect subnet and to ensure that at least one RAC instance survives when a failure takes down the entire interconnect subnet in the cluster. To configure this feature, the interconnect subnet must be specified in a separate MNP package using the CLUSTER_INTERCONNECT_SUBNET package attribute.
When the RAC MNP package is configured as a critical_package, the Site Controller Package considers only the RAC MNP package status to initiate a site failover. When the contained RAC database fails the RAC MNP package fails, therefore, the Site Controller Package fails over to start on the remote site node and initiates a site failover from the remote site.
1. 2. 3. 4. 5. 6. Install the required software on the new node and prepare the node for Oracle installation. Halt the Site Controller Package in the DETACH mode to avoid unnecessary site failover of the RAC database. Ensure that the new node can access the Clusterware OCR and, VOTE disks, and Oracle database disks, and then add the node to the Serviceguard cluster. Extend the Oracle Clusterware software to the new node.
3. Delete an instance from the RAC database. For more information on deleting an instance, see the documentation available at the Oracle documentation site. 4. Delete the RAC database software and Oracle Clusterware. For more information on deleting the RAC database and Oracle Clusterware, see the documentation available at the Oracle documentation site. 5. 6. 7. Remove the node from the node list of the Site Controller Package. Run the cmhaltnode command to halt the cluster on this node.
The Site Controller Package starts on the preferred node at the site. At startup, the Site Controller Package starts the corresponding RAC MNP stack packages in that site that are configured as managed packages. After the RAC MNP stack packages are up, check the package log files for any errors that must have occurred at startup. If the CRS MNP instance on a node is not up, the RAC MNP stack instance on that node does not start. However, if CVM/CFS is configured, the CVM DG and CFS MP MNP will start.
MNP package can only be started by restarting the Site Controller Package. This is because the Site Safety Latch closes when the Site Controller Package halts. Maintaining Oracle database 10gR2 RAC A RAC database configured using SADTA has two replicas of the RAC database configuration; one at each site. The database configuration is replicated between the replicas using a replicated storage.
Glossary A—C 3PAR Remote Copy The 3PAR storage systems are configured for use in data replication from one 3PAR storage system unit to another. This type of physical data replication is a part of the Metrocluster with 3PAR Remote Copy. 3PAR Remote Copy A facility provided by the Continuos Access software option available with the HP StorageWorks P9000 Disk Array family, HP StorageWorks E Disk Array XP series. This facility enables physical data replication between P9000 or XP series disk arrays.
redundant links, either for networking or data replication, that are installed along different routes, and automation of most or all of the recovery process. E-L Environment File Metrocluster Metrocluster Metrocluster Metrocluster uses a configuration file that includes variables that define the environment for the to operate in a Serviceguard cluster. This configuration file is referred to as the environment file. This file needs to be available on all nodes in the cluster for to function successfully.
T-Z volume group 102 Glossary In LVM, a set of physical volumes such that logical volumes can be defined within the volume group for user access. A volume group can be activated by only one node at a time unless you are using Serviceguard OPS Edition. Serviceguard can activate a volume group when it starts a package. A given disk can belong to only one volume group. A logical volume can belong to only one volume group.
Index Symbols F 3PAR storage systems Remote Copy pair, 7 failback, 43 failover, 43 configuration, 11 Restore, 50 A administration restrictions, 94 arguments, 12 arrays cabled, 14 asynchronous, 7 B bidirectional configuration, 8 C client access, 93 Cluster verification, 39 cluster multiple sites, 11 Clusterware configuration, 83, 84 toolkit, 84 command, 14 Common Provisioning Group (CPG) Remote Copy, 7 Virtual domains, 8 complex workload, 52 configuration administration, 94 environment, 10 Console SSH
sites, 47 password HP 3PAR storage systems, 17, 18 passwordless IdentityFile, 18 privileges configure, 17 R RAID virtual, 14 redundant package, 30 Remote Copy over IP (RCIP), 8 Remote Copy volume groups, 7 Replication failure, 47 replication, 14, 20 S SADTA configuration, 29 Serviceguard, 11 configuration, 11 Site failure, 48 Site Safety Latch dependancy, 37 software Installation, 11 Source Disk Site storage device, 32 SSH, 14 stack recovery cluster, 90 source disk site, 33 synchronous, 7 T target relati