
README for the HP Neoview Management Dashboard Client (R2.4)


Pre-Installation Steps for Support of International Character Sets
NOTE: For a list of limitations in Dashboard Client support for non-ASCII characters, see
“Dashboard Client Support for International Character Sets” (page 17).
Configuring a Non-ASCII Workstation
No special pre-installation steps are required for display of multibyte characters on a non-ASCII
workstation, for instance a Japanese workstation.
Configuring an ASCII Workstation to Display Multibyte Characters
If you want to display multibyte characters on an ASCII workstation, follow this procedure
before installing the Dashboard Client:
1. From the Start menu, open the Control Panel.
2. Select Regional and Language Options, and click the Advanced tab.
3. Set the Language for non-Unicode programs to the locale-specific language, for example
English (US). In the Code page conversion tables list box, check the boxes for all language
conversions required.
4. Click the Regional Options tab.
5. Under Standards and formats, select the language to use in displays, for example Japanese.
NOTE: When the language is changed from East Asian to English (for some purpose) and
then changed back again to East Asian language, it is recommended that you logoff from
the current session and login again. Otherwise, non-ASCII characters might not be properly
displayed.
6. Click the Languages tab.
7. In the Supplemental languages section, for display of Asian character sets, check both
boxes. If you have not previously installed the language-specific supplementary files for
your operating system, you must do so before installing the Dashboard Client.
NOTE: To install multibyte character sets on the Neoview System Console, you must use
an HP-branded DVD provided with the Console.
8. Click Details.
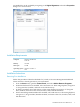
9. In the Text services and input languages dialog box, click the Advanced tab, check the
box labeled Extend the support of advanced text services to all programs, and click
Okay.
10. Click the Advanced tab.
11. Check the box labeled Apply all the settings to the current user account and to the
default user profile.
12. Reboot when prompted to do so.
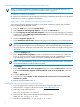
Installing the Neoview Management Dashboard Client
1. Close all applications running on the workstation, except the Web browser.
2. In the browser, navigate to the download site: www.software.hp.com.
3. Enter this string in the Search box:
Neoview Management Dashboard
4. Download the “HP Neoview Management Dashboard Client”
NVMD_Client_Setup_2.4.0.exe.
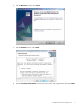
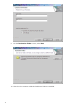
5. Run the executable NVMD_Client_Setup_2.4.0.exe.
8