
HP OneView for VMware vCenter User Guide (7.4)
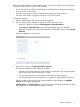
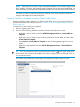


The Specify VMs window opens.
3. Enter the following information:
• Owner: Select the host or cluster that will own the new VMs. This information is entered
automatically if you initiated the VM creation from a host or cluster.
• VM Template: Select the template to use for the new VMs. This information is entered
automatically if you initiated the VM creation from a VM template.
• VM Quantity: Enter the number of VMs to create.
• VM Initial State: Specify whether the initial VM state is Power On or Power Off.
• Customization Specification: Specify a customization specification (if available). For more
information, see the VMware documentation.
4. Click Next.
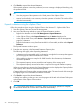
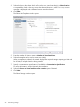
The Specify Storage window opens.
5. Enter the following information:
• Quantity: The number of datastores to create to support the new VMs. This value must be
less than or equal to the number of new VMs.
• Datastore Capacity: The minimum capacity for each new datastore.
The datastore capacity value is approximate. The actual virtual disk sizes might be slightly
larger to accommodate the VMware overhead.
• Storage Pools: Select the storage pool to use for the new datastores.
This window lists the configured storage pools with Full Access on arrays that support
provisioning. If there is not enough space available in the selected storage pool, a message
is displayed in the Warnings box.
TIP: Select the Name or Available Capacity option to sort the list of storage pools.
• RAID Level: Select the RAID level for the new datastores. The wizard lists all RAID levels
supported by the selected storage pool.
6. Click Next.
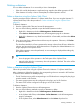
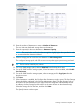
The Specify Names window opens.
7. Enter the following information:
• VM Names: Enter the base name for the new VMs. The # symbol is required and represents
the numeric sequence for the new names. In the generated VM names, the # symbol is
replaced with a number.
The default values are as follows:
Default start value for numeric sequenceNumber
11–9
0110–99
001100–999
100 Provisioning storage