
HP OneView for VMware vCenter User Guide (7.4)
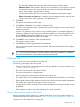


3. Enter the following information:
• Target Owner: Select the host or cluster that will own the new VMs.
• Target VM Quantity: Enter the number of VMs to create.
• Target VM Initial State: Specify whether the initial VM state is Power On or Power Off.
• Customization Specification: Specify a customization specification (if available). For more
information, see the VMware documentation.
• Clone Type: Select Snapshot or Clone.
A snapshot is a demand-allocated snapshot that remains associated with the source
volume. A clone is a fully allocated (thin-provisioned) copy that is not associated with the
source volume.
• Storage Pool: The storage pool used by the source VM is displayed automatically along
with the Capacity Before and Capacity After details.
4. Click Next.
The Specify New Names window opens.
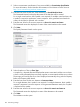
5. Enter the following information:
• New VM Names: Enter the base name for the new VMs. The # symbol is required and
represents the numeric sequence for the new names. In the generated VM names, the #
symbol is replaced with a number.
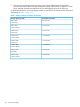
The default values are as follows:
Default start value for numeric sequenceNumber
11–9
0110–99
001100–999
The Generated Names box shows the names of the VMs that will be created.
• New Datastore Names: Enter the base name for the new datastores. The # symbol is
required and represents the numeric sequence for the new names. In the generated
datastore names, the # symbol is replaced with a number.
The Generated Names box shows the names of the datastores that will be created.
• Where # is numeric and starts at: For both the VM and datastore names, enter the start
value for the numeric naming sequence. The default value is 1.
6. Click Next.
The Review and Validate window opens.
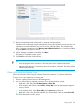
7. Click Next to validate that it is possible to create the cloned VMs.
The Review and Validate window is updated with icons showing the success or failure of the
validation processes.
A green icon indicates success, and a red icon indicates failure. If a validation step fails, a
message is displayed in the Warning and Validation Results box. Correct the problem, and
then click Retry to repeat the validation step. If you need to change values entered in the
wizard, use the Back and Next buttons to navigate.
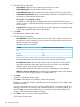
8. Click Next to view a summary of the requested actions.
The Summary window opens.
106 Provisioning storage