HP StorageWorks Hardware Providers VDS/VSS installation guide This document explains how to install and use the HP StorageWorks EVA and XP hardware providers for Microsoft Virtual Disk Service (VDS) and Volume Shadow Copy Service (VSS). Topics include configuration components, storage system requirements, and troubleshooting.
Legal and notice information © Copyright 2008, 2010 Hewlett-Packard Development Company, L.P. Confidential computer software. Valid license from HP required for possession, use or copying. Consistent with FAR 12.211 and 12.212, Commercial Computer Software, Computer Software Documentation, and Technical Data for Commercial Items are licensed to the U.S. Government under vendor's standard commercial license. The information contained herein is subject to change without notice.
Contents 1 Overview of HP StorageWorks hardware providers ................................. 6 Windows Disk Management ........................................................................................................ Management applications ........................................................................................................... Microsoft command-line utilities ....................................................................................................
Setting VSS options ...................................................................................................... Removing the HP XP hardware providers ............................................................................... Removing the HP hardware providers using Windows ....................................................... Removing the HP hardware provider using the XP hardware provider installer ...................... 37 37 38 38 4 Troubleshooting the HP hardware providers ..........
Figures 1 HP hardware provider software relationships ................................................................ 6 2 HP EVA hardware provider configuration ................................................................... 10 3 VDS configuration utility window (Windows Server 2003/2008) .................................. 16 4 VDS configuration utility window (Windows Server 2008 R2) ....................................... 16 5 VSS configuration utility window .........................................
1 Overview of HP StorageWorks hardware providers This chapter describes the HP StorageWorks hardware providers for Windows, and explains how they function with Microsoft operating systems and applications. HP hardware providers are software products that are installed on a Windows server connected to an HP disk array. They enable Windows operating systems and applications to control disk array functions and copy disk array data.
Management applications Management applications operate through the Microsoft VDS and VSS services and HP hardware providers to manage application data, manage array disks and volumes, perform backups, and restore data. Microsoft command-line utilities Microsoft command-line utilities can manage any storage device with a VDS or VSS hardware provider. • The DiskPart utility, which comes standard with Windows XP and Windows Server, is used to manage disks, volumes, and partitions.
HP VDS and VSS hardware providers The HP VDS and VSS hardware providers consist of DLLs and executables that are installed on your Windows server. These components extend the capabilities of Windows and its applications to manage HP disk arrays. You can install the HP VDS or VSS hardware provider, or both. Using Windows applications and the HP VDS hardware provider, you can manage array ports; discover and manage LUNs; format, partition, and mount volumes; and create and manage file systems and files.
2 Installing HP hardware providers for HP EVA disk arrays This chapter explains how to install and uninstall HP hardware providers for the HP EVA disk arrays. Preparing to install HP EVA hardware providers This section describes required hardware and software and explains how to configure the disk array and Windows servers for use with HP hardware providers. You must complete the procedures in this section before you install the hardware providers.
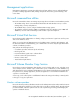
Figure 2 HP EVA hardware provider configuration . Hardware • HP StorageWorks EVA Disk Array—Disk array to be managed using VDS/VSS. For supported EVA models, see the HP StorageWorks EVA hardware provider release notes. • HP StorageWorks Command View EVA Server—A Windows server running Command View EVA. Multiple EVA disk arrays must be managed from one Command View management server. Other software is conditionally required on the Command View EVA server.
• Ethernet network interface cards (or available network interface port)—Connect each server to the Ethernet LAN. Notes on installing HP EVA hardware providers The following notes will help ensure successful operation of the hardware providers: • Using multiple servers to manage primary data and data copies is optional. However, if you use multiple servers, they must be in the same Ethernet domain so that the DCOM communication process can communicate between servers.
5. Connect the server to the disk array via the built-in Fibre Channel fabric switch, if present, or an external switch. Configure the switch, including zoning if required, according to the manufacturer's instructions. For helpful information on SAN construction, see the HP StorageWorks SAN design reference guide, available at www.hp.com/go/SDGManuals. 6. Connect the server to the corporate Ethernet LAN, through a firewall if desired.
4. Log in to Command View EVA using one of the user accounts you just created. 5. Add VDS and VSS hosts. For details about adding hosts, see the Command View EVA online help. 6. Add VDS and VSS disk groups. For details about adding disk groups, see the Command View EVA online help. Installing hardware providers for HP EVA disk arrays This section explains how to install and configure the HP EVA hardware providers.
2. Download and extract the HP EVA hardware providers files from the HP VDS/VSS web page: http://www.hp.com/support/HWPEVA The installer executables are provided in a self-extracting file with the name HP_StorageWorks_VDS_VSS_Hardware_Provider_for_EVA_version.exe. This file contains the executable files hpevavdsprv_xxx.exe and hpevavssprv_xxx.exe. NOTE: • There is only one self extracting file for Windows Server 2008 and Windows Server 2008 R2 because the installer executables (hpevavdsprv_xxx.
7. To accept the default destination and continue, click Next. To change the installation directory or folder, enter or browse to the new location, and then click Next. The Ready to Install the Program window opens. 8. Click Install to perform the installation. 9. During the installation, the VDS or VSS configuration utility window opens. You can configure VDS and VSS, or complete the installation and then configure VDS and VSS.
Figure 3 VDS configuration utility window (Windows Server 2003/2008) . Figure 4 VDS configuration utility window (Windows Server 2008 R2) .
1. Start the utility by selecting Start > Programs > Hewlett-Packard > Hardware Providers > VDS Configuration Utility for EVA. The utility can also be executed from a command window by running hpevavdscfg.exe, located in Program Files\Hewlett-Packard\HardwareProviders\EVA\VDS. 2. In the utility window, enter the IP address or name of the Command View EVA server in the EVA Command View Server name or IP address box, and then click Logon to log on to the server using your user name and password.
Figure 5 VSS configuration utility window . To select a snap type: 1. In the utility window, enter the IP address or name of the Command View EVA server in the EVA Command View Server name or IP address box and then click Logon to log on to the server with your user name and password. 2. Select a storage system from the EVA Storage System list.
3. Select a snap type under Snap type. • Demand Allocated Snapshot—Space for the copy is created only as needed when data is copied to the copy volume. • Fully Allocated Snapshot—Space for the copy is reserved in advance and filled when data is copied to the snapshot. • Snapclone—A complete cloned copy of the original data is created. If the snapclone properties have not been configured for the selected disk group, the Settings window opens automatically.
Figure 6 Snapclone tab settings window . Configuring a mirrorclone-snapshot The Mirrorclone-Snapshot tab in the Settings window enables you to select a disk group and modify the mirrorclone-snapshot properties.
Figure 7 Mirrorclone-Snapshot tab settings window . Configuring mirrorclones The Mirrorclone tab in the Settings window enables you to select a disk group and modify the mirrorclone properties.
Figure 8 Mirrorclone tab setting window . Removing the HP EVA hardware providers Before removing the VDS or VSS provider, issue a net stop vds or net stop vss command from the command prompt on the VDS/VSS server. Removing HP EVA hardware providers using Windows Control Panel To remove the hardware providers: 1. In Windows, select Start > Settings > Control Panel. 2. Double-click Add or Remove Programs. 3. Select the program you want to remove (VDS or VSS). 4. Click Change/Remove.
2. Enter the name of the executable for the hardware provider you want to remove (hpevavssprv_x86.exe for VSS and hpevavdsprv_x86.exe for VDS). 3. Select Remove from the window that opens, and then press Enter.
Installing HP hardware providers for HP EVA disk arrays
3 Installing HP hardware providers for HP XP disk arrays This chapter explains how to install and uninstall hardware providers for HP XP disk arrays. IMPORTANT: A successful installation depends on using compatible versions of the operating system and all installed software. See the hardware provider release notes for version requirements.
Figure 9 HP XP hardware provider configuration . • HP StorageWorks Disk Array with Business Copy license installed by HP. For supported XP models, see the HP StorageWorks XP Hardware Providers release notes. • Windows VDS/VSS Server running a supported Windows Server operating system. This server manages the primary data and contains applications (such as Exchange or SQL), VDS/VSS, HP hardware providers, and XP RAID Manager Library software.
Notes on installing HP XP hardware providers The following can affect the performance of the HP hardware providers: • Server load • Volume size (larger PVOLs take longer to copy) • VSS hardware provider mode (Resync mode copies faster than VSS mode) The following notes will help ensure successful operation of the hardware providers: • Using multiple servers to manage primary data and data copies is optional. However, if you use multiple servers, they must be in the same domain to enable communication.
vshadow -p N: O: vshadow -p M: N: O: HP XP hardware provider preparation procedures Prepare servers and software for use with the hardware providers as described below and in the product manuals. Your HP representative may perform some configuration tasks. Preparing the VDS/VSS servers The VDS/VSS server contains the applications that create and store primary data. Install and configure the server as follows: 1.
5. 6. For VSS, add primary and SVOL (secondary) LUNs to the primary and SVOL host groups, respectively. The primary and secondary LUNs must be the same emulation type (for example OPEN-3, OPEN-9) and the same size in GB. You must create at least an equal number of primary and secondary LUNs so that there are enough secondary LUNs to hold the primary LUN copies. Some applications require twice as many or more secondary LUNs as primary LUNs.
1. For VSS only, configure the disk array Fibre Channel port connected to the VDS/VSS server(s) as follows: Settings depend on how the array is connected to the servers. See the following table for the meanings of selections.
2. Open the Windows folder, click the RMLIB folder, and then double-click the setup.exe file to start the RM installation executable. The InstallShield Welcome window opens. 3. Click Next. The Choose Destination Location window opens. 4. Click Next to select the default Destination Folder shown, or click Browse and select a different location for installing the software, and then click Next. The software begins installing, and a window opens to show progress. 5.
Installing the HP hardware providers on Windows Server 2003/2008 This section explains how to install and uninstall HP hardware providers for the HP XP disk arrays. IMPORTANT: A successful installation depends on using compatible versions of the operating system and all installed software. See the hardware provider release notes for version requirements. 1. Download and extract the HP XP hardware provider files from the HP website (http:// www.hp.com/support/HWPXP). 2.
7. Click Next. The Destination Folder window opens. 8. Click Next to install VDS/VSS in the default location, or click Change to browse for a new location, and then click Next. The Ready to Install the Program window opens. 9. Click Install to start the installation process. A progress window opens to show installation status. 10. In the Installation Complete window, click Next. The InstallShield Wizard Finish window opens. 11. Click Finish. The InstallShield Wizard exits. 12.
NOTE: For Windows Server Core, you can start the configuration utility from the Windows GUI or from a command prompt: • Windows GUI: You will find the VDS and VSS configuration utilities in the Windows Start > Programs > Hewlett-Packard menu. • Command Window: Run the VSS (hpxpvsscfg.exe) and VDS (hpxpvdscfg.exe) configuration utilities from a command prompt.
1. Double-click an array in the Managed storage arrays pane. A window opens in which you can configure command devices for that array. 2. The left pane lists available RAID Manager command devices. Click the devices you want to manage using the hardware provider, and click the right arrow (>) to move those devices to the Managed command devices pane. Repeat this process until all devices you want to manage have been moved.
3. Click OK to close the Command devices window. Setting VDS options 1. In the VDS configuration utility window, click the VDS Hardware Provider Options tab to see the VDS options. 2. To specify a LUN tolerance, select the Enable LUN tolerance level check box and enter a percentage of tolerance. If you leave this function disabled, the VDS provider creates OPEN standard volume sizes if there is no close match to a requested volume size already available.
Setting VSS options 1. To set VSS options, open the VSS configuration utility and click the VSS Hardware Provider Options tab. 2. Use the Managed storage arrays list to choose the array you want to configure. 3. Select the VSS modes you want to enable as explained below. Repeat for each array to be managed. • Select VSS compliant mode if you want the provider to delete the paired relationship between PVOL and SVOL after the shadow copy is made.
net stop vds net stop vss net stop hpxpvssprv Removing the HP hardware providers using Windows 1. In Windows, select Start > Settings > Control Panel. 2. Double-click Add/Remove Programs. 3. Select the program you want to remove (HP VDS or VSS hardware provider). 4. Click Remove. Windows removes the program. Removing the HP hardware provider using the XP hardware provider installer You can also uninstall HP hardware provider by starting the HP hardware provider installer.
4 Troubleshooting the HP hardware providers This chapter explains how to troubleshoot the HP hardware providers and provides a list of VDS and VSS error messages and explanations.
2. Do the array volumes appear when you use the DiskPart utility? At the Run command prompt, enter diskpart.exe. Enter list disk to see a list of disk devices present. (Enter help to see a list of commands.) If you receive the error message: The disk management services could not complete the operation, VDS is not enabled at startup. Click Start > Control Panel, and then select Administrative Tools > Services. Right-click Virtual Disk and select Properties. Select Manual under Startup type, and click OK.
5. 6. 7. Check configuration as explained in the configuration and installation sections: • VDS/VSS server not connected to the SAN correctly. • For XP only: Check that a host group named SVOL exists with secondary LDEVs that match the parameters of the primary LUNs (same emulation type and size). Also check that a host group named SHADOW exists. No host WWNs should be associated with the SVOL or SHADOW host groups before installation.
• A writer application is not configured according to best practices. Consult the software manufacturer for recommended practices. For example, keeping database files small by creating more rather than larger files may speed up overall operation and database copying. Saving transaction logs to a different volume than the database may also speed up performance. • There are errors in the snapshot process.
Message ID Message ID value (hex) Message text VDS_E_NOT_ENOUGH_DRIVE 0x80042410L Not enough drives are specified to complete this operation. VDS_E_BAD_COOKIE 0x80042411L The cookie is not found. VDS_E_NO_MEDIA 0x80042412L There is no media in the device. VDS_E_DEVICE_IN_USE 0x80042413L The device is in use. VDS_E_DISK_NOT_EMPTY 0x80042414L The disk is not empty. VDS_E_INVALID_OPERATION 0x80042415L Invalid operation. VDS_E_PATH_NOT_FOUND 0x80042416L The path is not found.
Message ID Message ID value (hex) Message text VDS_E_ACCESS_DENIED 0x80042427L Access is denied. VDS_E_MEDIA_WRITE_PROTECTED 0x80042428L The media is write protected. HRESULT VDS_E_BAD_LABEL 0x80042429L The label is illegal. VDS_E_CANT_QUICK_FORMAT 0x8004242AL Cannot quick format the volume. VDS_E_IO_ERROR 0x8004242BL IO error occurred during format. VDS_E_VOLUME_TOO_SMALL 0x8004242CL The volume size is too small. VDS_E_VOLUME_TOO_BIG 0x8004242DL The volume size is too big.
Message ID value (hex) Message text VDS_E_NON_CONTIGUOUS_DATA_ PARTITIONS 0x8004243BL The migration operation failed. The selected GPT-formatted disk contains a nonbasic data partition, which is both preceded and followed by a basic data partition(s). VDS_E_MIGRATE_OPEN_VOLUME 0x8004243CL The migration operation failed. A volume on the selected disk could not be opened. VDS_E_VOLUME_NOT_ONLINE 0x8004243DL Operation failed. The volume is not online.
Message ID Message ID value (hex) Message text VDS_E_PACK_NOT_FOUND 0x80042450L The pack was not found. VDS_E_IMPORT_SET_INCOMPLETE 0x80042451L Import failed. Attempt to import a subset of the disks in the foreign pack. VDS_E_DISK_NOT_IMPORTED 0x80042452L A disk in the import's source pack was not imported. VDS_E_OBJECT_OUT_OF_SYNC 0x80042453L The system's information about the object may not be up-to-date. VDS_E_MISSING 0x80042454L Operation failed. The disk is missing.
Message ID value (hex) Message text VDS_E_REPAIR_VOLUMESTATE 0x80042460L The operation could not be completed. To repair a volume, both the volume and plex must be online, and must not be healthy or rebuilding. VDS_E_LDM_TIMEOUT 0x80042461L The operation timed out in the Logical Disk Manager Administrative service. Retry the operation. VDS_E_PLEX_NOT_REGENERATED 0x80042462L The operation failed. Cannot retain plex that has not regenerated. VDS_E_RETRY 0x80042463L The operation failed.
Error Meaning Corrective Action VSS_E_INVALID_XML_DOCUMENT 0x80042311L An XML document passed an argument that is not valid, i.e., is either not correctly formed XML or does not match the schema. VSS_E_MAXIMUM_NUMBER_OF_VOLUMES_REACHED 0x80042312L Cannot add any more volumes since the system passed the maximum limit. VSS_E_FLUSH_WRITES_TIMEOUT 0x80042313L VSS couldn't flush I/O writes anymore. VSS_E_HOLD_WRITES_TIMEOUT 0x80042314L VSS couldn't hold I/O writes anymore.
Error Meaning Corrective Action VSS_E_WRITERERROR_TIMEOUT 0x800423F2L Indicates that the writer failed due to a timeout between freeze and thaw. VSS_E_WRITERERROR_RETRYABLE 0x800423F3L Indicates that the writer failed due to an error that might not occur if another snapshot is created. VSS_E_WRITERERROR_NONRETRYABLE 0x800423F4L Indicates that the writer failed due to an error that most likely would occur if another snapshot were created.
Troubleshooting the HP hardware providers (XP only) Event log messages The following table lists hardware provider event log messages. Message Id Severity Module Description 1500 Error hpxpvssprv Failed to find a port on XP disk array with serial number AAA in which host group: BBB resides. HP XP Hardware Provider will not be able to proceed in the shadow copy creation process. For additional details please see log file: hpxpvssprv.log.
Message Id Severity Module Description 1552 Error hpxpvdsprv Failed to create a volume of the requested size AAA and type BBB in disk array CCC, due to insufficient free space. For additional details, please see log file: hpxpvdsprv.log. 1553 Error hpxpvdsprv Failed to create a volume of the requested size AAA and type BBB in disk array CCC, since no unassigned volumes could be found within the LUN size tolerance level DDD. For additional details, please see log file: hpxpvdsprv.log.
Message Id Severity Module Description 1150 Informational hpxpvdsprv Successfully created a new volume AAA of size BBB and type CCC in disk array DDD (requested size: EEE). 1152 Informational hpxpvdsprv Successfully masked (unmapped) the volume AAA in disk array BBB from all the hosts. 1153 Informational hpxpvdsprv Successfully unmasked (mapped) the volume AAA in disk array BBB to the WWN CCC.
Message Id Severity Module Description 2410 Error hpxpvdsprv Determined that hardware provider is not ready to commit shadow copies for Snapshot set with ID AAA. For additional details please see log file: hpxpvdsprv.log. 2411 Error hpxpvdsprv Failed to commit shadow copies for snapshot set with ID AAA. For additional details, please see log file: hpxpvdsprv.log. 2412 Error hpxpvdsprv Post-commit shadow copy operation failed for snapshot set with ID AAA.
Message Id Severity Module Description 3203 Warning hpxpvdsprv The volume AAA in the disk array BBB is in a failed state. 3002 Informational hpxpvdsprv The HP XP VDS hardware provider has registered successfully. 3003 Informational hpxpvdsprv The HP XP VDS hardware provider has unregistered successfully. 3004 Informational hpxpvdsprv The HP XP VDS hardware provider has loaded successfully.
5 Support and other resources Related documentation The following documents provide related information: • HP StorageWorks EVA VDS and VSS Hardware Providers 4.05.00 for Windows Server 2003 release notes • HP StorageWorks EVA VDS and VSS Hardware Providers 6.05.00 for Windows Server 2008 and Windows Server 2008 R2 release notes • HP StorageWorks XP VDS and VSS Hardware Providers 5.01.
http://www.hp.com/go/e-updates After registering, you will receive email notification of product enhancements, new driver versions, firmware updates, and other product resources. HP websites For additional information, see the following HP websites: • • • • • http://www.hp.com http://www.hp.com/go/storage http://www.hp.com/service_locator http://www.hp.com/support/manuals http://www.hp.com/support/downloads Documentation feedback HP welcomes your feedback.
Glossary This glossary defines acronyms and terms used in this guide or related to this product and is not a comprehensive glossary of computer terms. API Application Programming Interface, an interface that allows a software application to connect to and work with another software application. clone A full copy of a volume, usable by an application. Command View EVA HP StorageWorks Command View, a browser-based interface that allows management of an HP disk array.
provides automatically-switched connectivity between servers and storage in the fabric. shadow copy A Microsoft term describing a point-in-time copy of an original volume. The original volume continues to change as the process continues, but the shadow copy of the volume remains constant. snapclone An HP EVA disk array term denoting a full copy of a volume that becomes immediately usable by an application.
Index D A discover storage arrays—XP hardware providers, 33 disk array, 10, 26 configuring, 29 configuring—EVA, 12 overview, 8 disk management, 6 DiskPart, 7 DiskRaid, 7 documentation providing feedback, 56 related, 55 documentation, HP website, 55 additional servers configuring, 12 applications, 7 VDS, 8 VSS, 8 array configuration, 11, 28 configuration — EVA, 9 B block diagram, 6 C command devices—XP hardware providers, 33 Command View configuration for HP EVA hardware providers, 11 Command View manag
HP EVA hardware providers server configuring, 11 HP XP hardware provider server configuring, 28 HP XP hardware providers uninstalling, 37 I important HP XP notes, 27 installation HP EVA hardware providers, 13 HP XP hardware provider, 25 summary XP hardware providers, 30 installation-XP VDS options, 36 M manage arrays—XP hardware providers, 33 manage command devices—XP hardware providers, 33 management applications, 7 mirrorclone-snapshots configuring, 20 mirrorclones configuring, 21 multipathing, 11 N ne