
HP StorageWorks P9000 Application Performance Extender Software User Guide (5697-0984, September 2012)
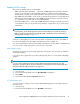
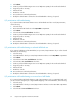
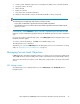
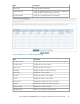
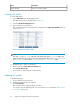
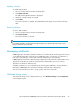
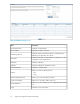

Figure 23 Schedule Summary table
.
2. Click Create Schedule to create a new schedule.
The SLO Schedule Update window is displayed, as shown in Figure 24.
Figure 24 Schedule update window
.
3. Select a profile from the SLO profile list.
4. Enter a schedule name.
5. Select an array from the array list.
6. Under SLO Effective Time, select the start time and end time to run the schedule.
7. Under Recurrence Pattern, select an appropriate option.
8. Under Range of Recurrence, select a date in the Effective From and Stop By fields. You can also
select the No End Date option.
9. Under Notifications, enter a valid email id to receive notifications.
10. Click Submit.
A schedule is created. The details of the created schedule will appear in the Schedule Summary
table.
11. Click Close to exit from the SLO Schedule Update Window.
NOTE:
After the created SLO schedule expires, the default profile is activated.
Using P9000 Application Performance Extender68