
8.14.01 HP Utility Meter User's Guide (June 2009)
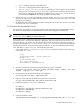


6. Click the Add Device button. An information message appears. If no errors occur, such as duplicate
device ID, the SAN Switch is added and listed in the Status field. If an error occurs, the Status field
displays the error message.
7. To add another SAN Switch, repeat this procedure starting with Step 5; otherwise, click the Done button
to close the Add Device dialog box.
This procedure adds the SMI-S Agent that maintains the HP/Brocade switches to the Utility Meter. In order
to meter an HP/Brocade switch you need to run Modify Device (see Change HP/Brocade Switch
Configuration Parameters.
3.5.2 Modify Device
3.5.2.1 Change a non-URS Disk Array to URS
This task allows you to change a non-URS disk array to a URS disk array, or a URS disk array to a non-URS
disk array, in the Managed Devices Tree. Only URS disk arrays, which are labeled as a URS Device
in the Managed Devices Tree, are metered by the Utility Meter.
NOTE: You can also modify other device fields in the Modify Device dialog box.
Follow this procedure to change a non-URS disk array to a URS disk array.
NOTE: This example modifies an EVA disk array, but the same procedure is used to modify an XP devices.
1. Start the Utility Meter GUI. For details, see Starting the Utility Meter GUI.
2. In the Utility Meter GUI, click the Devices tab.
3. In the Managed Devices Tree, select the IP address of the Command View server that manages the
non-URS disk array you want to change to a URS disk array.
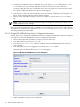
4. In the Utility Meter GUI Tasks (right) pane, click the Modify Device button.
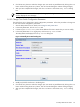
The Utility Meter GUI displays the Modify Device dialog box.
Figure 3-15 Modify EVA Device Dialog Box
3.5 Utility Meter Devices Tasks 63