Using the EPS / Bitmap Manual Tool 1
Introduction Beginning with print server software version 7.00, the ColorMark Pro and RIPStation print servers have had the capacity to manipulate EPS image files and assign custom page sizes for printing. Beginning with version 8.40, that functionality has been extended to include TIFF and JPEG image files. This document describes these features, known as the EPS/Bitmap Manual tools, and explains how to configure your ColorSpan software to take advantage of these features.
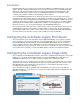
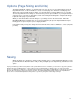
Then in the Preferences window, locate the option for “Passthrough Mode” and place a check mark in its box: You may then close the Preferences Window. When Passthrough Mode is thus enabled, any file you drop onto the CSIU window will be sent directly to the server for manipulation by the print server. Configuring the ColorSpan Downloader Utility On your Macintosh or MS-Windows workstation, launch the ColorSpan Downloader Utility (CSDU).
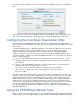
listed in the Attention Queue. If you downloaded a TIFF or JPEG image, you will see only “TIFF” or “JPEG” rather than the file name. This is because EPS files have a name embedded in their file format, while TIFF and JPEG images have only the image data in their format. To the right of the file name, you will see the text “Manual EPS/Bitmap”. This indicates that the job is in the Attention Queue because it requires page-size assignment through the EPS/Bitmap Manual tool.
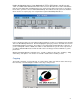
Tiling and Scaling The second tab, “Tiling and Scaling”, is pictured below. Type in numeric values in the Composite Box text fields or use the pointer to grab and drag the image to the desired dimensions. (If entering numbers in the text fields, press the Enter key on your keyboard to accept the new size.) To ensure that the image retains its original proportions, leave the “Retain Aspect Ratio” box checked. The image also can be flipped horizontally, vertically, or both by clicking the check boxes shown.
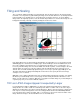
Options (Page Sizing and Units) The third and final tab, “Options”, is shown below. Here you can choose a pre-defined page size from the pull-down menu, or enter in numbers to create a custom page size. Enter the custom page size dimensions in the text fields and press Enter on your keyboard to accept the dimensions. You should observe the pull-down menu change to “Custom” after you have pressed Enter on your keyboard.
© Copyright 2007 Hewlett-Packard Development Company, L.P. The information contained herein is subject to change without notice. The only warranties for HP products and services are set forth in the express warranty statements accompanying such products and services. Nothing herein should be construed as constituting an additional warranty. HP shall not be liable for technical or editorial errors or omissions contained herein.