
ColorSpan Legacy Print Server - Using the EPS / Bitmap Manual Tool


4
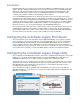
listed in the Attention Queue. If you downloaded a TIFF or JPEG image, you will see only
“TIFF” or “JPEG” rather than the file name. This is because EPS files have a name embedded in
their file format, while TIFF and JPEG images have only the image data in their format. To the right of
the file name, you will see the text “Manual EPS/Bitmap”. This indicates that the job is in the Attention
Queue because it requires page-size assignment through the EPS/Bitmap Manual tool.
In the tool button bar at the top of the Attention Queue window, you will see a new button at the far right.
This is the EPS/Bitmap Manual tool. Click and highlight the print job you wish to work with, then click on
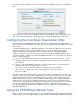
the EPS/Bitmap Manual tool button. There will be a short delay while the EPS Manual tool launches. If
you are working with a TIFF or JPEG, there will be a status bar while the system creates a preview for
use with the EPS/TIFF Manual tool. EPS files will not have an image preview, but will have a generic
placeholder.
When the EPS/TIFF Manual tool window opens, you will see that it has three tabs, “Cropping”, “Tiling
and Scaling”, and “Options”. The function of each tab is detailed in the following sections.
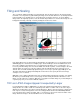
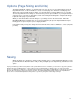
Cropping
The first tab, “Cropping”, is pictured below. To crop the image, either enter numeric values in the Crop
Box text fields, or click and drag the handles at the edges of the preview.