
ColorSpan Legacy Print Server - Using the EPS / Bitmap Manual Tool


6
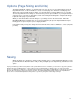
Options (Page Sizing and Units)
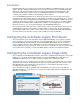
The third and final tab, “Options”, is shown below. Here you can choose a pre-defined page size from
the pull-down menu, or enter in numbers to create a custom page size. Enter the custom page size
dimensions in the text fields and press Enter on your keyboard to accept the dimensions. You should
observe the pull-down menu change to “Custom” after you have pressed Enter on your keyboard. Once
your page size is selected, you may wish to return to the Tiling and Scaling tab to verify that the image
is placed on the page as you intended.
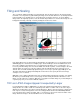
When you have made all the desired changes to your image, click on the Save button. When the
EPS/Bitmap Manual tool window has closed, you may drag the job up to the Input Standard or Input
Priority queue to queue the job for processing by the RIP.
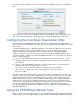
In the Options tab you may also change the measurement units to inches, millimeters, or dots (72 points
per inch).
Saving
When all settings are satisfactory, click the button marked “Save” to exit the EPS/TIFF Manual tool. The
job will remain in the Attention Queue until you drag it straight up to the Input Priority, Standard, or Hold
queue.
Tip: If you know that you will need to print the same job at a different size or orientation, you can leave a copy of the job in the
Attention queue by holding down the “control” (ctrl) key on the keyboard while you drag the job to one of the other Input
queues. You will notice a small plus (+) sign appear by the job/mouse arrow while you draw with the control key pressed. This
tip works when moving any job from one queue to another. The Manual EPS/TIFF job that remains in the Input Attention
queue can be resized and manipulated as many times as you like by using this “control-drag” technique.