
HP RIP Software - HP RIP Software User Guide


1-6 Installation
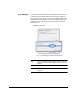
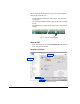
It can be difficult to determine which icon represents which connec-
tion. One way to determine this is to unplug the VideoNet cable and
observe which icon shows a red “X” (see Fig. 1-2 below).
5. To avoid confusion in the future, rename the Local Area Connec-
tion icons to “LAN” and “VideoNet.”
Step 3: Install the
VideoNet Protocol
(Windows Vista)
The VideoNet networking protocol is used to communicate with the
printer. These instructions assume a familiarity with Windows adminis-
trative functions. If necessary, consult your network or computer admin-
istrator or consultant for assistance.
Caution The VideoNet protocol is not compatible with Novell Net-
Ware. Do not install VideoNet on networks using Novell
NetWare.
1. Open Network Connections by clicking the Start button > Control
Panel > Network and Internet > Network and Sharing Center >
Manage Network Connections.
2. Right-click the local area connection that corresponds to the Video-
Net card, then click Properties. (Type the password or provide
confirmation if prompted.)
3. Click Install.
4. In the Select Network Feature Type dialog box, click Protocol,
and then click Add.
5. Browse to the folder on the hard drive or DVD that contains the
VideoNet protocol (videonet.inf).
6. Follow the prompts to complete the installation of the VideoNet
protocol.
Fig. 1-2. Identifying the VideoNet connection
VISTA