
HP StorageWorks SAN Virtualization Services Platform Manager user guide (5697-0295, January 2010)


Creating SAN API virtual disks
The VSM client enables you to create SAN API virtual disks (also called SAN CLI virtual disks). SAN
API virtual disks enable hosts to direct SAN API commands to VSM through a DPM. For more
information about SAN API commands, refer to the HP StorageWorks SAN Virtualization Services
Platform Manager command line interface user guide.
To create a SAN API virtual disk:
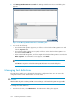
1. From the Tools menu, select Maintenance. The Maintenance dialog box appears.
2. Click Create SANAPI Virtual Disk. The Create SANAPI Virtual Disk wizard opens to the Enter
Virtual Disk parameters screen.
3. In the Virtual Disk name field, enter a unique name for the virtual disk.
4. In the Comment field, enter any desired text.
5. Click Next. The Select Storage Pool screen appears.
6. In the tree in the left area of the screen, navigate to the Storage Pool node or to a folder in which
you have copied a storage pool from which you want to allocate capacity to the virtual disk. The
upper right area of the screen now displays the storage pools at the location selected in the tree.
7. Select a storage pool from which you want to allocate capacity to the virtual disk. You can only
select storage pools that have enough available free space.
8. Click Add. The storage pool you selected appears in the lower area of the screen. If you want
to deselect the storage pool, select the storage pool in the lower area and click Remove.
9. Click Next. The Select host screen appears.
10. In the tree on the left of the screen, navigate to the Host node or to a folder in which you have
copied a host to which you want to assign permission to access the virtual disk. The upper right
area of the screen now displays any hosts at the location selected in the tree.
11. Select a host to which you want to assign permission to access the virtual disk.
12. Click Add. The host you selected appears in the lower area of the screen. If you want to deselect
the host, select the host in the lower area and click Remove.
13. Repeat steps 10 through 12, if necessary, until all the hosts you want to add to the virtual disk
are listed in the lower area of the screen.
14. Click Next. The Select LUN screen appears.
15. In the Select LUN field, select the LUN through which you want VSM to expose the virtual disk.
You may use the Next free LUN option or specify a number. This must be a unique LUN for each
host that will be accessing the virtual disk.
16. Click Next. The Select Folder screen appears.
17. If you want to add the virtual disk to a folder, enter the folder name in the Folder field or click
Browse to browse to the folder. The folder must already be created. For information about creating
folders, see “Creating folders” on page 315.
18. Click Next. A confirmation screen appears.
19. Click Finish. The SAN API virtual disk is created.
Performing maintenance activities372