
HP StorageWorks SAN Virtualization Services Platform administrator guide (5697-0204, January 2010)


8. To add a user that the SVSP VSS hardware provider will use for interfacing with the VSMs, type
SaHwConfig AddUser <domainname> <username> <password> and press Enter.
Adding a user succeeds if these conditions are met:
• The server can access a SAN CLI virtual disk from the domain with which you are trying to
connect.
• The user exists in that domain.
Making sure that VSS works with the VSM virtual disks
The following procedure describes how to test VSS functionality with the VSM virtual disks before you
integrate the VSS with the backup software. The procedure uses the VShadow utility from the Microsoft
Windows Software Development Kit (SDK). You also can use VShadow as a standalone tool for
creating consistent PiTs and snapshots for backup and recovery purpose. To read more about the
VShadow, access:
http://msdn.microsoft.com/en-us/library/bb530725.aspx
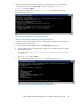
1. On the host server, open a DOS command prompt window and use the change directory command
(CD) to navigate to the installation folder for the SVSP VSS hardware provider.
The default folder is C:\Program Files\Hewlett-Packard\SVSP VSS Hardware
Provider\.
2. To show the help menu of the VShadow utility, type vshadow -? and press Enter.
3. On the VSM, create a virtual disk and present the virtual disk to the host server on which you
plan to test the integration of VSS with the VSM virtual disks.
4. From Computer Management on the host server, run a scan for hardware changes.
5. After the scan finishes, open Disk Management.
6. Identify the new disk and create the new disk as a single primary partition with a new drive letter.
In the following steps, the examples of commands assume that the VSM virtual disk was created
and assigned to use drive letter m:.
Microsoft Volume Shadow Copy Service86