
Using HP Serviceguard for Linux with Red Hat KVM Guests, May 2013


Technical white paper | Using HP Serviceguard for Linux with Red Hat KVM Guests
9
3. Add the physical interface to the bridge by modifying the network interface script of the given physical interface. Edit
the file and add a line BRIDGE=bridge0, so that the contents of the configuration file look like the following example:
DEVICE=eth0
BRIDGE=bridge0
BOOTPROTO=none
HWADDR=00:19:b9:7e:c8:63
ONBOOT=yes
TYPE=Ethernet
IPV6INIT=no
NM_CONTROLLED=no
Note:
Repeat the steps 2 and 3 for every interface that requires to be bridged.
4. Configure IP Tables to allow all traffic to be forwarded across the bridge
# iptables -I FORWARD -m physdev --physdev-is-bridged -j ACCEPT
# service iptables save
# service iptables restart
Alternatively, prevent bridged traffic from being processed by iptables rules by appending the following lines in the file
/etc/sysctl.conf
net.bridge.bridge-nf-call-ip6tables = 0
net.bridge.bridge-nf-call-iptables = 0
net.bridge.bridge-nf-call-arptables = 0
Reload the kernel parameter configured with sysctl by executing the below command
# sysctl –p /etc/sysctl.conf
5. Restart the network services to bring all the network configuration changes into effect.
# service network restart
6. Verify that your eth0 was added to the bridge0 using the brctl show command.
# brctl show
The output must look similar to the following:
bridge name bridge Id STP enabled interfaces
virbr0 8000.000000000000 yes
bridge0 8000.0019b97ec863 yes eth0
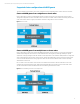
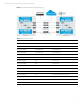
“bridge0” is now available through virt-manager and libvirt. Guests can now connect to this device for full network
access. This can be also viewed through virt-manager as shown below.
Click on Edit Connection Details Network Interfaces.
You can see the list of bridge interface created.