
HP Serviceguard for Linux Version A.11.19 Deployment Guide, September 2012


17
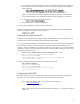
2. Set the date and time.
a. Click “MANAGE“ in the left-hand pane.
b. Click “GENERAL CONFIG” in the left-hand pane.
c. Click “set date/time” in the left-hand pane.
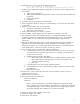
d. If NTP is available, locate the “Obtain Time with NTP” frame.
i. Select Enable NTP
ii. Enter the NTP Server Address, for example 15.36.88.4
e. Set current date, if incorrect, in “Set MSA Storage System Date” frame.
f. Set current time, if incorrect, in “Set MSA Storage System Time” frame.
g. To save changes, click the “Save Date/Time” button.
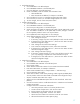
3. Configure the host ports
a. Click “MANAGE“ in the left-hand pane.
b. Click “GENERAL CONFIG” in the left-hand pane.
c. Click “host port configuration” in the left-hand pane.
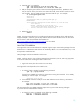
d. Set the Controller Link Speeds to match the link speed of the FC HBA cards on each
host. The default is 4 GBit/sec. If the speed does not match, change it in each of
the “Link Speed” pull-down menus in the top two frames.
e. Click “Update Host Port Configuration” to save changes.
f. Set the Advanced Options (in the “Advanced Options” frame).
i. Click “Change FC Loop ID”.
ii. If necessary, change Loop ID to “Soft” (default) for each controller module.
iii. If changed, click “Save and Continue..”, otherwise click “Return to Main
Host Port Configuration Page”.
iv. Click “Change FC Port Interconnect Settings”.
v. In the “Host Port Configuration” frame, select “Interconnected”.
vi. If changed, click “Save and Continue..”, otherwise click “Return to Main
Host Port Configuration Page”.
vii. Click “Change Host Port Topology”.
viii. If necessary, change Topology to “Loop” in the pull-down menu for each
port. Loop topology is required with “Interconnected” host ports.
ix. If changed, click “Save and Continue..”, otherwise click “Return to Main
Host Port Configuration Page”.
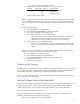
4. Create the virtual disk.
a. Click “MANAGE“ in the left-hand pane.
b. Click “VIRTUAL DISK CONFIG” in the left-hand pane.
c. Click “create a vdisk”.
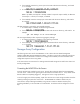
d. Select “Manual Virtual Disk Creation” for the Virtual Disk Creation Method.
e. Enter Virtual Disk Name, for example “edenshare”.
f. Select Virtual Disk RAID level, for example “RAID 1 – Disk Mirroring”.
g. Click “Create New Virtual Disk”.
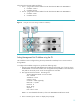
h. Select drives to add to virtual disk by checking at least 2 green (available) disks.
You may need to select more disks based on the RAID level configured in step f.
i. Skip the “Calculate Virtual Disk Size” option.
j. Would you like to add dedicated spare drives for this virtual disk? Select “No”
(default).
k. Click the “Continue” button to “Add Selected Drives to “edenshare” and Continue
Creating Virtual Disk”.
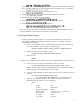
l. Configure Volumes for Virtual Disk “edenshare”.
i. How Many Volumes? Select “3” from the pull-down menu.
ii. Create Volumes of Equal Size? Click the “No” button.
iii. Expose Volumes to All Hosts? Click the “Yes” button.
iv. Automatically Assign LUNs? Click the “Yes” button.
v. Would You Like to Name Your Volumes? Click the “Yes” button.
vi. Advanced Virtual Disk Creation Options [skip]