
HP Serviceguard for Linux Version A.11.19 Deployment Guide, September 2012


18
vii. Click the “Create Virtual Disk” button.
m. To add volumes to virtual disk “edenshare”, enter the following:
Volume # Volume Size – Mbytes Volume Name
1 100 edenshare_lockLUN
2 200 edenshare_ws
3 300 edenshare_clog
n. Click the “Add Volumes” button.
NOTE: It could take a few hours to initialize the virtual disk depending on the size and RAID
level. By default the virtual disk will be initialized “Online”, so it can be used immediately.
You do not need to wait for the vdisk initialization to complete before moving on to the next
step.
5. Verify the volume mapping.
a. Click “MANAGE“ in the left-hand pane.
b. Click “VOLUME MANAGEMENT” in the left-hand pane.
c. Click “volume mapping” in the left-hand pane.
d. Click “map hosts to volume” in the left-hand pane.
i. Select each volume to view settings. From the “edenshare” Volume Menu,
select each volume (one at a time) to view the “Current Host-Volume
Relationships” to verify “All Hosts” and “rw” access on each port.
e. Click “manage host list” in the left-hand pane.
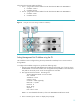
i. From the “Current Global Host Port List”, verify that the storage device sees
the 4 host connections by the Host WWN and Manufacturer (for example,
Qlogic).
NOTE: If all 4 host connections are not listed, check the cable connections and reboot the
controllers. To reboot the controllers, take the following steps:
a. Click “MANAGE” in the left-hand pane.
b. Click “RESTART SYSTEM” in the left-hand pane.
c. Select “Restart Both RAID Controllers” from the pull-down menu.
d. Click the “Restart” button.
e. Click “OK” to the warning.
Preparing the Servers
In preparation for the Serviceguard for Linux installation and configuration steps, the two servers need
to be configured to meet the minimum requirements for Serviceguard in terms of redundant paths to
the external storage server, shared storage configuration and network redundancy.
NOTE: If you haven’t already done so, copy all downloaded software files to a directory on each
server, /tmp/sglx_install, for example.
Install and Configure Driver for Fibre Channel HBA
New drivers will probably be required for the Fibre Channel HBA card used to connect each server to
the shared storage device. These instructions are for the QLogic HBA cards recommended in the
“What to Order” section. Be sure to get the driver appropriate for your systems’ HBA cards.
These steps need to be executed on each server.
The following examples are for the QLogic driver, version 8.01.07.25.02. If a newer driver is
available, change the command arguments accordingly.
1. Check to see if a QLogic driver is already installed: