
HP MSA Power and Cooling Module Replacement Instructions (481595-003, June 2013)
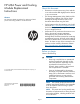

The following illustration shows power and cooling
module locations:
2. Power and cooling mod 21. Power and cooling mod 1
Verifying module failure
Before replacing the module, look at the event log,
software management utilities, and device LEDs, and
then confirm with HP support that the module has
failed.
Table 1 LED descriptions
DescriptionModule LED
Input Source Power
Good (top LED)
• Solid Green = Power is on and input
voltage is normal.
• Off = Power is off or input voltage is
below the minimum threshold.
Voltage/Fan
Fault/Service Required
(bottom LED)
• Solid Amber = Output voltage is out
of range or a fan is operating below
the minimum required RPM.
• Off = Output voltage is normal.
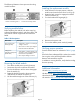
Removing the failed module
1. Turn off the module power switch (if present).
2. Disconnect the power cord from the module.
3. Turn the thumbscrew until the screw disengages
from the module (1).
4. Rotate the latch downward to disconnect the
module from the internal connector (2).
5. Pull the module straight out of the enclosure (3).
Installing the replacement module
1. With the latch in the open position, slide the
module into the enclosure as far as it will go (1).
2. Rotate the latch upward to engage the module
internal connector (2).
3. Turn the thumbscrews finger-tight (3).
4. Reconnect the power cord.
5. Turn on the module power switch (if present).
Verifying proper operation
Examine module status as indicated in Table 1 (page
2).
If the Fault/Service Required LED is amber, the module
has not gone online and likely failed its self-test.
Remove and reinstall the module.
In addition to viewing the LEDs, verify that the cooling
fans are spinning.
Additional information
HP MSA: http://www.hp.com/go/msa
HP data storage: http://www.hp.com/storage
HP technical support: http://www.hp.com/support
HP manuals: http://www.hp.com/support/manuals
Page 2