
HP StorageWorks 2012i Modular Smart Array controller module replacement instructions (481594-001, March 2008)

Page 2
3. Illuminate the UID (Unit Identification) LED of the enclosure that
contains the controller module to remove.
a. Select Manage > General Config > Enclosure Management.
b. Click Illuminate Locator LED.
4. Locate the enclosure whose UID LED (front right ear) is blue, and
within it, the module whose OK to Remove LED is blue.
5. Disconnect any SAS cables that connect the controller to a drive
enclosure.
6. Turn the thumbscrews (2) until the screws disengage from the
controller.
7. Press both latches downward to disconnect the module from the
midplane.
8. Pull outward on the latches to slide the module out of the
enclosure.
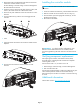
Installing the controller module
NOTE: You can install a controller into an enclosure that is
powered on.
1. Loosen the controller’s thumbscrews; press the latches downward.
2. Slide the controller into the enclosure as far as it will go (1).
3. Press the latches upward to engage the controller (2); turn the
thumbscrews finger-tight.
4. Reconnect the SAS cables.
IMPORTANT: In a dual-controller configuration, if the
firmware versions differ between the two controllers, Partner
Firmware Upgrade brings the older firmware to the later firmware
level.
Verifying component replacement
After replacing the controller, check that the OK LED (back)
illuminates green, indicating that the controller has completed
initializing and is online.
If the enclosure’s UID is on, use SMU to turn it off.
1. Select Manage > General Config > Enclosure Management.
2. Click Turn Off Locator LED.
If the Fault/Service Required LED is amber, the module has not gone
online and likely failed its self-test. Put the module online by
following the steps to shut down a controller or check the event log
for errors.
Additional information
See the MSA web site: http://www.hp.com/go/msa.
1 Latch 2 Thumbscrew
12 1 2
1
1
1
2
2