
HP Storage Essentials SRM 6.0 User Guide for Enterprise Edition and Standard Edition SRM Software (July 2008)


HP Storage Essentials SRM 6.0 User Guide 323
• Severity - The severity level
• Time - The time the event was recorded.
• Summary Text - A brief explanation of the event. When you click the summary text, the details of
the event are displayed.
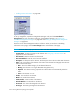
The Events tab lets you use Event Manager to:
• View Event Details - See ”Viewing Event Details” on page 335.
• Clear Events - See ”Clearing Events” on page 337.
• Delete Events - See ”Deleting Events” on page 339.
• Sort Events - See ”Sorting Events” on page 339.
• Select a Severity for Filtering - See ”Setting up a filter” on page 342 and ”” on page 330.
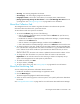
Asset Attributes of an Element
IMPORTANT: Depending on your license, Chargeback Manager may not be available. To
determine if you have access to Chargeback Manager, see the List of Features, which is accessible
from the Documentation Center (Help > Documentation Center in Storage Essentials).
Chargeback Manager provides a handy way for you to keep track of your asset information for an
element. You can easily store warranty and licensing information, as well as contact information for
the element. For example, assume a switch on the network is having some problems, and you want
to contact the person in charge of that switch. You can use the element's asset record to find both
the contact information for that switch and the location of the switch.
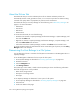
To access asset information for an element, do one of the following:
• Click an element (except a file server) in Application Viewer, and then click the Asset
Management tab.
• Double-click an element in Capacity Manager, Performance Manager, or System Manager, and
then click the Asset Management tab.
• Click a discovered host in Backup Manager, and then click Chargeback in the lower-left corner.
• Click an element in Chargeback.
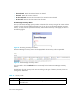
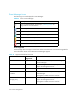
The Asset Management tab displays general asset information about an element. It also provides
access to other screens that provide additional asset information, such as staff, geographic,
licensing, and warranty information. You can access these other screens by expanding the Asset
Record node and clicking one of its children, as shown in the following figure. To learn more about
these other screens, see the following topics:
• ”Adding Asset Information” on page 645
• ”Adding General Information” on page 645
• ”Adding Staff Information” on page 646
• ”Adding Geographic Information” on page 647
• ”Adding Licensing and Warranty Information” on page 647