
HP Storage Essentials SRM 6.0 User Guide for Enterprise Edition and Standard Edition SRM Software (July 2008)


HP Storage Essentials SRM 6.0 User Guide 621
5. Repeat Steps 2 and 3 for multiple ports.
6. If you want to remove the host, click the button.
7. When you are done with your changes, click OK.
The host is added to the list of hosts.
8. Physically connect the host to the network before the job runs.
Step 3 - Select a Host Security Group
1. Select a host security group. See ”Creating a Host Security Group” on page 627 for information
on how to create a host security group. See ”General Provisioning Issues” on page 563 for
information on how your storage system handles host security groups.
2. Click Step 4.
3. Click Create Job.
The job is added to the bottom pane.
4. Take one of the following actions:
• If you want the job to execute now, click the Execute Job () button.
• If you want the job to execute at a later time, schedule the job as described in the topic,
”Scheduling Provisioning Jobs” on page 628.
Step 4 - Select a Zone
NOTE: If the zone has already been selected and Step 5 is clicked, skip this step or click the
button to clear the selection.
If a zone has not been selected or created yet, most likely the option Automatically Configure
Zoning is not selected in the Customize Zone Options dialog box ( ). The management server
assumes you want to select a pre-existing zone or create one manually.
• To reuse a zone - Select a zone in the Zone pane and then click Step 5, and expand a fabric
node to view its zones.
• To create a zone - Select a fabric in the zone pane, click the button, and then enter a name
for the zone. For more information, see ”Creating a Zone” on page 622
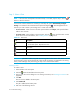
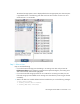
Table 152 Zone Icons
Icon Description
• Above Zone pane - Used to create zones.
• In the Zone pane - Represents a zone.
Zone Alias
Port
The fabric cannot be reached