
HP Storage Essentials SRM 6.0 User Guide for Enterprise Edition and Standard Edition SRM Software (July 2008)

Path Provisioning630
Executing Provisioning Jobs
If you want to save and execute a job, you must click the Execute Job ( ) button. When you click
that button, the job is saved on the management server. Other users can now see the job.
When the management server is determining which job to perform first, it looks first for jobs
requiring volume and/or zone creation. It does not perform the jobs in the order suggested by the
Provision Job ID nor in the order of the jobs appearing in the Provision Jobs table.
The management server can detect when the required volume and/or zone has already been
created. For example, assume you created a job to create a volume. The next few jobs use this
volume. These jobs will determine if the volume has been created, before creating the volume.
You can schedule a job to start immediately or at a pre-determined time in the future:
• To start a job now, click the Execute Job ( ) button before the job is scheduled.
• To start a job at a pre-determined time in the future, schedule the job first, and then click the
Execute Job ( ) button. The job is executed according to the time set on the management
server.
To view the latest information in Path Provisioning, click Refresh. For details about what the Refresh
button updates, see ”About Path Provisioning” on page 595.
Monitoring Provisioning Jobs
If you want to view the latest status of the provisioning jobs listed, click the button in the Provision
Jobs pane. The management server gathers information about the provisioning jobs listed to
determine their latest status. Use this feature when you are not sure if a job has ended.
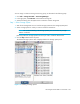
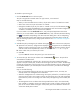
Deleting Multiple Jobs
IMPORTANT: You cannot delete a job once it has started. A job has started if it has a state of
“started.” To delete jobs, select the jobs in the M column and then click the Delete () button until
all selected jobs have been removed, as shown in the figure below.
To deselect a job, click the check marks or click the Clear Selection ( ) button in the Provision Jobs
pane.
Naming Conventions
Observer the following naming conventions:
Naming Conventions for Brocade Switches:
• The name must contain 1 to 64 characters.
• The name must begin with a letter. Any character other than the first character can be a letter, a
number (0 to 9), or an underscore (_).