
HP Storage Essentials SRM 6.0 User Guide for Enterprise Edition and Standard Edition SRM Software (July 2008)


HP Storage Essentials SRM 6.0 User Guide 321
IMPORTANT: Before you change the margins, decide on a unit of measurement.
• Unit - Select cm (centimeters) or inch for the margins.
• Position/Size - Lets you change the position and size of the printout so that it spans several
pages:
• Start x - Same as in step 6.
• Start y - Same as in step 6.
• Width - Determines the width of the printout. If the width entered does not fit on the page,
the printout wraps around to another page.
• Height - Determines the height of the printout. If the height entered does not fit on the
page, the printout wraps around to another page.
• Resolution (pixel/unit) - Lets you change the resolution so that the printout spans several
pages.
• Page - Lets you expand the printout so it prints on several pages without modifying the
graphic.
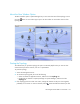
A preview of the printout is displayed in the right pane.
10.When you are done, click Apply.
11.To preview your pages, click the Preview tab. Then click the page you want to preview.
The page appears in the right pane.
12.When you are ready to print, click Print.
13.Click Close.
NOTE: To return to all of the original settings, click the Default button next to the Print button.
Creating a Virtual Application
The management server lets you keep track of unsupported applications. For example, assume your
company has created an internal application, and you want to be able to use the software to keep
track of that application. You can create a virtual application for that product. A virtual application
is a placeholder you create for an application.
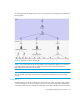
Once you create the virtual application, it will appear connected to a host in your topology.
1. Access System Manager by clicking the System Manager button in the left pane.
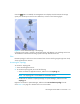
2. Right-click the host that contains the application you want to monitor.
If the host is not in the topology, verify you have discovered the element and obtained element
details. See ”Discovery Data Collection” on page 67.
3. Select Add Virtual Application from the menu.
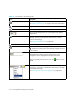
4. Enter the following information for the virtual application.
• Name
• Product