
HP StorageWorks Storage Mirroring Reporting Center user guide (T2558-96071, February 2008)


36
the Backup Save Set Size field contains information on the size of a backup Save Set. The data is measured
in megabytes. By default, a table report automatically scales the data in the table. For example, if the size
of a backup Save Set is 2325 MB, it is displayed in the table as 2.3 GB.
The Table Field Editor allows selecting of the fields to include as table columns. It also allows reordering the
column. In case of numeric fields, it allows changing their display cast and possibly their scaling.
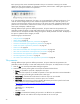
To modify the table fields parameter:
1. Click the
Table Fields icon. The Table Fields Editor dialog box appears.
2. To disable fields that are displayed in a report, select the row for the field you want to disable. Deselect
the check box in the
Display column.
By default, all of the fields returned in the report’s content are displayed in a report.
3. To disable automatic scaling and display the data to a specific scale, select the row in which you want
to modify scaling and select from the
Scale To column. Choose a value from the list of values. Use this
feature to always display the size of backup Save Sets in MB, for example.
4. Enter data in the following fields:
•
Field—Name of the field.
•
Cast—Cast of the field. The display cast of numeric fields can be changed.
•
Display—If checked the field is included as a table column.
•
Unit—Unit of the field data.
•
Scale To—Multiplier to which the field data is to be scaled. If automatic it scales to the largest
possible multiplier.
•
Up and Down—Moves the ordering of the table columns.
5. Click
OK to save the Table Fields settings on the report. The report is updated to reflect your changes.
Cell styles
Cell styles allow you to configure rules that control the background and foreground colors of cells in the
table based on the contents of the data within the rows.
To configure cell styles:
1. Click the
Cell Style icon. The Cell Styles Editor dialog box appears.
2. The Cell Styles Editor dialog box allows you to add rules that control the appearance of cells and rows
within the table. To add a rule, click
Add. The Style Editor dialog box appears.
3. Add a rule to control the row colors by selecting the
Condition check box in the Style Editor dialog box
and clicking
Edit. The Conditions dialog box appears. See “Conditions” on page 44 for more
information.
4. To delete an existing style, select the style then click
Delete in the Style Editor dialog box.
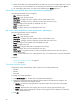
5. Add a Condition by clicking
Add Condition. The Condition dialog box appears.
6. Specify a field from the
FieldName field, an operator from the Operator field, and a value in the Value
field.
Values can be either static or dynamic. A static value is a fixed value. A dynamic value is one that is
calculated at run time and can be either
Current Time, Start Time, End Time, or End of Time.
7. Specify the condition for your report and click
OK. The condition is added to the condition expression.
8. To create complex conditions, you can combine multiple conditions with
AND as well as OR operators.
To add an operator, click
Add Operator and select the operator you want to use from the list of values.
As you add conditions and operators, you can add complex conditions.
9. To complete the condition, click
OK. The condition is added to the Style Editor dialog box.
10. To specify the foreground and background colors, select either the Foreground or Background check
boxes. Click Foreground or Background. A Color selection dialog box appears that allows you to
specify the color.
11. Apply the specified colors to the entire row that match the condition or to just specific fields in that row.
To modify the selection to a specific field, change the
Select field to the name of the field to which you
want the Style rule to apply and click
OK. The Styles Editor dialog box appears.