Virtual Infrastructure user’s guide Part number: T2558-96095 Second edition: May 2008
© Copyright 2008 Hewlett-Packard Development Company, L.P. Hewlett-Packard Company makes no warranty of any kind with regard to this material, including, but not limited to, the implied warranties of merchantability and fitness for a particular purpose. Hewlett-Packard shall not be liable for errors contained herein or for incidental or consequential damages in connection with the furnishing, performance, or use of this material.
Table of Contents Introducing Storage Mirroring for Virtual Infrastructure ..................... 2 Requirements .......................................................................................................... 3 Related documentation ............................................................................................. 3 Install Storage Mirroring for Virtual Infrastructure ............................. 4 Getting Started with Storage Mirroring for Virtual Infrastructure ........
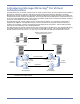
Introducing Storage Mirroring® for Virtual Infrastructure Storage Mirroring® for Virtual Infrastructure is used to protect entire virtual machines on the VMware ESX Server platform by actively replicating virtual machine files between datastores. Storage Mirroring for Virtual Infrastructure leverages VMware published and supported web service APIs for snapshot and virtual machine management, ensuring that protected and replica virtual machines are in known and manageable states.
Requirements Storage Mirroring for Virtual Infrastructure requires the following minimum system configuration: z The Storage Mirroring for Virtual Infrastructure client and the Storage Mirroring for Virtual Infrastructure service must be installed on a server running one of the following 32-bit operating systems: z Microsoft® Windows® XP z Microsoft Windows 2003 z A copy of Storage Mirroring for Virtual Infrastructure z VMware VirtualCenter 2.x or later (Strongly recommended: VMware VirtualCenter 2.
Install Storage Mirroring for Virtual Infrastructure Install Storage Mirroring for Virtual Infrastructure by running the setup.exe file. NOTE: z z If you are upgrading from Storage Mirroring for Virtual Infrastructure version 2.0: Before you begin the upgrade, first put all active jobs into Stop mode (in order to avoid re-synchronization after upgrade). Next, upgrade the Storage Mirroring for Virtual Infrastructure service. Finally, upgrade the clients.
Getting Started with Storage Mirroring for Virtual Infrastructure Configure your VMware ESX server to use a root account Before you use Storage Mirroring for Virtual Infrastructure, you must configure your VMware ESX server to allow remote root login for secure shell (SSH) clients and to enable the client port for SSH. You will need to do this on both the source and target servers. 1. Allow remote root login for SSH. a. Log on to the ESX server through the console, using root credentials. b.
Configure the SCP timeout The SCP may timeout during the initial synchronization if you have a large virtual machine or a slow connection from the source to the target. Follow these steps to modify the SCP transfer timeout value. 1. Stop the protection job for which you want to change the SCP timeout value. 2. Change the default value of 2880 minutes in the DefaultJob.
Help menu z SMVI Help—Launch the online help for Storage Mirroring for Virtual Infrastructure. z SMVI User’s Guide—View the Storage Mirroring for Virtual Infrastructure User’s Guide PDF. z Check for updates—Visit the Hewlett-Packard technical support site to see if an updated version of Storage Mirroring for Virtual Infrastructure is available. z About Storage Mirroring for Virtual Infrastructure—View information about this version of Storage Mirroring for Virtual Infrastructure.
Connect to the Administrative Servers For both the SMVI server and the VirtualCenter server, you will need to enter valid credentials that will allow you to connect to interfaces that these services are publishing on the network. Connect to the SMVI server In order to configure or manage any server, you must first enter credentials that have the appropriate permissions to perform the desired tasks.
Connect to the VirtualCenter server You may enter credentials for logging in to the VMware VirtualCenter server in order to configure or manage an ESX server. After you enter login information for the SMVI server and click Next, the Connect to VirtualCenter Server dialog box will appear: The VirtualCenter server is where the VMware VirtualCenter service is running. The VMware VirtualCenter service manages all the VMware ESX servers in the environment.
Log off administrative servers Logging off clears the current credentials so that you will be prompted to enter credentials on your next logon. To log off the servers, click the Disconnect button in the left pane. A box that identifies the server(s) that you are currently logged in to will appear. If you click OK, the Connect to SMVI Servers window will appear so that you can log in to different SMVI and VirtualCenter servers.
Set up the E-mail Server To configure access to the SMTP mail server to use for e-mail notification, either click the Set up e-mail server button in the left pane, or choose Go, Set up e-mail server. The Set up e-mail server window will appear. NOTE: You should set up the e-mail server before creating a protection. Otherwise, you can set up the e-mail server during the protection configuration workflow by clicking the Configure button on the Configure e-mail notifications window.
Manage ESX Servers When you click on the Manage servers button, Storage Mirroring for Virtual Infrastructure automatically scans to find ESX servers that are VMotion™ destination candidates for protected virtual machines, based upon SAN connectivity. You can view the Credentials Cached column to identify servers that need to have credentials entered. NOTE: Only servers for which credentials have been entered will be available for use with VMotion.
Configure an ESX server If you want to change the credentials for an ESX server, add a new credential, or delete an existing credential that is not being used in any protection, select the server, then click the Configure server button. The Configure server window will appear in the right pane. Select an account in the Credentials area, then click Add to add a username and password, or Edit to change existing credentials. The Credential dialog box will appear.
Set up Protection for a Virtual Machine Select the source virtual machine If you are connected to a VirtualCenter server, when you select Protect a virtual machine, the Select virtual machine window will appear. NOTE: If you are not connected to a VirtualCenter server, you will need to manually enter your source server. See Select the source virtual machine without VirtualCenter on page 16.
Enter the following information for the source server: z Virtual machine to protect—Enter the name of the virtual machine you want to protect. Or, click the Browse button to browse VirtualCenter to locate a virtual machine. The Select Virtual Machine window will appear. In the Select virtual machine window, browse through the file tree on the left side to select a source virtual machine.
Select the source virtual machine without VirtualCenter If you did not enter credentials for a VirtualCenter server, when you select Protect a virtual machine, the Select source server window will appear. Enter the following information for the source server: z IP address or DNS name—This field displays the IP address or DNS name of the selected VMware ESX server. z User name—Enter the user name for the account you will be using to log on to the source server.
Select the target physical machine If you are connected to a VirtualCenter server, Storage Mirroring for Virtual Infrastructure will find potential target servers. On the Select target server window, you will enter information to select the target server. NOTE: If you are not connected to a VirtualCenter server, you will need to manually enter your target server. See Select the target physical machine without VirtualCenter on page 19.
Enter the following information for the target server: z IP address or DNS Name—Enter the IP address or DNS name of the VMware server that will provide a backup for your source virtual machine. Or, click the Browse button to browse VirtualCenter to locate a server. The Select server window will appear. 169.254.14.159 In the Select server window, browse through the file tree on the left side to select a target server.
Select the target physical machine without VirtualCenter If you did not enter credentials for a VirtualCenter server, the Select target server window will appear. On the Select target server window, you will enter information to select the target server. Enter the following information for the target server: z IP address or DNS Name—Enter the IP address or DNS name of the VMware server that will provide a backup for your source virtual machine.
Select the datastore where the source virtual machine data will be replicated. By default, the path for the replica virtual machine will be filled in with the source virtual machine name. If you want to change the replica virtual machine path, enter it in the field. NOTE: Do not use any special or unique characters in the replica virtual machine path, including the following: #\:*?'"<>| When you are finished, click Next.
z Enter the display name—Enter the name you would like to use to identify the replica virtual machine. NOTE: Do not use any special or unique characters in the replica virtual machine name, including the following: #/\:*?'"<>| z Map replica virtual network adapters to target VSwitches—If there are multiple target networks, you can select the network on the target to use. z Number of processors—Select the number of processors for the replica virtual machine.
Modify protection settings The first time you access the Protection summary page, it will be populated with default values that are recommended for a basic environment. You can change protection settings for this job by clicking on the Change buttons. See the following sections for more information.
Schedule protection start time By default, Storage Mirroring for Virtual Infrastructure starts the initial synchronization of a protection immediately after the protection is created. If you want to specify a date and time in the future at which the initial synchronization will be started, click the Schedule button at the top of the window. The Configure protection start time window will appear.
Set data transmission options You can modify the data transmission options in order to make them more suitable for your environment. Click the Change button in the Data Transmission area. The Set data transmission options window will appear. You can change the snapshot data compression settings in the Compression area. The following options are available: z Never—(Default) No compression will be applied to the data.
z Transmit data, regardless of snapshot size, after—(Default = 15 minutes) Enter a time value and unit that will trigger a transmission from the source to the target. The minimum time allowed is 5 minutes. NOTE: A snapshot transmission cycle from the source to the target will begin when either of the threshold conditions are met: time or size. During the snapshot transmission cycle, the thresholds are not monitored.
Set e-mail notification options You can configure e-mail addresses and select the events that you want to trigger automatic e-mail alerts. Click the Change button in the E-mail notifications area. The Configure e-mail notifications window will appear. If you have not yet configured an e-mail server, a message will appear at the top of the window prompting you to set up the e-mail server. Click Configure to launch the Set up e-mail server window.
To verify that your settings are valid, click the Test E-mail Settings button. Storage Mirroring for Virtual Infrastructure will verify that e-mail notifications can be sent to the recipients you entered using the configured e-mail server. NOTE: If you receive the following error message after testing the e-mail notification, the antivirus software on your SMVI server may be blocking the outbound e-mails. “Failure sending mail. Unable to connect to the remote server.
Enter the following information in the appropriate fields: z Server—Enter the IP address or fully-qualified domain name of the VirtualCenter server. NOTE: If you have changed the default port used by the VirtualCenter server, specify the port as well. Enter the IP address and port in the Server field, using the format Address:Port. z User name—Enter the user name for the account that will access the VirtualCenter server. z Password—Enter the password that is associated with the user name.
Save protection settings Review the protection settings on the Protection summary page. If the settings are acceptable, click Finish to save your protection settings.
After your protection has been configured, you will be able to monitor the protection status of your virtual machine(s). See Monitor your Protected Virtual Machines on page 31. NOTE: While using Storage Mirroring for Virtual Infrastructure, you should not attempt to manually create or delete snapshots on the protected virtual machine. Doing so will disrupt the protection of the virtual machine and may generate unpredictable results on the source and target virtual machines.
Monitor your Protected Virtual Machines The Monitor protection page displays a status summary for each of the virtual machines you have protected using Storage Mirroring for Virtual Infrastructure. For each protection you have configured, you can view the current status and bytes pending. NOTE: During the synchronization phase, the Bytes Pending column displays the un-transferred base .vmdk file size + snapshot file size. For example, if the synchronization is 10% done, the base .
z Delete Protection—Select a protection, then click the Delete Protection button to remove configuration information for the selected protection. NOTE: When you click the Delete Protection button, you will be prompted to either keep or delete the associated replica virtual machine. If you no longer want to protect the source and are no longer interested in the target replica, then select the Delete the associated replica virtual machine option.
Understanding failover and job reversal When you select the Failover button, the following dialog box appears where you can select failover options: z Live failover—Select this option to perform a live failover with network connectivity to the target replica virtual machine. This option will shut down the source. z Test failover—Select this option to perform a test failover without network connectivity to the target replica virtual machine. The source will not be powered off.
Perform a failover test to verify the quality of the backup data without disrupting clients 1. Click the Failover button. 2. Choose the Test failover option. 3. Review the target virtual machine to verify that the data quality is acceptable. At this point, you can either: z Undo the failover as described in step 4. z Promote the replica virtual machine to be the production server by shutting down the source and enabling the target replica’s NIC through the Virtual Infrastructure client. 4.
Pre-Staging Data on the Target Storage Mirroring for Virtual Infrastructure keeps track of all the information about the association of any source .vmdk file to the corresponding target .vmdk file. The mapping information can be used to perform target pre-staging. Pre-staging means before creating a job, you would copy information through other means, and after a job is created, Storage Mirroring for Virtual Infrastructure will use a difference synchronization instead of a full synchronization.