Data Migration User’s Guide First Edition (April 2009) Part Number: T2558-96333
© Copyright 2009 Hewlett-Packard Development Company, L.P. Hewlett-Packard Company makes no warranty of any kind with regard to this material, including, but not limited to, the implied warranties of merchantability and fitness for a particular purpose. Hewlett-Packard shall not be liable for errors contained herein or for incidental or consequential damages in connection with the furnishing, performance, or use of this material.
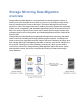
Storage Mirroring Data Migration overview Storage Mirroring Data Migration is a comprehensive workload migration solution. It allows you to move an entire server, known as a source, by mirroring an image of that source to another server, known as the target. The source and target servers can be physical or virtual. The image of the source contains the server's system state (operating system, server configuration, and installation applications) and all of the source server’s data.
Storage Mirroring Data Migration requirements Each Storage Mirroring Data Migration server must meet minimum requirements. Verify that each server meets the requirements for the function of that machine. Additionally, the machine where you will be running the Storage Mirroring Data Migration console must also meet some basic requirements.
Target server requirements ● Operating system—Your target operating system will depend on the kind of target you are using. ● Physical or existing virtual—If your target is a physical server or an existing virtual server, it can have any of the following Windows operating system editions. ● ● ● Windows Server 2003 or 2003 R2 Enterprise, Standard, Web, Small Business Server, Enterprise x64, or Standard x64. Each of the Windows 2003 operating systems require Service Pack 1 or later.
● ● ● ● ● Disk space for data files—This is the amount of disk space on the target to hold all of the source data files. This will be dependent on the applications you are running and the amount of data files you have. Disk space for system state image—This is the amount of disk space on the target to hold the image of the source system state. You should have at least 5 GB of space on the target. The more applications you are running on the source, the larger the system state image will be.
Installation You will need to install and license the Storage Mirroring Data Migration console first. From the console, you will be able to install your Storage Mirroring Data Migration servers. Make sure before installing on your servers, you verify the type of server licensing you will use. The following sections are included in this section.
Installing the Storage Mirroring Data Migration console Install the Storage Mirroring Data Migration console first. From the console, you will be able to install your Storage Mirroring Data Migration servers. You will not be able to install a Storage Mirroring Data Migration server on the Note: same machine where you are running the Storage Mirroring Data Migration console. 1. Close any open applications. 2. Start the installation program using the appropriate instructions, depending on your media source.
6. Select where you want to install Storage Mirroring Data Migration and click Next to continue. 7. Click Install to begin the installation process. 8. After the files have completed copying, click Finish to exit the installation program. The Storage Mirroring Data Migration console installation is complete.
Licensing your console The Storage Mirroring Data Migration console is used to perform Storage Mirroring Data Migration installations on other servers, and it is used as a license manager to manage your Storage Mirroring Data Migration source server licenses. Before you can install Storage Mirroring Data Migration on source servers or before you can manage your source server licenses, you must first license your Storage Mirroring Data Migration console.
4. After you or your reseller have submitted the required information and the Server Information, you will be provided an unlock code via e-mail. Enter that code in the Unlock Code field and click Unlock. Once your console has a valid Unlock Code, you can install on the number of sources assigned to that license. This is listed as the Total migration licenses. The Currently available licenses field identifies the number of migration licenses you have available for use.
Storage Mirroring Data Migration server licensing Storage Mirroring Data Migration has two different licensing strategies. License Purchase Purchase Requirements Requirements for the for the Source Target You must purchase a Storage Storage Mirroring Mirroring Data Data Migration Migration migration migration license for license each source you want to migrate.
License Storage Mirroring license Purchase Purchase Requirements Requirements for the for the Source Target You must purchase a Storage Mirroring license for both the source and target. Server Installation Migration Timeline Console Locking Requirements 1 If Storage Mirroring is not already installed on each server, you can use the Storage Mirroring Data Migration console to install Storage Mirroring Data Migration on each server.
Installing a Storage Mirroring Data Migration server Before you can perform a migration, you must have Storage Mirroring Data Migration installed on both the source and target. You must use the Storage Mirroring Data Migration console to perform Storage Mirroring Data Migration installations on these servers. You can also use the Storage Mirroring Data Migration console to perform Storage Mirroring installations.
available in your Storage Mirroring Data Migration console installation directory before you start your Storage Mirroring Data Migration server installations. a. In your Storage Mirroring Data Migration console installation directory (by default, \Program Files\StorageWorks\Storage Mirroring), look for the i386 and x64 directories. Only one of them will exist depending on the file you downloaded and installed.
push a Storage Mirroring Data Migration license to the source. You must complete the migration before the license expiration date. Your Storage Mirroring Data Migration console must be licensed to install Storage Mirroring Data Migration licenses on source servers. Click the Licensing button to open the console licensing dialog box. For instructions on console licensing, see Licensing your console.
Storage Mirroring Data Migration console The Storage Mirroring Data Migration console is the user interface that manages, monitors, and controls your migration solutions. It is also the license manager for all of your Storage Mirroring Data Migration servers. To open the console, select Start, Programs, Storage Mirroring, Storage Mirroring Data Migration Console. On the left pane of the console are static navigation buttons which initiate workflows and display monitoring pages.
Clearing console security credentials By default, the Storage Mirroring Data Migration console caches security credentials. Also by default, the cache is saved when you close the console, allowing you to reuse the credentials when you reuse the console. This setting is controlled by the Tools, Save credentials cache menu option. When the option is selected with a checkmark, the security credentials cache will be saved.
Server migration When migrating a server, you can migrate a physical or virtual source to an existing physical or virtual target. You can also migrate to a provisioned virtual target, which means Storage Mirroring Data Migration can create the virtual machine for you during the migration process. The following sections are included in this section.
Migrating a source to an existing target Use the following instructions to migrate a source to an existing physical or virtual target. 1. Click Migrate Server from the left navigation pane. 2. Identify the source server that you want to migrate. ● ● ● ● Server—Specify the name of the source server. You can also click Browse to select the name from Active Directory or from a network drill-down list. User name—Specify a user that is a member of the Double-Take Admin security group on the source.
folders, and files that you will be unable to exclude, because they are required for migration. For example, the boot volume cannot be excluded because that is where the system state information is stored. Volumes, folders, and files that are marked with a checkmark are included. If there is no checkmark, the item is excluded. Expand and collapse the directory tree and click on an item to add or remove a checkmark. Once you have configured the data to migrate, click Next to continue.
this for each IP address. If you want to remove an IP address, highlight the address and click Remove. Once you have your DNS updates configured, click Test DNS to determine if your DNS updates will be successful. 10. Click Next to continue. 11. Specify your migration shutdown options. ● ● Wait for user intervention before cutover—Specify if you want to perform a manual or automatic cutover.
user intervention, when the migration mirror is complete, the status will change to Ready for Cutover. Use this time to complete any necessary tasks. When you are ready to complete the migration, click Cutover on the Monitor page toolbar to complete the migration process. Once the target server has been rebooted, it will become the source server. Because the Windows product activation is dependent on hardware, you may need to reactivate your Windows registration after migration.
Migrating a source to a provisioned virtual machine on a VMware ESX target Use the following instructions to migrate a source to a provisioned virtual machine on a VMware ESX target. 1. Click Migrate Server from the left navigation pane. 2. Identify the source server that you want to migrate. ● ● ● ● Server—Specify the name of the source server. You can also click Browse to select the name from Active Directory or from a network drill-down list.
system volumes cannot be excluded because that is where the system state information is stored. For non-boot and non-system volumes, you can exclude them if necessary. Volumes marked with a checkmark are included. If there is no checkmark, the volume is excluded. Click on an item to add or remove a checkmark. Once you have configured the data to migrate, click Next to continue. The Select all and Deselect all buttons allow you to quickly select or deselect all user data on your server.
● ● Password—Specify the password associated with the User name you entered. Domain—If you are working in a domain environment, specify the Domain. 11. Click Next to continue. 12. Configure the new virtual machine. ● ● ● ● VMware Console display name—By default, the source name will be used to create the new virtual machine display name. Map replica virtual network IP to target networks—You will need to identify how you want to handle the network mapping.
configure optional settings, click Configure. Once you have completed your configuration, click Finish to start the migration. 17. Monitor the progress of the migration mirror on the Monitor page. 18. When the migration mirror has completed, the target will automatically reboot to complete the migration process, if you disabled user intervention. If you enabled user intervention, when the migration mirror is complete, the status will change to Ready for Cutover.
Migrating a source to a provisioned virtual machine on a Hyper-V target Use the following instructions to migrate a source to a provisioned virtual machine on a Hyper-V target. 1. Click Migrate Server from the left navigation pane. 2. Identify the source server that you want to migrate. ● ● ● ● Server—Specify the name of the source server. You can also click Browse to select the name from Active Directory or from a network drill-down list.
of your installed applications. There are some volumes that you will be unable to exclude, because they are required for migration. For example, the boot and system volumes cannot be excluded because that is where the system state information is stored. For non-boot and non-system volumes, you can exclude them if necessary. Volumes marked with a checkmark are included. If there is no checkmark, the volume is excluded. Click on an item to add or remove a checkmark.
● ● Wait for user intervention before cutover—Specify if you want to perform a manual or automatic cutover. If you select manual, Storage Mirroring Data Migration will pause the migration process after the source data has been mirrored to the target, which allows you time to coordinate any other tasks. Replication will continue during this time. If you do not wait for user intervention and cutover is automatic, the source will cutover to the target immediately after the mirror is complete.
If your source was disconnected from the network during the cutover process, the original job that was mirroring the data will still be active on that machine. Do not bring that machine back on the network. If you do, the original job will attempt to begin mirroring data again which could result in data loss. While the machine is still disconnected from the network, stop the Storage Mirroring service, delete the file connect.
Migrating data to an existing target Use the following instructions to migrate data from your source to an existing physical or virtual target. 1. Click Migrate Data from the left navigation pane. 2. Identify the source that contains the data that you want to migrate. ● ● ● ● Server—Specify the name of the source server. You can also click Browse to select the name from Active Directory or from a network drill-down list.
The Select all and Deselect all buttons allow you to quickly select or deselect all user data on your server. These buttons do not change the Note: selection of system state data, which is defined by Storage Mirroring Data Migration and cannot be modified manually. 7. Specify the location on the target to store the data from the source. The location you specify must be a full path including the volume. For example, you might enter C: or C:\directory. 8. Click Next to continue. 9.
If your source was disconnected from the network during the cutover process, the original job that was mirroring the data will still be active on that machine. Do not bring that machine back on the network. If you do, the original job will attempt to begin mirroring data again which could result in data loss. While the machine is still disconnected from the Note: network, stop the Storage Mirroring service, delete the file connect.
Monitoring a job Once you have a job established or imported, you can easily monitor the status of the migration from the Monitor page. When viewing the Monitor page, the main window is divided into two sections. The top pane displays overview monitoring information, while the bottom pane displays detailed data. You can hide the details pane by clicking on the Hide details text. You can display the details pane by clicking on the Show details text.
Column Description on the source. If the source appears to have no issues, try refreshing the job credentials through the Update credentials toolbar button. For more details on error messages, review the log file located in the \log subdirectory of your Storage Mirroring Data Migration installation directory. Source The name of your source server is displayed. Target The name of your target server is displayed. When mirroring, this is the estimated time remaining to complete the mirror.
Section Detailed Item Description There are many different status messages that keep you informed of the progress of your jobs. Most of the status messages are informational and do not require any administrator interaction. If you see error messages, check the job details. Job properties Job Status If the Job Status is Communication Error, the issue could be several things such as the source server is unavailable or the client has invalid credentials for the source.
Section Detailed Item Connection Transmit Properties status Connection Target Properties status Description ● Transmitting—The job is transmitting data. ● Stopped—The job is stopped. ● Paused—The job is paused. ● Error—There is a transmission error. ● Processing—The target is processing data. ● Paused—The target is paused. ● Connection Cutover Properties available ● ● Mirror statistics Mirror status Yes—The mirror is complete and the source is ready for cutover.
Detailed Item Section Description ● Replicating—Data is being replicated. ● Pending—Replication is pending. ● Stopped—Replication is stopped. ● Replication statistics Replication status ● ● Out of memory—Kernel memory has been exhausted. Watchdog—The Storage Mirroring service is not receiving replication operations from the Storage Mirroring driver. Unknown—The console is trying or unable to determine the replication status.
Toolbar Icon Tooltip Text Description you want to permanently delete the job, use the Delete job button. Resume The green triangle icon resumes the selected job. Stop The red square icon stops the selected job. The image of the source, at the time the job was stopped, is still available to complete a migration, but the image is no longer being updated with data changes from the source. If you want to use the job again, you must restart it using the Resume button.
Toolbar Icon Tooltip Text Description OK The green circle with the white checkmark icon toggles between displaying and hiding those jobs that are in a good state. The number of jobs in the good state is also displayed on the toolbar button. Warning The yellow triangle with the black exclamation point icon toggles between displaying and hiding those jobs that are in a warning state. The number of jobs in the warning state is also displayed on the toolbar button.
Importing a job You can import existing Storage Mirroring Data Migration jobs into the console using the following instructions. 1. From the Monitor page, select Import jobs on the toolbar. 2. Identify the import server. This is the target server that you are migrating to. ● ● ● ● Server—Specify the name of the target server. You can also click Browse to select the name from Active Directory or from a network drill-down list.
Using compression To help reduce the amount of bandwidth needed to transmit Storage Mirroring Data Migration data, compression allows you to compress data prior to transmitting it across the network. In a WAN environment this provides optimal use of your network resources. If compression is enabled, the data is compressed before it is transmitted from the source. When the target receives the compressed data, it decompresses it and then writes it to disk.
Limiting bandwidth Bandwidth limitations are available to restrict the amount of network bandwidth used for Storage Mirroring Data Migration data transmissions. When a bandwidth limit is specified, Storage Mirroring Data Migration never exceeds that allotted amount. The bandwidth not in use by Storage Mirroring Data Migration is available for all other network traffic. ● ● Do not limit bandwidth—Storage Mirroring Data Migration will transmit data using 100% bandwidth availability.
Routing transmission By default, Storage Mirroring Data Migration will select a default route for transmissions. The default route is the first connection listed in the NIC binding order on the target.
Configuring e-mail notification E-mail notification sends specific Storage Mirroring Data Migration events to userdefined e-mail addresses. If you want to use e-mail notification, you will need to identify who will receive the messages, what messages they will receive, and your e-mail server configuration. ● ● Recipients—Specify the e-mail address that each Storage Mirroring Data Migration e-mail message should be sent to and click Add New. The e-mail address will be inserted into the list of addresses.
Make sure you configure your e-mail client so that the Storage Mirroring Note: Data Migration e-mail notification messages do not get blocked by a spam filter or sent to a junk mail folder.
Using firewalls If your servers are on opposite sides of a NAT or firewall, you will need to configure your hardware to accommodate Storage Mirroring Data Migrationcommunications. You must have the hardware already in place and know how to configure the hardware ports. If you do not, see the reference manual for your hardware. In a NAT or firewall environment, you must have a static mapping where a single, internal IP address is always mapped in a one-to-one correlation to a single, external IP address.
a. Select Start, Programs, Storage Mirroring, Management Console. b. Locate your server in the server tree in the left pane of the Management Console. Note: If your server is not listed, select Insert, Server. Type the machine name or IP address and click OK. c. Right-click the server in the left pane of the Management Console and select Properties. d. On the Network tab, modify the Communications Port to match the IdentificationPort in the configuration files. e. Click OK. f.