
HP StorageWorks Storage Mirroring Data Migration user's guide (T2558-96333, May 2009)

32 of 49
Migrating data to an existing target
Use the following instructions to migrate data from your source to an existing physical or
virtual target.
1. Click Migrate Data from the left navigation pane.
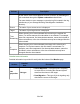
2. Identify the source that contains the data that you want to migrate.
● Server—Specify the name of the source server. You can also click Browse
to select the name from Active Directory or from a network drill-down list.
● User name—Specify a user that is a member of the Double-Take Admin
security group on the source. If your source is the only domain controller in
your network, the account must also be a local account in the local
administrators group.
● Password—Specify the password associated with the User name you
entered.
● Domain—If you are working in a domain environment, specify the Domain.
3. Click Next to continue.
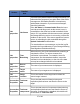
4. Identify the target server. This is the server that, after the migration, will contain the
source data. The target must be an existing physical or virtual server.
● Server—Specify the name of the existing target server. You can also click
Browse to select the name from Active Directory or from a network drill-down
list.
● User name—Specify a user that is a member of the Double-Take Admin
security group on the target. If your source is the only domain controller in
your network, the account must also be a local account in the local
administrators group.
● Password—Specify the password associated with the User name you
entered.
● Domain—If you are working in a domain environment, specify the Domain.
5. Click Next to continue.
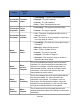
6. By default, Storage Mirroring Data Migration selects all of the data on your source
for migration. It automatically excludes system state information. If desired, you can
exclude other files that you do not want to migrate, but be careful when excluding
data. Excluded volumes, folders, and/or files may compromise the integrity of your
installed applications. Volumes, folders, and files that are marked with a
checkmark are included. If there is no checkmark, the item is excluded. Expand
and collapse the directory tree and click on an item to add or remove a checkmark.
Once you have configured the data to migrate, click Next to continue.