
HP StorageWorks Storage Mirroring user's guide (T2558-96073, February 2008)


12 - 1
12 X Simulating a connection
Simulating a connection
Storage Mirroring offers a simple way for you to simulate a connection in order to generate statistics that can be used to
approximate the time and amount of bandwidth that the connection will use when actively established. This connection uses
the TDU (T
hroughput Diagnostics Utility), which is a built-in null (non-existent) target to simulate a real connection. No data
is actually transmitted across the network. Since there is no true connection, this connection type helps you plan for a disaster
recovery solution.
Gathering system information
Before and after simulating your connection, you may want to gather network and system information specific to Storage
Mirroring operations. Use DTInfo to automatically collect this data. It gathers Storage Mirroring log files; Storage Mirroring
and system registry settings; network configuration information such as IP, WINS, and DNS addresses; and other data which
may be necessary in evaluating Storage Mirroring performance. The utility can be found on product CD or on the HP web site.
1. Copy DTInfo.exe to the source machine where you are going to install Storage Mirroring and run the TDU.
2. Run DTInfo.exe. It may take several mintues for DTInfo to finish processing.
3. After DTInfo is complete, the directory C:\Program Files\StorageWorks\Storage Mirroring\support will
automatically be created containing a .zip file containing the information gathered. The file name is based on the
machine name. To distinguish this file from the next time you run DTInfo, append a unique identifier, perhaps the date
and time, to the end of the file name.
Be sure and run DTInfo before and after your simulation.
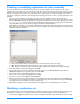
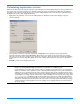
Creating a replication set
Before you can establish a connection, you must create a replication set.
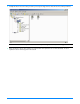
1. Highlight a source in the left pane of the Management Console and select Insert, Replication Set from the menu bar. You
can also right-click on the source name and select
New, Replication Set.
2. A replication set icon appears in the left pane under the source. By default, it is named New Replication Set.
Rename the newly inserted replication set with a unique name by typing over the default name and pressing Enter. This
process is similar to naming a new folder in Windows Explorer.
3. Expand the tree under the replication set name to view the volume and directory tree for the source.
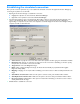
NOTE: The default number of files that are listed in the right pane of the Management Console is 2500, but this is
user configurable. A larger number of file listings allows you to see more files in the Management Console,
but results in a slower display rate. A smaller number of file listings displays faster, but may not show all
files contained in the directory. To change the number of files displayed, select
File, Options and adjust the
File Listings slider bar to the desired number.
To hide offline files, such as those generated by snapshot applications, select
File, Options and disable
Display Offline Files. Offline files and folders are denoted by the arrow over the lower left corner of the
folder or file icon.