
HP StorageWorks Storage Mirroring Enterprise Install Console (T2558-96321, April 2009)


7
Scheduling an installation
You may want to schedule your installations for a more convenient time.
Single server—If you are scheduling an installation for a single server, highlight that server in
the Servers folder and select Action, Schedule Install, or right-click the server and select
Action, Schedule Install.
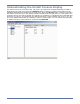
Multiple servers—Highlight the root of the Servers folder and then select the servers you want
to schedule for installation on the right pane of the Install Console. Use the Shift key to select
contiguous servers in the list or use the Ctrl key to select non-contiguous servers in the list. Once
the servers have been selected, right-click in the right pane and select Schedule Install.
All servers—If you are scheduling all of your servers, highlight the root of the Servers folder
and select Action, Schedule Install or right-click the root and select Action, Schedule Install.
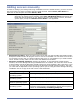
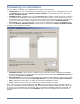
Configure your schedule as desired.
Available Servers—These are the available servers that do not have a scheduled installation
already configured. Move servers back and forth between this list and the Selected Servers list
by using clicking Add and Remove.
Selected Servers—These are the servers that this schedule will be applied to. Move servers back
and forth between this list and the Available Servers list by using clicking Add and Remove.
Date—Specify the date when you want the scheduled installation to start.
Time—Specify the time when you want the scheduled installation to start.
Once you have your schedule configured, click OK to save the settings. When the date and time
arrives, the installation will automatically start as long as the Enterprise Install Console is open. If it
is not open, the installation will be skipped. Once a scheduled installation has been executed, the
schedule task will be removed from the Schedule folder, and the detailed server status will be
updated.