Migration Utility for SQL Server Operations Guide Matrix DataBase Solution Pack for SQL Server™ 3.6.
Copyright © 2007 PolyServe, Inc. Use, reproduction and distribution of this document and the software it describes are subject to the terms of the software license agreement distributed with the product (“License Agreement”). Any use, reproduction, or distribution of this document or the described software not explicitly permitted pursuant to the License Agreement is strictly prohibited unless prior written permission from PolyServe has been received.
Contents 1 HP Technical Support HP Storage Website . . . . . . . . . . . . . . . . . . . . . . . . . . . . . . . . . . . . . . . . . 1 HP NAS Services Website . . . . . . . . . . . . . . . . . . . . . . . . . . . . . . . . . . . . 2 2 Introduction Overview . . . . . . . . . . . . . . . . . . . . . . . . . . . . . . . . . . . . . . . . . . . . . . . . . . How MxMigrate Works. . . . . . . . . . . . . . . . . . . . . . . . . . . . . . . . . . . Migrated Data . . . . . . . . . . . . . . . . . . . . . . . . . .
1 HP Technical Support Telephone numbers for worldwide technical support are listed on the following HP website: http://www.hp.com/support. From this website, select the country of origin. For example, the North American technical support number is 800-633-3600. NOTE: For continuous quality improvement, calls may be recorded or monitored.
Chapter 1: HP Technical Support 2 HP NAS Services Website The HP NAS Services site allows you to choose from convenient HP Care Pack Services packages or implement a custom support solution delivered by HP ProLiant Storage Server specialists and/or our certified service partners. For more information see us at http://www.hp.com/hps/storage/ns_nas.html. Copyright © 1999-2007 PolyServe, Inc. All rights reserved.
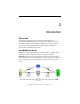
2 Introduction Overview The PolyServe Migration Tool for SQL Server (MxMigrate) is a wizard-based utility designed to move SQL Server databases into the PolyServe Database Utility (MxDB for SQL Server). At the end of the process, the migrated SQL databases will be highly available and manageable via MxDB for SQL Server. How MxMigrate Works MxMigrate is a WinForm application built on .NET 2.0 and SQL Server Management Object (SMO). It consists of a single executable, MxMigrate.
Introduction 4 Migrated Data MxMigrate migrates the following: • User data • SQL logins • Linked/remote servers • SQL jobs • DTS packages (SQL 2000 to SQL 2000 migration only) MxMigrate does not migrate or handle the following: • System databases (for example, master, msdb, tempdb) • SSIS settings and packages • Replications • Log shipping • Fulltext (SQL 2000) • Database mirroring • External dependencies • Reporting Services • Notification Services • Service Broker MxMigrate does not handle auto-close or
Introduction 5 • Microsoft SQL 2005 client redistributables (XMO) Following are additional requirements: • Matrix Server must be installed and running on all nodes in the cluster. • MxDB for SQL Server must be installed on all cluster nodes that might host the SQL Server instance. • The Microsoft SQL Server instance must be installed as described in the MxDB for SQL Server documentation. • If you are not using agents, the source and target servers must have access to the backup directory (share).
Introduction 6 • Migrate to a new matrix. The SQL Server instance on the source node and the Virtual SQL Server on the target node will use the same hostname and IP address. • Migrate to an existing matrix. The SQL Server instance on the source node and the Virtual SQL Server on the target node will use different hostnames and IP addresses.
Introduction 7 10. Apply the SQL securities and logins, the SQL jobs, and the linked/remote server configurations found on the source server to the target server (Pre-Switch Steps window). 11. Apply any third-party applications, tools, and libraries to the target server so that it will match the configuration of the source server. 12. Test applications against the target server in stand-alone mode. 13. Virtualize the SQL Server instance on the target server.
Introduction 8 Migrate to a New Matrix, Using the Same Hostnames/IPs In this scenario, Matrix Server, MxDB for SQL Server, and the SQL Server instance are installed on the target node. The SQL Server instance has not yet been virtualized with MxDB for SQL Server. After the target SQL Server instance is virtualized during the procedure, the Virtual SQL Server will use the same host name and IP as the source SQL Server instance.
Introduction 9 13. Back up the source databases (Backup and Restore Databases window). 14. Restore databases to the target server using NonRecovery (Backup and Restore Databases window). 15. Put the source database in ReadOnly mode. Users will now be accessing the target server for data, not the source server (Pre-Switch Steps window). 16. Shut down the source server. 17. Virtualize the SQL Server instance on the target server.
Introduction 10 7. Create any missing databases on the target server (Validation > New Database window). 8. Back up the source databases (Backup and Restore Databases window). 9. Restore databases to the target server, using the Recovery feature (Backup and Restore Databases window). 10. Apply the SQL securities and logins, SQL jobs, and linked/remote server configurations found on the source server to the target server (Pre-Switch Steps window). 11.
3 Using MxMigrate Install MxMigrate MxMigrate should be installed on either a node in the Matrix Server cluster or another system that has network connectivity to both the source and target SQL Server instance. To install MxMigrate, complete these steps: 1. Locate the MxMigrate.msi file in the directory where you downloaded the product. 2. Double-click the MxMigrate.msi file and run the Installation Wizard. The installation creates an MxMigrate shortcut that can be used to run the utility.
Using MxMigrate 12 Source Login Window The Source Login window asks for the SQL login information needed to connect to the source SQL Server instance. Copyright © 1999-2007 PolyServe, Inc. All rights reserved.
Using MxMigrate 13 SQL Server Instance. Enter a valid SQL 2000 or 2005 instance such as MySQLSource or MySQLSource\Instance1. NOTE: If you are unsure of the instance name, click the (…) button to open the Select SQL Server Instance window, which lists the SQL Server instances available on the network. Highlight the desired instance and click the Select button to return to the main application. If you cannot find the correct instance, enter the instance name manually in the textbox field.
Using MxMigrate 14 Password. Enter the userʹs password, and then re-enter it in the next field. (This value is needed only if SQL Server Integrated Security is selected as the Authentication Method.) Test Connection. Click this button to verify the credentials. This step must be completed before moving to the next step in the migration. Target Login Window On the Target Login window, enter the SQL login information needed to connect to the target SQL Server instance. SQL Server Instance.
Using MxMigrate 15 User Name. Enter the appropriate user name. (This value is needed only if SQL Server Integrated Security is selected as the Authentication Method.) Password. Enter the userʹs password and then re-enter it in the next field. (This value is needed only if SQL Server Integrated Security is selected as the Authentication Method.) Test Connection. Click this button to verify the credentials. This step must be completed before moving to the next step in the migration.
Using MxMigrate 16 Options Window The Options window allows you to set options that affect how the database backup should be carried out. Number of Parallel backups. Enter the number of threads that the system should spawn to perform the backup in parallel. This option is useful when there is more than one database to be backed up. The default value is 1. Use file-based backup. This is the default method for backing up the database(s). Backup to.
Using MxMigrate 17 NOTE: The user running MxMigrate and the user account under which the SQL Server process is running must have read, write, list, create, and delete permission within the folder. This applies to both the source and target server. Remove backup files. Check this item if you want to remove the backup files after a successful restore. Validation Window The Validation window allows you to validate the Source and Target servers before proceeding with the actual database migration.
Using MxMigrate 18 Validation Process In addition to validating access, the validation process can save the results of the validation to a file and can create any missing databases on the target server. Save Info. Click Save Info to save the results of the validation to a file. Copyright © 1999-2007 PolyServe, Inc. All rights reserved.
Using MxMigrate 19 Start Validation. Click Start Validation to start the validation process. This process can be run as many times as desired. Create DB. If a database is missing on the target server, use this option to create the database shell on that server using the same database size and ANSI options as the source server. (No data is transferred.) Scroll down the validation report, select the missing database, and then click Create DB.
Using MxMigrate 20 Backup and Restore Databases Window This window is used to back up the source databases and restore them on the target server. Start Backup. Click this button to start backing up the source SQL Server database to a shared folder. Start Restore. When the backup is complete, click Start Restore to begin restoring the database to the target server. Restore with RECOVERY on Target server.
Using MxMigrate 21 Pre-Switch Steps Window The pre-switch steps include creating linked servers on the target server, transferring SQL logins and SQL jobs from the source server to the target server, and setting the source database to read-only. Check the steps that you want to perform. Create remote/linked server on Target server. This box is checked by default. Create SQL logins/securities on Target server. Check the box to transfer SQL logins from the source server to the target server.
Using MxMigrate 22 Create SQL jobs on Target server. Check the box to transfer SQL jobs from the source server to the target server. This box is checked by default. Set Source DBs to read_only mode and terminate all user connections. Check the box to set the source database to read-only. Use this option only if you no longer want users to write to the source database. This option is valid for production migration. This box is unchecked by default.
Using MxMigrate 23 Start Log Restore. Begin restoring the log to the target server. NOTE: This step utilizes regular log backup, which could invalidate your existing SQL 2000 backup strategy/schedule. On SQL 2005, the COPY_ONLY flag is used to ensure that your backup strategy is intact. See SQL Book Online for details. DTS (for SQL 2000 Only) Window The DTS window can be used to transfer SQL 2000 DTS packages from the source server to the target server.
Using MxMigrate 24 Post-Switch Steps Window Use this window to connect to the target SQL Server and re-sync SQL IDs for the migrated databases. Click Start to begin the operation. Finished Window This window appears when the migration is complete. It shows the migration status log, which you can save to a file for future reference. Click Save Info to save the status log. Copyright © 1999-2007 PolyServe, Inc. All rights reserved.
Using MxMigrate 25 The MxMigrate utility also maintains a debug log called MxMigrate.log that can be used for debugging purposes. The log is in the same directory as the MxMigrate.exe file. Copyright © 1999-2007 PolyServe, Inc. All rights reserved.