
HP StorageWorks Replacing an HSG60 and HSG80 Cache Module Installation Instructions (EK-80CAH-IM. F01, March 2005)


Page 3
d. Remove the cache module from the
enclosure.
e. Place the cache module on a grounded
antistatic mat or in an antistatic bag.
Note: The DIMMs must be removed for installation in the
replacement cache module.
8. Note the location for each DIMM in the cache module
that is being replaced, and then install the DIMMs in the
corresponding locations in the replacement cache
module. Use the following substeps to remove the
DIMMs:
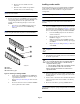
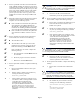
a. Press down on the DIMM retaining clips (see
Figure 3) at both ends of the DIMM being
removed.
Note: To facilitate pressing down on the DIMM retaining clips,
consider using the eraser end of a pencil or a small screwdriver.
Figure 3: Removing or installing a DIMM
b. Gently remove the DIMM from the DIMM slot,
and then place the DIMM on an antistatic bag or
a grounded antistatic mat.
c. Repeat substep 8a and substep 8b above for each
DIMM.
d. Proceed to the next section to install the DIMMs
in the replacement cache module.
Installing a cache module
Perform the following steps to install an HSG60 and HSG80
cache module in an HSG60 and HSG80 subsystem. These
instructions are for cache modules in a single-controller
configuration.
Tip: When replacing DIMMs, see Figure 3.
Note: The replacement cache modules
must
contain the same
memory configuration as that of the cache module which was
removed.
1. Insert each DIMM straight into the appropriate slot of
the replacement cache module (see Figure 3), ensuring
that the notches in the DIMM align with the tabs in the
slot. Use the following substeps to install the DIMMs:
a. Press the DIMM gently into the slot until it is
seated at both ends.
b. Ensure that the two retaining clips for the
DIMM are engaged.
c. Make sure both ends of the DIMM are firmly
seated in the slot and both retaining clips engage
the DIMM.
d. Repeat substep 1a through substep 1c above for
each DIMM.
Caution: Misaligning the module can damage the
backplane.
2. Carefully align and partially insert the cache module in
the Cache A guide rails.
Caution: If your cache module is in a BA370 enclosure,
you must disable the ECB. Failure to disable the ECB can
result in cache module damage. To disable the ECB,
complete the following steps:
1. Press the battery disable switch on the battery module.
2. Connect the ECB Y-cable to the cache module.
Refer to other ECB documentation for additional and
specific ECB details.
3. Insert the replacement cache module completely into
the appropriate bay, and then engage the cache module
retaining levers.
4. Connect a PC or terminal to the controller maintenance
port for the replacement cache module, if not already
connected.
5. Restart the controller by pressing the Reset button.
Note: A controller restart can take as long as 60 seconds,
indicated by the temporary cycling of the port LEDs and a flashing
Reset button.
1 DIMM
2 DIMM slot
3 DIMM retaining clips
CXO6577B
1
2
3