
HP StorageWorks Replacing an HSG60 and HSG80 Cache Module Installation Instructions (EK-80CAH-IM. F01, March 2005)


Page 5
Caution: Early removal of the cache module can result in a
controller crash. To prevent this, wait for
FRUTIL
to instruct
you to remove the cache module.
FRUTIL
will display the
following message when it is ready for you to remove the
cache module:
Remove the slot x cache module within 2
minutes.
g. Enter 3 for the Other cache module option.
h. Enter Y(es) to confirm the intent to remove the
slot x cache module.
FRUTIL quiesces all device ports, indicates a
2-minute limit to remove the cache module, and
then begins counting down the time in
10-second intervals.
Caution: Wait for
FRUTIL
to quiesce the device
ports—indicated by an All device ports
quiesced message. Failure to allow the ports to
quiesce can result in data loss. Quiescing can take
several minutes.
Note: A countdown timer allows you a total of 2 minutes to remove
the cache module. After 2 minutes, “this controller” exits
FRUTIL,
restarts the "other controller,” and then resumes operations. If this
happens, perform the following steps:
1. Connect the PC or terminal to the "other controller."
2. Shut down the "other controller" by issuing the command:
SHUTDOWN THIS_CONTROLLER
3. Disconnect the PC or terminal, and then reconnect it to the
operational controller.
4. Return to step d on page 4, and then proceed.
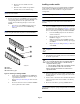
3. For the cache module to be replaced, complete one of
the following two options after the message, Remove
the slot x cache module within 2
minutes, is displayed:
■ For StorageWorks Model 2100 and 2200
enclosures, disengage both retaining levers, and
then remove the “other controller” cache module.
■ For all other supported enclosures:
a. Disengage both retaining levers, and then
partially remove the “other controller” cache
module—about halfway.
Caution: You must disable the ECB before disconnecting
the ECB Y-cable from the cache module. (If the ECB status
light is off, this indicates that the ECB is disabled.) Failure to
disable the ECB can result in cache module damage.
b. Disable the ECB by pressing the battery
disable switch until the status light stops
flashing. This should take approximately
5 seconds.
c. Disconnect the ECB Y-cable from the “other
controller” cache module.
d. Remove the cache module from the
enclosure.
4. For the operational controller, observe that FRUTIL
restarts I/O ports, disables writeback caching and
mirrored writes, indicates that the mirrored cache is
disabled, and then terminates.
5. Enter N(o) to the question for a replacement cache
module.
FRUTIL exits.
6. For the operational controller, place the cache module
on an antistatic bag or a grounded antistatic mat.
7. For the cache module to be replaced, note the location
for each DIMM in the cache module that was
replaced, and remove them. Use the following
substeps to remove the DIMMs:
Note: The DIMMs must be removed for installation in the
replacement cache module.
a. Press down on the DIMM retaining clips at both
ends of the DIMM being removed.
b. Gently remove the DIMM from the DIMM slot,
and then place the DIMM on an antistatic bag or
a grounded antistatic mat.
c. Repeat step a and step b above for each DIMM.
Installing a cache module
Perform the following steps to install an HSG60 and HSG80
cache module in an HSG60 and HSG80 subsystem. These
instructions are for cache modules in a dual-redundant
controller configuration.
Caution: ESD can easily damage a cache module or a
DIMM. Wear a snug-fitting, grounded ESD wrist strap.
Note: The replacement cache module
must
contain the same cache
memory configuration as the module being replaced.
Note: If you are installing a cache module after resolving a failed
cache state, refer to the
HP StorageWorks HSG60 and HSG80
Array Controller and Array Controller Software Maintenance and
Service Guide
.