
HP StorageWorks Replacing an HSG60 and HSG80 External Cache Battery (ECB) Installation Instructions (EK-80ECB-IM. F01, March 2005)


Page 3
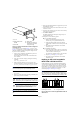
Figure 4: Cache module locations in an HP StorageWorks Model
2100 and 2200 enclosure
Note: If you are replacing an ECB (see Figure 5), match the vacant
ECB bay with the supported cache module. This bay is always next
to the failed ECB.
Figure 5: Removing an ECB that supports cache module B in an
HP StorageWorks Model 2100 and 2200 enclosure
Use the following steps and Figure 3, Figure 4 and Figure 5, as
appropriate, to replace an ECB in single-controller and
dual-redundant controller configurations using the Field
Replacement Utility (FRUTIL):
1. Connect a PC or terminal to the maintenance port of the
controller that has the defective ECB.
The controller connected to the PC or terminal becomes
“this controller.”
2. Enter the following command to verify that system time is
set:
SHOW THIS_CONTROLLER FULL
3. If system time is not set or current, enter current data using
the following command:
SET THIS_CONTROLLER TIME=dd-mm-yyyy:hh:mm:ss
Note: An internal clock monitors the life of the ECB battery. This
clock is automatically reset as part of the
FRUTIL
procedure.
4. Start FRUTIL with the following command:
RUN FRUTIL
5. Follow on-screen instructions to replace the ECB.
Caution:
Do not
remove the old ECB until the ECB charged
LED on the replacement ECB turns on (see Figure 7, on
page 4).
Caution: Make sure to install the replacement ECB in a
bay that supports the same cache module as the current
ECB being removed (see Figure 3).
Remove the blank bezel from this replacement bay and
reinstall the blank bezel in the bay vacated by the current
ECB. Failure to reinstall the blank bezel might cause an
over-temperature condition and damage the enclosure.
Note: Install a Battery Service Label on the replacement ECB prior
to installing the ECB in the enclosure. This label indicates the
installation date (MM/YY) for the replacement ECB.
6. Attach the Battery Service Label to the replacement ECB
as described by the HP StorageWorks ECB Battery Service
Label Placement installation instructions.
7. Remove the blank bezel from the appropriate bay, and then
install the replacement ECB.
8. Remove the old ECB, and then install the blank bezel in
this bay.
9. Press Enter or Return.
Note: The ECB expiration date and deep discharge history are
updated.
FRUTIL
exits.
10. Disconnect the PC terminal from the controller
maintenance port.
11. Repeat this entire procedure to replace the ECB for the
“other controller.”
Replacing an ECB in HP StorageWorks Model
2100 and 2200 enclosures using hot-pluggable
procedure
For a hot-pluggable ECB replacement, use the procedure in
this section.
Note: The hot-pluggable procedure (used in the HSG60 and
HSG80 controller sections) uses
FRUTIL
to update the ECB
expiration date and deep discharge history.
The hot-pluggable procedure in this section is used to replace the
ECB only and is not used to update ECB history data.
Use the following procedure to replace an ECB as a
hot-pluggable device:
1. Using Figure 3 on page 2, determine the specific bay to
install the ECB.
Note: Ensure that the bay supports the same cache module (A or
B) as the ECB being removed.
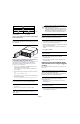
2. Press the release tab and pivot the lever downward on the
replacement ECB (see Figure 6).
1 Controller A
2 Controller B
3 Cache A
4 Cache B
CXO5608B
1
2
3
4
CXO6922B