
HP StorageWorks Replacing DIMMs in HSG60 and HSG80 Cache Modules Installation Instructions (EK-80DIM-IM. E01, March 2005)

Page 4
6. Carefully align the cache module in the appropriate guide
rails.
Caution: Misalignment can damage the backplane.
7. Insert the cache module into the appropriate bay and
engage the retaining levers.
Note: For HP StorageWorks Model 2100 and 2200 enclosures,
omit step 8 and step 9. The ECB does not contain switches or use
ECB Y-cables.
Caution: You must disable the ECB before disconnecting
the ECB Y-cable from the cache module. Failure to disable
the ECB can damage the cache module.
8. If not already done, disable the ECB by pressing the battery
disable switch for approximately 5 seconds.
9. Connect the ECB Y-cable to the cache module.
10. If not already connected, connect a PC or terminal to the
controller maintenance port.
11. Restart the controller by pressing the Reset button.
Note: A controller restart can take as long as 60 seconds,
indicated by the temporary cycling of the port LEDs and a flashing
Reset button.
Note: If the controller did not restart, use the following steps:
a. Press and hold the controller Reset button.
b. Reseat the controller program card.
c. Release the Reset button.
12. From the CLI prompt, display details about the configured
controller using the following command:
SHOW THIS_CONTROLLER FULL
13. Set the date and time by using the following command, if
necessary:
SET THIS_CONTROLLER TIME=dd-mm-yyyy:hh:mm:ss
14. Mount the logical units on the host.
15. For Windows 2000 or Windows NT platform users, restart
the server.
16. Disconnect the PC or terminal from the controller
maintenance port.
Replacing an HSG60 and HSG80 DIMM
in dual-redundant controller
configurations
Use the steps in “Removing DIMMs” and “Installing DIMMs”
to replace DIMMS in a cache module:
Caution: Static electricity can easily damage a cache
module or a DIMM. Wear a snug-fitting, grounded
electrostatic discharge (ESD) wrist strap.
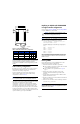
Note: If a DIMM fails, note which DIMM needs replacement based
on the diagram displayed on the console. ACS displays the
following CLI messages if a DIMM failure is detected:
1. %CER--DebugTop> --18-MAY-2005 10:50:47--
Cache module DIMM 2 failed
2. %EVL--DebugTop> --18-MAY-2005 10:50:58--
Instance Code: 02623801 (not yet reported to
host)
DIMM Instance Code
DIMM-1 = 02613801
DIMM-2 = 02623801
DIMM-3 = 02633801
DIMM-4 = 02643801
Refer to
HP StorageWorks HSG60 and HSG80 Array Controller
and Array Controller Software Troubleshooting Guide
for cache
policies information that to determine which cache module and
DIMM are at fault.
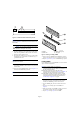
Removing DIMMs
Use the following steps to remove DIMMs from a cache
module in dual-redundant configurations:
1. Connect a PC or terminal to the maintenance port of the
operational controller.
The controller connected to the PC or terminal becomes
“this controller,” and the controller for the cache module
being removed becomes the “other controller.”
2. Disable failover, and then take the controllers out of the
dual-redundant configuration with one of the following
commands:
SET NOFAILOVER
or
SET NOMULTIBUS_FAILOVER
3. Start the Field Replacement Utility (FRUTIL) with the
following command:
RUN FRUTIL
4. Enter N(o) to the question about replacing the cache
battery.
5. Enter 1 to replace or remove a controller or cache module.
6. Enter 3 to replace or remove the “other controller” cache
module.
7. Enter Y(es) to confirm the intent to remove the “other
controller” cache module.
8. Wait for FRUTIL to quiesce the device ports—indicated by
an “All device ports quiesced” message.