
HP StorageWorks Replacing DIMMs in HSG60 and HSG80 Cache Modules Installation Instructions (EK-80DIM-IM. E01, March 2005)

Page 5
Caution: Failure to allow the ports to quiesce can
result in data loss. Quiescing can take several
minutes.
The ECB must be disabled before disconnecting the ECB
cable from the cache module. Failure to disable the ECB
might result in cache module damage.
Note: A countdown timer allows a total of 2 minutes to remove the
cache module. After 2 minutes, “this controller” exits
FRUTIL
and
resumes operations. If this happens, return to step 3 on page 4 and
proceed.
9. For HP StorageWorks Model 2100 and 2200 enclosures,
disengage both retaining levers and remove the “other
controller” cache module.
10. For all other supported enclosures:
a. Disengage both retaining levers and partially remove
the “other controller” cache module—about halfway.
Caution: You must disable the ECB before disconnecting
the ECB Y-cable from the cache module. Failure to disable
the ECB might damage the cache module.
b. Disable the ECB by pressing in the battery disable
switch while removing the ECB Y-cable from the cache
module.
c. Release the battery disable switch.
d. Disconnect the ECB cable from the “other controller”
cache module.
e. Remove the cache module from the enclosure.
11. Place the cache module on an antistatic bag or a grounded
antistatic mat.
12. Enter N(o) to the question for a replacement cache module.
FRUTIL exits.
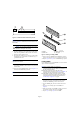
13. Press down on the DIMM retaining clips at both ends of the
DIMM being removed (see Figure 5
on page 3).
Note: To facilitate pressing down on the DIMM retaining clips, use
the eraser end of a pencil or a small screwdriver.
14. Gently remove the DIMM from the DIMM slot, and then
place it in an antistatic bag or on a grounded antistatic mat.
15. Repeat step 13 and step 14 for each DIMM being replaced.
Installing DIMMs
Use the following steps to install DIMMs in a cache module in
dual-redundant configurations:
Note: Before installing DIMMs, note the following:
■ New cache modules arrive without DIMMs installed; the DIMMs
are packaged separately. Unpack the DIMMs and install them
into the cache module as required.
■ Both cache modules
must
contain the same memory
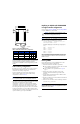
configuration for the ACS version. See Figure 3 and Table 1 on
page 2 for valid cache module memory configurations.
■ Some HSG80 controller configurations require a 512-MB
cache memory configuration. Make sure the cache memory
configuration meets or exceeds the ACS requirement. See
“Cache memory configuration” on page 2.
1. Insert each DIMM (see Figure 5 on page 3) straight into the
appropriate slot of the cache module, ensuring that the
notches in the DIMM align with the tabs in the slot.
2. Press the DIMM gently into the slot until seated at both
ends.
3. Engage the two retaining clips for the DIMM (see Figure 5
on page 3).
4. Make sure both ends of the DIMM are firmly seated in the
slot and both retaining clips engage the DIMM.
5. Repeat step 1 through step 4 for each DIMM.
6. If not already connected, connect a PC or terminal to the
operational controller.
The controller connected to the PC or terminal becomes
“this controller,” and the controller for the cache module
being installed becomes the “other controller.”
7. Start FRUTIL with the following command:
RUN FRUTIL
8. Enter N(o) to the question about replacing the cache
battery.
9. Enter 2 for the install a controller or cache module option.
10. Enter 3 for the install the “other controller” cache module
option.
11. Enter Y(es) to confirm the intent to install the “other
controller” cache module.
12. Wait for FRUTIL to quiesce the device ports—indicated by
an “All device ports quiesced” message.
Caution: Failure to allow the ports to quiesce can result in
data loss. Quiescing can take several minutes.
You must disable the ECB before connecting the ECB cable
to the cache module. Failure to disable the ECB might
damage the cache module.
Carefully align the cache module in the appropriate guide
rails. Misalignment might damage the backplane.
Note: A countdown timer allows a total of 2 minutes to install the
cache module. After 2 minutes, “this controller” exits
FRUTIL
and
resumes operations. If this happens, return to step 7 and proceed.