
HP StorageWorks Replacing an HSG60 and HSG80 External Cache Battery (ECB) Installation Instructions (EK-80ECB-IM. F01, March 2005)

Page 2
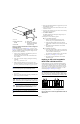
Figure 2: Dual ECB for dual-redundant controller configurations
in a BA370 enclosure
Use the following steps including Figure 1 (on page 1) and
Figure 2, as appropriate, to replace an ECB in single-controller
and dual-redundant controller configurations using the Field
Replacement Utility (FRUTIL):
1. Connect a PC or terminal to the maintenance port of the
controller with the defective ECB.
The controller connected to the PC or terminal becomes
“this controller.”
2. Verify the system time setting by entering the following
command:
SHOW THIS_CONTROLLER FULL
3. If the system date and time is not set or current, enter
current date and time by entering the following command:
SET THIS_CONTROLLER TIME=dd-mm-yyyy:hh:mm:ss
Note: An internal clock monitors the life of the ECB battery. This
clock is automatically reset as part of the
FRUTIL
procedure.
4. Start FRUTIL with the following command:
RUN FRUTIL
5. Follow on-screen instructions concerning availability and
replacement questions for the ECB.
Caution: Ensure that at least one ECB is connected to the
ECB Y-cable at all times during this procedure. Otherwise,
cache memory data is not protected and is subject to loss.
Caution: The ECB Y-cable has a 12-volt and a 5-volt pin.
Improper handling or misalignment while connecting or
disconnecting the ECB can cause these pins to contact
ground, resulting in cache module damage.
Note: If an empty bay is not available, temporarily place the
replacement ECB on top of the enclosure or at the bottom of the
rack.
6. Insert the replacement ECB into an appropriate bay or near
the ECB being removed.
7. Connect the new battery to the unused end of the Y-cable
attached to cache A.
8. Disconnect the old battery. Do not wait for the new battery
status light to turn solid green.
9. Press Enter or Return.
The ECB expiration date and deep discharge history are
updated. FRUTIL exits.
10. Complete one of the following options:
■ For single ECB replacement:
1) Remove the old ECB, and then place it in an
antistatic bag or on a grounded antistatic mat.
2) If the replacement ECB is not placed within an
available bay, install it into the vacant bay of the old
ECB.
3) Disconnect the PC terminal from the controller
maintenance port.
■ For dual ECB replacement:
1) If the other cache module is also to be connected to
the new dual ECB, connect the PC or terminal to the
“other controller” maintenance port.
The connected controller becomes “this controller.”
2) Repeat step 2 through step 9 as required.
3) Disconnect the PC terminal from the controller
maintenance port.
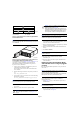
Replacing an ECB in HP StorageWorks
Model 2100 and 2200 enclosures
Unlike the BA370 enclosure, the HP StorageWorks Model
2100 and 2200 controller enclosures use a type of ECBs that
does not require an ECB Y-cable. These enclosures contain
four ECB bays: two bays support Cache A (bays A1 and A2)
and two bays support Cache B (bays B1 and B2)—see this
relationship in Figure 3 and Figure 4 on page 3.
Note: No more than two ECBs are supported within an HP
StorageWorks Model 2100 or 2200 controller enclosure at any
time—one for each array controller and cache set. Blanks must be
installed in the remaining vacant ECB bays for controlling air flow.
.
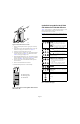
Figure 3: ECB locations in an HP StorageWorks Model 2100 and
2200 enclosure
1 Battery disable switch
(shutoff)
2 Status LED
3 ECB Y-cable
4 Faceplate and controls for
second battery (dual ECB
configuration only)
CXO5713B
C
A
C
H
E
P
O
W
E
R
STATUS
S
H
U
T
O
F
F
C
A
C
H
E
P
O
W
E
R
STATUS
S
H
U
T
O
F
F
1
2
3
4
1 B1 supports cache B
2 B2 supports cache B
3 A2 supports cache A
4 A1 supports cache A
CXO6864A
1 2 3 4