
HP StorageWorks LUN Configuration and Security Manager XP user guide for the XP10000/XP12000 (December 2005)


52 Volume Management for the XP10000/XP12000
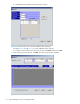
Creating a LUSE volume using the Select an LDEV list
CAUTION: Creating a LUSE volume destroys existing data. To protect your data, make a backup copy of
the existing data before starting the LUSE creation operation.
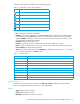
1. In the Volume Management pane, select a CU number in the LDEV Information tree.
2. In the Select an LDEV list, select a top LDEV of the LUSE volume. The Expanded LDEVs list displays the
selected volume. The Free LDEVs table displays normal LDEVs, allocated LDEVs, VSC volumes, and
LUSE volumes that can be used for a LUSE volume.
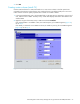
• To add LDEVs to the Expanded LDEVs list, select one or more LDEVs in the Free LDEVs table and
click Add. The selected LDEVs are added to the Expanded LDEVs list and deleted from the Free
LDEVs table.
• To delete LDEVs from the Expanded LDEVs list, select one or more LDEVs in the Expanded LDEVs list
and click Delete. The selected LDEVs are deleted from the Expanded LDEVs list and displayed in the
Free LDEVs table.
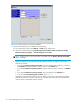
3. Click Set. A confirmation message appears.
4. To perform a LUSE operation on a volume that has a path definition, click OK. If a message appears
asking if you want to perform a LUSE operation that will affect more than one SLPR or CLPR, go to
step 5. Otherwise, go to step 6.
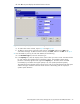
5. To perform a LUSE operation that will affect more than one SLPR or CLPR, click OK. A confirmation
message appears.
6. Click OK. The changes are shown in blue in the LDEV Information table.
7. Click Apply. A confirmation message appears.
8. Click OK. The LUSE settings are registered with the disk array. A dialog box appears when the
requested action is complete.
9. Click OK.
Creating a LUSE volume using the LDEV information table
CAUTION: Creating a LUSE volume destroys existing data. To protect your data, make a backup copy of
the existing data before starting the LUSE creation operation.
1. In the Volume Management pane, select a CU number in the LDEV Information tree.
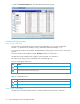
2. In the LDEV Information table, select the normal LDEVs, VSC volumes, or LUSE volumes. Right-click the
selection and select Set LUSE Volume.
a. To perform a LUSE operation on a volume that has a path definition, click OK. If a message
appears asking if you want to perform a LUSE operation that will affect more than one SLPR or
CLPR, go to step 2. Otherwise, go to step 3.
b. To perform a LUSE operation on a volume that will affect more than one SLPR or CLPR, click OK. A
confirmation message appears.
3. Verify the information in the dialog box and click OK. The LUSE creation starts. The changes are shown
in blue in the LDEV Information table.
4. Click Apply. A confirmation message appears.
5. Click OK. The LUSE setting is registered. A dialog box appears when the requested action is complete.
6. Click OK.
Releasing a LUSE volume
CAUTION: This operation destroys data. To protect data, be sure to make a backup copy before starting
the LUSE releasing operation.