HP StorageWorks P9000 Performance Advisor Software Installation Guide This document describes how to install and configure the HP StorageWorks P9000 Performance Advisor Software (P9000 Performance Advisor). This document is intended for users and HP service providers who have knowledge of the HP StorageWorks XP and P9000 disk arrays hardware, software, and storage systems. For the latest release information on this product, see the HP StorageWorks P9000 Performance Advisor Software Release Notes.
Legal and notice information © Copyright 2002 - 2011-NaN Hewlett-Packard Development Company, L.P. Confidential computer software. Valid license from HP required for possession, use or copying. Consistent with FAR 12.211 and 12.212, Commercial Computer Software, Computer Software Documentation, and Technical Data for Commercial Items are licensed to the U.S. Government under vendor's standard commercial license. The information contained herein is subject to change without notice.
Contents 1 Overview of P9000 Performance Advisor .............................................. 9 P9000 Performance Advisor resources ........................................................................................... 9 Installation work flow ................................................................................................................. 12 Upgrade work flow ...................................................................................................................
Selecting components to install (custom installation) ................................................................ Completing the P9000 Performance Advisor installation and next steps ........................................... P9000 Performance Advisor post-installation steps .................................................................. Confirming the P9000 Performance Advisor services ...............................................................
9 Modifying or repairing P9000 Performance Advisor ........................... 117 10 Removing P9000 Performance Advisor ........................................... 121 Removing the P9000 Performance Advisor host agent .................................................................. 121 Removing the P9000 Performance Advisor management station .................................................... 123 Post removal instructions .................................................................................
Installing a Loopback Adapter on Windows Vista ................................................................. 158 Removing a Loopback Adapter ................................................................................................. 159 B Starting, stopping, and restarting Windows and UNIX host agent services ........................................................................................... 161 Glossary .....................................................................................
Figures 1 P9000 Performance Advisor setup ............................................................................. 10 2 P9000 Performance Advisor installation work flow ...................................................... 12 3 P9000 Performance Advisor upgrade work flow ......................................................... 14 4 Sample xpinfo -i output for Windows host agent ......................................................... 42 5 Sample xpinfo -i output for UNIX host agent .................
Tables 1 P9000 Performance Advisor utilities .......................................................................... 13 2 HP StorageWorks P9000 Performance Advisor and host agents installation checklist ........ 16 3 Large XP and P9000 disk array configurations ............................................................ 21 4 LDAP server connection settings ................................................................................ 51 5 LDAP server User Search and Filter, and Group settings ........
1 Overview of P9000 Performance Advisor The HP StorageWorks P9000 Performance Advisor Software (P9000 Performance Advisor) is a web-based application that collects, monitors, and displays the performance of your XP and P9000 disk arrays.
Figure 1 P9000 Performance Advisor setup . Additionally, the P9000 Performance Advisor also provides P9000Watch, P9000Sketch, and P9000Info. For a brief description of these tools, see Table 1 on page 13. IMPORTANT: The P9000Watch, P9000Sketch, and P9000Info were called XPWatch, XPSketch, and XPInfo in the pre-5.0 versions. Installation work flow In a typical installation, you need to install P9000 Performance Advisor on the management station followed by the host agents on the respective hosts.
“Installation work flow” on page 12 illustrates the P9000 Performance Advisor installation work flow.
Figure 2 P9000 Performance Advisor installation work flow . In “Installation work flow” on page 12, the CLUI, P9000Watch, P9000Sketch, and P9000Info are additional utilities provided with P9000 Performance Advisor. Table 1 on page 13 provides a brief description of these utilities. The HP StorageWorks P9000 Performance Advisor Software Installation Guide covers only the end-to-end installation or upgrade of the P9000 Performance Advisor, and host agents.
IMPORTANT: The CLUI, P9000Watch, P9000Sketch, and P9000Info are available in the Tools folder on the P9000 Performance Advisor Installation disk 2. Table 1 P9000 Performance Advisor utilities P9000 Performance Advisor tools P9000Watch Description P9000Watch is a command-line utility provided with P9000 Performance Advisor. It is designed for focused troubleshooting and can capture data as frequently as every 10 seconds.
7. 8. 9. Complete the prerequisites to upgrade the P9000 Performance Advisor host agents. Upgrade the P9000 Performance Advisor host agents on the respective hosts. Verify that the P9000 Performance Advisor host agent services have started and you are able to view host agent details in the P9000 Performance Advisor GUI. 10. Verify that you are able to perform configuration and performance data collections using the upgraded version of P9000 Performance Advisor.
2 Understanding the P9000 Performance Advisor installation prerequisites This chapter describes the prerequisites to install the P9000 Performance Advisor software and the host agents, and explains the installation checklist. For more information, see Table 2 on page 16. To upgrade an existing version of P9000 Performance Advisor, see Table 8 on page 100.
Sections in the HP StorageWorks P9000 Performance Advisor and Host Agents Installation Checklist The prerequisites and tasks provided in the installation checklist are organized as follows: • Before installing P9000 Performance Advisor: This section lists the tasks and prerequisites you must complete before starting the P9000 Performance Advisor installation process on your management station.
Verify if the JRE v5.0 Update 18 (minimum) or later is installed (JRE v6.0 Update 18 is the maximum supported), and if the JAVA path is pointing to the installed location on your management station. For more information, see the Software section in “Verifying the supported configurations for P9000 Performance Advisor” on page 24. Get the fully-qualified domain name or IP address of your management station.
Installing P9000 Performance Advisor Install P9000 Performance Advisor on your management station. At this point, return to the P9000 Performance Advisor Installation Wizard Welcome window to proceed with the installation. For more information, see “Installing the P9000 Performance Advisor” on page 43. IMPORTANT: After installing P9000 Performance Advisor, return to this checklist to complete the remaining prerequisites and tasks for downloading and installing the P9000 Performance Advisor host agents.
Installing the P9000 Performance Advisor host agents Install the P9000 Performance Advisor host agents. At this point, return to the respective P9000 Performance Advisor host agents installation procedures for the host agents you want to install. For more information, see “Installing P9000 Performance Advisor host agents” on page 71.
After you complete the prerequisites, perform the P9000 Performance Advisor management station prerequisites. For more information, see “Management station prerequisites” on page 24. Designing the infrastructure This complete section needs to be reviewed for the new array, P9000. The following procedure helps you to estimate the number of management stations, hosts, XP and the P9000 disk arrays that are required: 1.
1. Check the supported configuration for the management station and the host agent. For more information, see “Verifying the supported configurations for P9000 Performance Advisor” on page 24 and “Verifying the supported configurations for P9000 Performance Advisor host agents” on page 34. 2. Increase the management station and the host agent configuration based on the number of LDEVs you require and the collection frequencies you want to set.
• SECONDS_PER_DAY = 86400 The consolidated free space that is available for P9000 Performance Advisor is the total sum of the free space available on all the XP and the P9000 disk arrays monitored by P9000 Performance Advisor. Example 1. Determining the disk space requirements for P9000 Performance Advisor Consider that the P9000 and the XP disk arrays, P9500 and XP24000 are monitored by the P9000 Performance Advisor management station.
first collection occurs immediately and the next collection is 15 minutes later, which is at 10:27 a.m., and subsequent collections every 15 minutes after that. The Stagger schedule ensures that the load on Performance Advisor at any point in time is balanced because data collection occurs for all the XP and the P9000 disk arrays not every 15 minutes of the hour, but at varied points of time in the day.
• P9000 Performance Advisor + HP Storage Essentials • Any other configuration that is not mentioned in the preceding ‘Supported coexistence configurations’ list For optimal performance, HP recommends that you install P9000 Performance Advisor as a standalone product. For more information on the supported versions, see the P9000 Performance Advisor streams document available at http://h20272.www2.hp.com/Pages/spock2Html.aspx?htmlFile= sw_array_xp.html.
• VGA graphics display with 256 colors (21-inch SVGA graphics display with 32-bit graphics interface is recommended) NOTE: P9000 Performance Advisor installation is also supported on the Quad-core servers. Software Your management station must meet the following software requirements: • Windows operating system compatible with P9000 Performance Advisor. • Microsoft .NET Framework v2.0 or later. If the installation wizard detects that the Microsoft .NET Framework v2.
Web browser P9000 Performance Advisor is supported on Microsoft Internet Explorer only. For the list of supported IE versions, see the HP StorageWorks P9000 Performance Advisor Software OS Support Matrix. For document download location, see “Related documentation” on page 152. NOTE: • You can access P9000 Performance Advisor locally on your management station or remotely from another system. • Configure your IE browser to allow pop-ups, so that P9000 Performance Advisor functions properly.
authentication method you select. The following types of authentication are supported by P9000 Performance Advisor: • • • • • P9000 Performance Advisor Native Authentication Windows System Authentication Windows Domain based Authentication LDAP Authentication RADIUS Server Authentication NOTE: • To implement the Windows System Authentication or Windows Domain based Authentication on your management station, ensure that your management station is part of a domain.
LDAP Authentication The LDAP Authentication is required if you want to implement the Lightweight Directory Access Protocol (LDAP) for centralized authentication, where the LDAP server authenticates and authorizes P9000 Performance Advisor users. The following LDAP server implementations and authentication mechanism are supported by P9000 Performance Advisor from v4.
to Hewlett-Packard by IANA. Further, the VSA can have one or both of the following attribute values, depending on the role assigned to the user profile. In the following examples, a VSA attribute type and value is assigned to an P9000 Performance Advisor administrator and user: Example 2.
2. Right-click the following Oracle database services, the HP StorageWorks P9000 Performance Advisor Database and the HP StorageWorks P9000 Performance Advisor Database Listener, and select Stop from the drop-down list. 3. Select Start > Run and type appwiz.cpl in the command line. 4. Remove Oracle from the list of programs. 5. Go to :\Program Files and delete the folder for Oracle. 6. Reboot your management station, so that Oracle is completely removed.
3. 4. 5. In the Local Area Connection Properties window, select Internet Protocol (TCP/IP) from the This connection uses the following items list, and click Properties. In the Internet Protocol (TCP/IP) Properties window, select the Use the following IP Address option and provide the IP address details. Similarly, select the Use the following DNS server addresses option and provide the relevant details.
TCP 0.0.0.0:80 0.0.0.0:0 LISTENING 804 The last column of the output from the above command is the process identifier (PID), denoted by . In the example output, the PID is 804. To forcibly terminate the process which is using the port, execute the following command: TASKKILL /F /PID Following is an example for terminating the process that is using port 80: TASKKILL /F /PID Where, is replaced by the process identifier of the task currently using port 80.
UAC controls the installation and removal of programs, and prevents programs from being added to the registry. Ensure that UAC is disabled before installing or removing P9000 Performance Advisor. Following is a sample procedure that shows how to disable UAC on a Windows Vista management station: 1. Go to Start > Run, type msconfig in the command line, and press the Enter key. The System Configuration window appears. 2. 3. 4. In the System Configuration window, click the Tools tab.
Verifying the supported configurations for P9000 Performance Advisor host agents To install the P9000 Performance Advisor host agents, verify that you have the supported configurations in the following categories: • Hardware on page 34 • Software on page 34 Hardware Your Windows or UNIX hosts must include the following respective hardware requirements: • Microsoft Windows host: • DVD drive • 2.
IMPORTANT: • Only 32-bit (X86) JRE version is supported on both the 32-bit (X86) and 64-bit (X64) host agent platforms. • Only IA64-bit JRE version is supported on the IA64-bit host agent platforms. • For a Linux host agent, the JRE must be installed using its .rpm package. It ensures that the JRE gets registered with the RPM database.
• Run the /sbin/service xinetd restart command Setting up a Red Hat Enterprise Linux 4.0 host Before installing the P9000 Performance Advisor host agent on a Red Hat Enterprise Linux v4.0 host, ensure that the following prerequisites are completed: 1. 2. 3. You must have a root or superuser access to the host. Install the Legacy Network Packages if the packages are not installed. Edit /etc/xinetd.d/ to enable the service by default, where is rexec, vsftpd, etc. 4.
Logging into XP Remote Web Console through XP Command View AE Complete the following steps to log onto the XP Remote Web Console: 1. Open an IE browser window and enter http://:23015/DeviceManager/ address in the browser address line to access the XP Command View AE Device Manager. NOTE: If you are using a secured connection, the port number is different and the URL format is as follows: http://:23016/DeviceManager/ 2. 3. 4. 5.
NOTE: The LDEV CONFIG button in the LDEV Information display area is enabled only when you select a LDEV from the LDEV list. 5. In the LDEV Information display area, click LDEV CONFIG to enable the selected LDEV as a command device.
2. 3. 4. 5. 6. In the P9000 Remote Web Console Explorer pane, under Storage Systems node, click the P9000 disk array node for which you want to create a command device. In the list that appears, select Logical Devices. The list of LDEVs for the selected P9000 disk array appear under the LDEVs tab in the Storage Systems work area. For the LDEV that you want to configure as a command device, select the corresponding LDEV record and click the down arrow symbol (v) next to More Actions.
6. In the Create Host Groups window, enter the Host Group Name and select the Host Mode. The host mode is based on the host system where you will assign the command device. 7. Select the HBA WWN record for the host group from the Available Hosts table. The HBA WWN is specific to the HBA port on the host where you assign the command device. 8. Click Add New Host. 9. Select the corresponding port record from the list displayed in the Available Ports table. 10. Click Add.
Mapping command devices from VMware ESX virtual server The command devices that are visible to the VMware ESX must be made available to the virtual or guest operating platforms residing on these virtual servers. This is one of the prerequisites for installing host agents on the VMware ESX virtual server. 1. 2. In the VMware Infrastructure Client screen, right-click the guest operating platform where you want to map the command devices. Select Edit Setting from the pop menu.
Figure 4 Sample xpinfo -i output for Windows host agent . Where, CM in the Type indicates a command device. You can also test the host connectivity to a command device during the Windows host agent installation. For more information, see “Installing the P9000 Performance Advisor Windows host agents” on page 73. • To verify if a command device is presented to a UNIX host: In the command prompt window of your host, type xpinfo -i. Figure 5 Sample xpinfo -i output for UNIX host agent .
3 Installing P9000 Performance Advisor This chapter describes the process of installing P9000 Performance Advisor on a management station.
3. The installation wizard verifies the following on your management station and takes the appropriate action: • If Microsoft .NET Framework v2.0 or later is installed. If Microsoft .NET Framework v2.0 or later is not installed, a message appears displaying that the required version is not available. Click OK on the message dialog box for the installation wizard to install Microsoft .NET Framework v3.5 (recommended version).
Figure 6 P9000 Performance Advisor Welcome installation window . Read through the instructions displayed on the Welcome installation window. • To proceed with the installation, you must complete a set of installation prerequisites and tasks provided in a checklist that appears when you click Launch Checklist. For more information, see “Launching the P9000 Performance Advisor checklist” on page 46.
Launching the P9000 Performance Advisor checklist To launch the installation or upgrade checklist, click Launch Checklist on the P9000 Performance Advisor Welcome installation window, one of the following checklists appears: • The installation checklist appears, if the installation wizard has not detected an existing version of P9000 Performance Advisor on the management station. This checklist guides you through the installation of P9000 Performance Advisor.
Retaining or selecting a different database location By default, the P9000 Performance Advisor database (padb) folder is placed on the same , where you install P9000 Performance Advisor. The Install Database to displays the default location for your P9000 Performance Advisor database, which is \HPSS\padb. In this context, the refers to the C drive where Windows operating system is installed.
host agents also communicate using IPv6. Also, configure the HTTP port that P9000 Performance Advisor should use for all its communications. NOTE: • Both the P9000 Performance Advisor and host agents must communicate using the same protocol, either IPv4 or IPv6, and also the same HTTP port number. • Enabling IPv6 in an IPv4 only environment, that is, on a management station configured with only an IPv4 interface, does not make P9000 Performance Advisor unusable.
IMPORTANT: The Windows System Authentication and Windows Domain based Authentication are displayed in the authentication list, only if your management station is part of a domain. Click Next to configure the authentication settings for the selected authentication method. The appropriate Authentication Configuration installation window appears.
By default, the P9000 Performance Advisor installer displays HP Storage Admins and HP Storage Users as the domain groups. You can retain these names or provide group names of your choice (the groups with the names that you provide must exist on the domain controller). NOTE: Ensure that the domain or site administrator has created the two default domain groups, HP Storage Admins and HP Storage Users or the domain groups of your choice on the domain controller. Click Next to proceed.
1. Enter the required Server and Connection values. “Configuring the LDAP server and connection settings” on page 51 provides the description for each of the fields under the Server and Connection sections. Figure 8 Configure LDAP Server and Authentication Settings installation window . Table 4 LDAP server connection settings Screen elements Description Network name (or IP address) and Port # of the LDAP server to be used for authentication.
Screen elements Description • Microsoft Active Directory Use SSL when communicating with the LDAP server check box Select this check box to use SSL when communicating with the LDAP server. The default port # used for the communication will be 636. Ensure that SSL is also enabled on the LDAP server before selecting this check box. If not selected, it might result in authentication and authorization failures for P9000 Performance Advisor users.
1. Enter the required P9000 Performance Advisor User Search and Filter Settings and P9000 Performance Advisor Group Settings. Table 5 on page 53 provides the description for the P9000 Performance Advisor User Search and Filter Settings and P9000 Performance Advisor Group Settings fields. Figure 9 Configure LDAP Filter and Group Settings installation window .
Screen elements Description {Username} is the placeholder, that will be replaced with the P9000 Performance Advisor user’s name whose account should be authenticated and authorized. Group Base DN box Base DN in the LDAP DIT for all the groups. This is the path in the LDAP directory where all groups are located. P9000 PA Administrators Group DN box Distinguished names of the P9000 Performance Advisor Administrators in the LDAP directory.
1. Enter the required server connection values. Table 6 on page 55 provides the description for each of the RADIUS fields. NOTE: Among the following settings, only the server address and shared secret values must be provided. The remaining values are pre-populated and should not be modified. Figure 10 Configure RADIUS Authentication Settings installation window .
2. Screen elements Description Confirm Shared Secret box Confirm the shared secret to be used when communicating with the RADIUS server for user authentication. Retry Count box The maximum number of authentication attempts for a user to log in (default value: 3). Timeout Value box The duration of time (in milliseconds) before timing out on an authentication attempt. (Default value: 3000). Click Next to proceed. The Choose Setup Type installation window appears.
IMPORTANT: • After installing P9000 Performance Advisor, the host agents, CLUI, P9000Watch, and the P9000Sketch are available in the :\HPSS\pa\tomcat\ webapps\pa\tools folder on your management station. • The P9000 Performance Advisor host agents are also available on the P9000 Performance Advisor Installation disk 2.
• Choose a location on your management station to install P9000 Performance Advisor. By default, the Install to: displays the location as :\HPSS\. Select another folder on the default or a different disk volume and the folder location on your management station. To manually select a different installation location: 1.
2. Click the down arrow for the P9000 Performance Advisor host agent that you want to install. Figure 11 Configure Custom Setup installation window . A pop-up dialog box appears displaying the different installation types. 3. Select the type of installation that you want. The following installation options are available: This feature will be installed on the local drive (disk volume). This feature and all the sub features, will be installed on the local drive.
Selecting P9000 Performance Advisor tools To select the P9000 Performance Advisor tools that you want to install: 1. Click the + sign or the down arrow beside the Tools menu to view the following P9000 Performance Advisor tools: • • • • 2. P9000Sketch P9000Watch P9000Info CmdLineUserInterface By default, CmdLineUserInterface (CLUI) software is copied to the location where P9000 Performance Advisor is installed.
• • • • • HP HP HP HP HP StorageWorks StorageWorks StorageWorks StorageWorks StorageWorks P9000 P9000 P9000 P9000 P9000 Performance Performance Performance Performance Performance Advisor Advisor Advisor Advisor Advisor Database Database Listener Security Tomcat Monitor To confirm whether the above-mentioned services have started, see “Confirming the P9000 Performance Advisor services” on page 62.
Confirming the P9000 Performance Advisor services To confirm whether the P9000 Performance Advisor services have started after installation: 1. Select Start > Run, type services.msc, and press the Enter key. The Services window appears. 2. If P9000 Performance Advisor is installed, the status of the following services are in the Started mode.
1. Log on to P9000 Performance Advisor as a default administrator (administrator:administrator). For more information, see “Launching P9000 Performance Advisor” on page 64. 2. In the P9000 Performance Advisor Home screen, click Settings in the left pane. 3. From the list that appears, select Security. 4. In the Security screen, click New. 5. Enter the following details for the user in the pop-up window that appears: a. Name of the new user and a brief description about the user profile. b.
Launching P9000 Performance Advisor IMPORTANT: • Ensure that Adobe Flash Player and Flash Player Plugin, v10.0.0 or later are installed on the system from where you want to access P9000 Performance Advisor, otherwise the following error is displayed when you type http:// or /pa in your IE browser window: P9000 Performance Advisor requires Adobe Flash Player Version 10.0.0. Download both Adobe Flash Player and Flash Player Plugin, v10.0.
2. Enter your user name and password. P9000 Performance Advisor authenticates your credentials based on the authentication type you selected while installing P9000 Performance Advisor. Your site or system administrator will have information on the authentication type configured on the management station. For more information on authentication types, see “Implementing the authentication method” on page 48.
4. Click Next >>. The Array information input screen appears. The following details are displayed: • • • • Registration number P9000 Performance Advisor base license Additional PA LTU that you purchased Internal raw disk capacity or usable capacity that the LTU supports IMPORTANT: • The internal raw disk capacity is applicable only for the XP disk arrays.
9. Add the Permanent license to P9000 Performance Advisor: a. Log on to P9000 Performance Advisor. For more information, see “Launching P9000 Performance Advisor” on page 64. b. In the P9000 Performance Advisor Home screen, click License in the left pane. The License screen appears. c. Click Browse in the Add New License File section. d. Navigate to the folder where the license (.dat) file is stored. e. Select the license that you want to add and click Open.
The procedure to generate and add the Meter based Term license is similar to the above mentioned procedure for Permanent license. While generating a Meter based Term license, you can select the TB-Days that you want to use when entering the registration number. For example, if you have a Meter based Term LTU for 100TB-Days and you want to use only 25TB-Days, enter 25 as the TB-Days. You are provided a license key that can be used for 25TB-Days.
Installation or upgrade When you upgrade P9000 Performance Advisor from v4.5 or later to v5.2, and the following are detected: • License violation for one or more monitored XP or P9000 disk arrays • P9000 Performance Advisor is already in the grace period When you upgrade P9000 Performance Advisor from v4.5 or later to v5.
Installing P9000 Performance Advisor
4 Installing the P9000 Performance Advisor host agents This chapter describes the process to install P9000 Performance Advisor Windows and UNIX host agents.
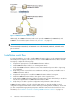
2. In the P9000 Performance Advisor Home screen, click Support in the title pane. Figure 12 P9000 Performance Advisor Support screen - Downloading host agent software . 3. Navigate to the Host Agents section. A list of host agents for supported operating platforms is provided. 4. Click the link for the host agent you want to select and download the host agent (.tar) file to your host. 5. Navigate to the P9000Info section and download the P9000Info software. 6.
8. Install or upgrade the P9000 Performance Advisor host agents on the respective operating system hosts.
4. Run the setup.exe installation script. The Welcome installation window appears that takes you through the P9000 Performance Advisor installation. 5. Click Next to proceed. The Connection Settings installation window appears. For more information on the next set of steps, “Enabling IPv6 and configuring HTTP port for the Windows host agent” on page 74.
3. Enter the HTTP Port number that the host agent should use to communicate with P9000 Performance Advisor on the management station. The port number that you enter must be the same as that provided when installing P9000 Performance Advisor on the management station. Port 80 is the default port number, which you can retain or provide a different port number. 4. Click Next to proceed. The Connectivity Test window appears.
1. Complete the following verifications, rectify the errors that are displayed, and proceed to the next step: a. Click Test Validity to verify if the DNS or IP address of the management station that you provided on the Connection Settings installation window is valid. If the installer displays the following message, it indicates that you must verify and provide a valid DNS or IP address: The DNS or IP address entered for your management station is incorrect.
• http.port, where you provide the port number of the management station with which your Windows host agent should communicate. 3. Restart the Windows host agent services. For more information, see Appendix B. • Check whether a command device is created and presented to the host. For more information, see “Creating and presenting command devices to hosts” on page 36. • Check whether the Windows GUID (\\?\Volume{GUID}) is created and assigned to command devices on the Windows host.
or a different disk volume and the folder location on your host. To manually select a different installation location, click Change. In the Change Location window, browse to the location where you want to install the P9000 Performance Advisor host agent. You can also enter the installation location in the Folder Name text box. • Check the available free space on all the disk volumes in your host. Click Check Space to view the free space available on all the disk volumes in your host.
If you want to install the P9000 Performance Advisor UNIX host agents, see “Installing the P9000 Performance Advisor UNIX host agents” on page 79. Confirming the P9000 Performance Advisor Windows host agent services To confirm whether the P9000 Performance Advisor Windows host agent services have started: 1. Select Start > Run, type services.msc, and press the Enter key. The Services dialog box appears. 2.
2. Navigate to the tmp directory or to the folder, where you have copied the host agent files. 3. Untar the host agent .tar file: tar -xvf XPPA_HA_.tar 4. Run the installation script: unix_local_install.sh The installation script, for UNIX hosts, displays a series of prompts. Respond to these prompts as appropriate for your environment. 5. Click Y to continue.
P9000 Performance Advisor UNIX host agent post-installation steps The following P9000 Performance Advisor UNIX host agent services start: • HP StorageWorks P9000 Performance Advisor Hostagent • HP StorageWorks P9000 Performance Advisor Realtime Server To confirm whether the above-mentioned services have started, see Confirming the P9000 Performance Advisor UNIX host agent services on page 81.
After the P9000 Performance Advisor host agents are installed, the P9000 Performance Advisor automatically displays the corresponding details in the Host Information table on the Array View screen. It is an indication that the connectivity is established between the management station and the host. When host agents are installed or upgraded, their current status is displayed as Received.
2. From a command line, run the XPInfo –i, to display the list of all the command devices (see Figure 16 on page 83). Figure 16 XPInfo –i command . 3. Create a GUID on the command devices to perform data collection. Complete the following steps: a. Log on to the P9000 Performance Advisor host agent as an administrator or as a member of the Administrators group. b. Open the Computer Management console by clicking Start > Run > compmgmt.msc, and press the Enter key. c.
The selected command device is partitioned and is assigned a GUID. For information on using Disk Management, see http://support.microsoft.com/kb/309000/en-us. 4. Restart the P9000 Performance Advisor host agent services. For example, :\Program Files\Hewlett-Packard\xppa\ hostagent\sbin> xppa restart 5. On the management station, launch P9000 Performance Advisor and click Array View on the left pane.
2. Generate keystore on the Tomcat server: <%JAVA_HOME%>\bin>keytool -genkey -alias tomcat -keyalg RSA -keystore <%HPSS_HOME>\hpss\pa\tomcat\conf\keystore 3. When prompted, provide the password as changeit. 4. When prompted for the first name and last name, enter the fully-qualified domain name of your management station. For example, abc.domain.company.com. 5. For the rest of the fields, enter appropriate values in the order mentioned: Division, Company (your company name), City, State, and Country.
9. To retrieve the public key from the P9000 Performance Advisor management station and create a keystore, type: <%JAVA_HOME%>\bin\javaC InstallCert :443 Example of a DNS, abc.domain.company.net. The following status messages appear while InstallCert creates the Keystore: Loading KeyStore /opt/java6/jre/lib/security/cacerts... Opening connection to abc.domain.company.net:443... Starting SSL handshake... javax.net.ssl.SSLHandshakeException: sun.security.
10. When prompted to select the certificate to be added to the trusted keystore, look through the list of certificates displayed and enter the serial number of the certificate you want to add. For example, enter 1 if you want the first certificate in the list to be added to the trusted keystore. If you do not want to proceed, type q to quit. Enter certificate to add to trusted keystore or 'q' to quit: [1] 1 [ [ Version: V3 Subject: CN=abc.domain.company.
13. When prompted to select the certificate to be added to the trusted keystore, look through the list of certificates displayed and enter the serial number of the certificate that you want to add. If you do not want to proceed, type q to quit. Enter certificate to add to trusted keystore or 'q' to quit: [1] q KeyStore not changed 14. Modify the paxp_service.properties to use SSL. Replace http with https and the IP address of the management station with its fully-qualified domain name. ManagementStation.
5 Using P9000 Performance Advisor After installing the P9000 Performance Advisor and the host agents, start collecting the configuration and the performance data for the XP and the P9000 disk arrays. You can initiate configuration data collection for only one XP or P9000 disk array at a time, and select only one command device through which you can collect data for the XP or the P9000 disk array.
5. Click Request Info. The Request Info button is enabled only when you select the host agents. Use the Shft or the Ctrl key to select multiple host agent records. The request is executed in the subsequent data collection cycle.
3. Select Collection Period as Recurring. NOTE: To collect configuration data once, select One Time as the collection period. Figure 17 on page 91 shows scheduling configuration data collection for 53036, which belongs to the P9500 Disk Array type. Figure 17 Configuration Data Collection .
4. Retain the Collection Type as OutBand (default selection), if you want P9000 Performance Advisor to directly collect data from the XP or the P9000 disk array through the array SVP (not applicable for XP1024/128 Disk Arrays). Select the Collection Type as Inband, if you want the RAID Manager Library to collect the configuration data from an XP or a P9000 disk array and transfer to P9000 Performance Advisor.
6. Based on the disk array and mode of collection that you selected, following are the further course of steps: If you selected an XP disk array and either of the following modes of configuration data collection: • The outband mode - In this case, manually enter the SVP IP address in the SVP IP Address text box and proceed to next step to initiate the configuration data collection.
IMPORTANT: If the configuration data collection fails due to an error, the Collection Status displays for the error is displayed as a tool tip. . The reason After completing the configuration data collection, start collecting the performance data for the XP or the P9000 disk array. For more information, see “Collecting performance data” on page 94. Collecting performance data IMPORTANT: • The performance data collection does not start if the configuration data collection is in progress.
3. Click Create. The Create button is enabled only when you select an XP or a P9000 disk array record under the Performance Collection tab.
6. In the respective component type lists, select the check boxes for the components to collect their performance data. The following component type lists are displayed: For an XP disk array, the DKC provides data on the CHIPs, ACPs, Cache, SLPR, CLPR, and the SM. DKC For a P9000 disk array, the DKC provides data on the MP blades, in addition to the data on the Cache, CLPR, and the SM. NOTE: SLPR does not exist in the P9000 disk arrays.
Figure 18 Performance Data Collection . 1 Resource type list. 7. Set the frequency in minutes for the DKC, RAID groups, and the port performance data collection by selecting the frequency from the respective Frequency list. 8. Select the check box for Stagger Schedule if you want to stagger the data collection time at different intervals.
The new schedule starts automatically. The following table provides the subsequent changes that occur in the Performance Data section for the selected XP or the P9000 disk array record: Screen elements Description Schedule Name Displays the new schedule name. Components Displays the selected components. Click View to see the corresponding schedule details. Enabled Frequency Displays , which indicates that the schedule has started.
6 Understanding the P9000 Performance Advisor upgrade prerequisites This chapter describes the prerequisites to upgrade the P9000 Performance Advisor software and the host agents, and explains the upgrade checklist. For more information, see Table 8 on page 100. To install P9000 Performance Advisor, see Table 2 on page 16.
Sections in the HP StorageWorks P9000 Performance Advisor and Host Agents Upgrade Checklist The prerequisites and tasks provided in the upgrade checklist are organized as follows: • Before upgrading P9000 Performance Advisor: This section lists the tasks and prerequisites that you must complete before starting the P9000 Performance Advisor upgrade process on your management station. • Upgrading P9000 Performance Advisor: This section directs you to the P9000 Performance Advisor installation wizard.
After upgrading P9000 Performance Advisor Verify the P9000 Performance Advisor upgrade. The post install steps to verify that the services have started are applicable for the post upgrade also. For more information, see “P9000 Performance Advisor post-installation steps” on page 60. Verify if you have received the product license entitlement certificate for P9000 Performance Advisor. For more information, see “Viewing product license entitlement certificate for existing customers” on page 65.
After upgrading P9000 Performance Advisor host agents Verify the P9000 Performance Advisor host agents upgrade. The procedures are the same as given for verifying the host agents installation. For more information, see “Verifying if the host agents appear in P9000 Performance Advisor” on page 81. Using P9000 Performance Advisor Launch P9000 Performance Advisor and log in using your credentials. For more information, see “Launching P9000 Performance Advisor” on page 64.
1. 2. 3. 4. Upgrade the current version to the v3.2, which also includes the migration of the current data. For more information on upgrading to P9000 Performance Advisor v3.2, see the HP StorageWorks P9000 Performance Advisor Software Installation Guide provided in the P9000 Performance Advisor v3.2 CD media. Upgrade from a v3.2 to the v3.5 or v3.5.2 using the P9000 Performance Advisor database migration utility. To download this utility, see HP Business Support Center: http://h20000.www2.hp.
2. the v4.5, v4.5.1, v4.6, v5.0, or v5.1 respectively. For document download location, see “Related documentation” on page 152. Upgrade from a v4.5, v4.5.1, v4.6, v5.0, or v5.1 to v5.2. Complete the prerequisite on adequate free disk space and proceed with the upgrade process. For more information, see “Using v4.5.x, v4.6, v5.0, or v5.1 of P9000 Performance Advisor” on page 104. Using v4.5.x, v4.6, v5.0, or v5.1 of P9000 Performance Advisor For the upgrade from v4.5, v4.5.1, v4.6, v5.0, or v5.1 to v5.
7 Upgrading P9000 Performance Advisor This chapter describes upgrading the current version of P9000 Performance Advisor to its latest version.
NOTE: • If the upgrade does not complete, the installation wizard will automatically perform a roll-back of P9000 Performance Advisor to the earlier version, from where you had initiated the upgrade. • The installer log details are available in the PA_Install.log file, which is available in the user's Temp folder. Enter %Temp% environment variable at the command prompt to navigate to the Temp folder. For the PA_Install.log to open, Windows Installer v4.
4. Select the metrics for which you want to plot performance graphs. If you have selected a combination of components from different component types, only the metrics related to the selected components are displayed in the Choose Metrics box. The following image shows the metrics for the MP blade processors on 53036, which belongs to the P9500 Disk Array type. The performance graphs of components are automatically displayed in the Chart Work Area for the selected metric. 5.
IMPORTANT: • If you are upgrading P9000 Performance Advisor pre-v4.5 to v5.2, reconfigure the email and alarm notification settings in v5.2 after the upgrade process is completed. It is to ensure that you continue to receive notifications when the alarms and reports are generated, or the performance data collection fails. • If you are upgrading P9000 Performance Advisor v4.5 or later to v5.2, the existing notification settings are retained in the serverparameters.
2. Configure the following settings on the Email Settings screen: SMTP Server Settings • IP address or host name of the SMTP server. The default SMTP server IP address is localhost. • Related port number (accepts only numbers). The default port address is 25. P9000 Performance Advisor uses the above settings to dispatch email notifications to the intended recipients when alarms or reports are generated, or performance data collection fails.
• An appropriate subject text for the report email notifications. P9000 Performance Advisor uses the specified subject text as the default text for all the notifications that are dispatched when a report is generated as scheduled. The default subject line is P9000 Performance Report. • Name of the report you want to generate. • Name of the customer for whom the report is generated. • Name of the consultant who is associated with the customer.
For more information on configuring the SMTP settings, see the HP StorageWorks P9000 Performance Advisor Software User Guide. For document download location, see “Related documentation” on page 152.
Upgrading P9000 Performance Advisor
8 Upgrading the P9000 Performance Advisor host agents This chapter describes upgrading the P9000 Performance Advisor Windows and UNIX host agents.
Upgrading the P9000 Performance Advisor Windows host agents IMPORTANT: • During the Windows host agent upgrade process, port 80 on the management station is always reserved as the default port for the P9000 Performance Advisor and host agent communication. Any other port is not considered. So, you might experience connectivity issues in scenarios where you installed P9000 Performance Advisor and upgraded the Windows host agent.
After the upgrade, verify that the P9000 Performance Advisor Windows host agent services have started. Additionally, you must complete the remaining post-installation prerequisites and tasks for using P9000 Performance Advisor. For more information, see P9000 Performance Advisor Windows host agent post-installation steps on page 78. Upgrading the P9000 Performance Advisor UNIX host agents For UNIX host agent upgrade, see “Installing the P9000 Performance Advisor UNIX host agents” on page 79.
Upgrading the P9000 Performance Advisor host agents
9 Modifying or repairing P9000 Performance Advisor After installing P9000 Performance Advisor or the host agents, modify the settings that you selected during the installation.
2. Select Repair as the Program Maintenance type and click Next. 3. Click Install on the Ready to Repair window. The setup program transfers and removes application files (as appropriate) to, and from the destination folder, and configures P9000 Performance Advisor. When prompted for the second disk, insert the P9000 Performance Advisor Installation disk 2 into the DVD drive, and click OK to continue. 4. When the repair is done, the Installation Complete window appears.
1. Run the setup.exe installation script. For more information, see “Executing the Windows host agent installer” on page 73. The Welcome installation window appears. 2. Select Repair as the Program Maintenance type and click Next. The Ready to Repair the Program window appears. 3. Click Install on the Ready to Repair the Program window. The setup program transfers and removes application files (as appropriate) to, and from the destination folder, and configures the P9000 Performance Advisor.
Modifying or repairing P9000 Performance Advisor
10 Removing P9000 Performance Advisor To remove P9000 Performance Advisor, you must first remove the host agent from each host, and then remove P9000 Performance Advisor from the management station. IMPORTANT: Ensure that the following are completed before you proceed: • No other user is accessing the folders in the \HPSS (%HPSS_HOME%) folder on the management station and the \ Program Files\Hewlett-Packard\XPPA\hostagent folder on the respective hosts.
2. 3. 4. Select HP StorageWorks P9000 Host Agent Installer to remove the existing version of the host agent. The installer informs you that a system reboot is required after the host agent is removed. Click OK to proceed or click Cancel. The installer starts gathering the required information. This might take few minutes. The installer then prompts you to remove the RAID Manager Library functions. Click Yes to remove the RAID Manager Library.
Removing the P9000 Performance Advisor management station WARNING! Removing P9000 Performance Advisor also deletes the database completely from the management station. If you want to retain a copy of the database, click No on the message prompt that appears when you begin the un-installation process. Then, take a backup of the database using the Backup utility (click Start > Programs > HP StorageWorks > Backup Utility). After the data backup is complete, resume the un-installation process.
Removing P9000 Performance Advisor
11 Installing Oracle patches and security updates This section describes the Oracle patch installation procedure to apply the latest patches and security features for the Oracle instance that is installed with P9000 Performance Advisor. It is not mandatory to install the patches. It is required only if you want to meet the security compliance standards of Oracle within your organization.
1. Take a backup of the installed PADB database, the Oracle base directory, and the Oracle inventory under the c:\Program files\oracle directory using the Backup utility. The environment variable %PADB_HOME% points to the Oracle base directory. You can restore the inventory later if required. For more information on using the Backup utility, see the HP StorageWorks P9000 Performance Advisor Software User Guide. NOTE: The database install location and the Oracle base directory are the same. 2.
2. After the installation, complete the following additional steps to verify invalid objects: a. In the command prompt window, type sqlplus /nolog and press Enter. b. Execute the following query to connect to the database as SYSDBA using SQL*Plus: CONNECT / AS SYSDBA SQL c. After you are connected, execute the following query: SELECT OBJECT_NAME FROM DBA_OBJECTS WHERE STATUS = 'INVALID'; The following message is displayed: no rows selected.
Installing Oracle patches and security updates
12 Troubleshooting P9000 Performance Advisor installation related issues This chapter discusses the following: • • • • • “Troubleshooting installation issues” on page 129 “Troubleshooting configuration issues” on page 133 “Troubleshooting web client issues” on page 141 “Troubleshooting Oracle patch installation issues” on page 144 “Installation error messages” on page 147 Each of the troubleshooting scenarios described in the above-mentioned sections have a description of the issue, cause, action to be ta
• Configure a Loopback Adapter on your management station. For more information, see “Configuring a Loopback Adapter or static IP address” on page 30. • Revert the changes made in the C:\Windows\System32\drivers\etc\hosts file. HP recommends that you do not tamper the entries for the localhost in this file. • If a previous version of P9000 Performance Advisor has been removed, verify that the Oracle folders and services for P9000 Performance Advisor have been removed.
• Set the Path system variable to the location, where JRE is installed on your UNIX host. For more information, see “Setting the JRE path for a P9000 Performance Advisor UNIX host agent” on page 131. • Stop the disk management services on your Windows host. For more information, see the user manual provided for the respective Windows operating flavor. • Make enough disk space available for copying the host agent executable on the respective hosts.
Resolution Perform the steps listed to resolve the error: Start the HP StorageWorks P9000 Performance Advisor Database Listener service manually by completing the following steps: 1. Open the listener.ora and tnsnames.ora files available in the following location: %PADB_HOME%\oradb\ADMIN\NETWORK. 2. If an incorrect DNS name is specified, replace it with the correct DNS name of the management station. If the problem persists, replace the DNS name with the IP address of the management station.
• The PATH variable does not point to the correct %PADB_HOME%\ora_db\bin location. Resolution The solution might be one or a combination of the following actions. Perform the steps listed for the following actions to verify and complete the required procedures: 1. 2. Verify the location pointed to the %PADB_HOME% environment variable. a. Right-click My Computer and select Properties from the drop-down list. b. In the System Properties window, click the Advanced tab. c. Click Environment Variables.
Host agents are not seen in P9000 Performance Advisor after an install or upgrade The P9000 Performance Advisor Windows or UNIX host agent might not appear under the Host Information tab (Array View > Host Information) in P9000 Performance Advisor after they are installed or upgraded on the respective hosts. The following are the typical causes: • An incorrect management station DNS or IP address is specified in the host agent paxp_service.
If you have logged into P9000 Performance Advisor, the host agent version is also displayed in the Host Information table under HA Version. For more information, see “Requesting host update” on page 89. If the host agent version is different, upgrade the existing host agent version to be in sync with the version of P9000 Performance Advisor installed on your management station. For more information, see “Upgrading to the latest versions of host agents” on page 113.
In all the above mentioned scenarios, the upgrade or installation process completes, but a Connection refused error message appears when the host agent tries to establish connection with P9000 Performance Advisor. Verify if the following are the reasons and rectify if required. Verifying the HP StorageWorks P9000 Performance Advisor Tomcat service Manually verify if the HP StorageWorks P9000 Performance Advisor Tomcat service is active on the management station.
Changing the HTTP port number To change the HTTP port number, complete the following steps: On the management station 1. Look for the following tag in the server.xml and manually replace the existing port number with the new port number: The server.xml is available in the :\HPSS\pa\tomcat\conf folder on your management station. 2.
• The available disk space on your management station is low • The upgrade log file, xpslperf_UpgradeScript.log is created (with errors), or has not been created (occurrence is only with upgrades) • The Std*out.
NOTE: To ensure optimal performance and results, the maximum number of LDEVs for data collection is 6000. This is the total number of LDEVs across all the XP and the P9000 disk arrays that are visible to a particular host agent. You can decrease the LDEV count by restricting the total number of LDEVs that are visible to the host. You can also increase the LDEV count by exposing more number of LDEVs to the host agent. Checking std*out.log file size The std*out.
Configuring firewall settings on a Windows XP Professional management station IMPORTANT: Perform this procedure if you have upgraded to P9000 Performance Advisor v5.2 from a pre-5.2 version on a Windows XP Professional management station. Configure the Windows XP Professional firewall settings to enable web browser clients to access P9000 Performance Advisor on your management station. To configure the firewall settings: 1. 2. 5. Open the control panel, and double-click Windows Firewall.
IMPORTANT: If P9000 Performance Advisor is using a port other than port 80, you must specify that port number along with the server name or IP address in the http address format. For example: http://[server name]:/pa or http://[server name].[domain name]:/pa. Add administrators and users to P9000 Performance Advisor. For more information on adding users, see Adding users for P9000 Performance Advisor Native Authentication on page 62.
• If you have not cleared your web browser's cache, it is observed that the browser tries to access the files from the cache. For more information, see “Clearing web browser's cache” on page 143. • Download Adobe Flash Player and Flash Player Plugin, v10.0.0 or later from the following location: http://get.adobe.com/flashplayer/. • Modify your web browser's security and ActiveX settings. For more information, see Modifying the web browser's security and ActiveX settings.
2. 3. Right-click Local Area Connection, select Properties. Under the General tab, double-click Internet Protocol (TCP/IP). The Internet Protocol (TCP/IP) properties Window is displayed. 4. Click the Advanced tab. The Advanced TCP/IP Settings window is displayed. 5. 6. 7. Under the DNS tab, select Append DNS suffixes. Add host name suffix. Click OK to save the settings. Clearing web browser's cache If the web browser's cache is not cleared, it might try to access the files from the cache folder.
4. 5. 6. Select Prompt for Download Signed ActiveX Controls. Select Prompt for Run ActiveX Controls And Plug-ins. Click Apply and then OK to save the modified security level. Troubleshooting Oracle patch installation issues This section describes the error messages that might be displayed when you try to install Oracle patches provided with P9000 Performance Advisor. Error message: The Oracle patch installer for P9000 Performance Advisor Software was unable to query the value of ORACLE BASE location.
stallation issues, see the P9000 Performance Advisor Install Guide available on Disk 1. Refer to the description and resolution provided for the previous error message. Error message: The Oracle patch application library for P9000 Performance Advisor Software could not be initialized. The installation wizard will exit now. For more information on troubleshooting Oracle patch installation issues, see the P9000 Performance Advisor Install Guide available on Disk 1.
tion>. The installation wizard will exit now. Ensure that you close all applications holding the locked files before you rerun the installer. The reason might be that the files in the Oracle Base directory are in use due to Performance Advisor GUI being accessed either locally or remotely. It can also be because the Performance Advisor and Oracle services are not having released files. Resolution: Do the following: 1. Inspect the __OraclePatch.log file. 2.
• • • • • • • HP HP HP HP HP HP HP StorageWorks StorageWorks StorageWorks StorageWorks StorageWorks StorageWorks StorageWorks P9000 P9000 P9000 P9000 P9000 P9000 P9000 Performance Performance Performance Performance Performance Performance Performance Advisor Advisor Advisor Advisor Advisor Advisor Advisor Database Database Job Scheduler Database Listener Database VSS Writer Monitor Security Tomcat The Oracle patch application process for P9000 Performance Advisor Software failed.
• Solution or Workaround: Provides the solution for resolving the error, or a workaround Table 9 Installation error messages Error Title Error Description Solution or Workaround Static IP address or Loopback Adapter is not configured on this management station. The installation wizard has detected that your management station does not have a static IP address or Loopback Adapter configured. They should be configured for the installation wizard to proceed.
Error Title The entered admin group does not exist in the domain provided. The entered user group does not exist in the domain provided. Earlier version (pre-3.5) of P9000 Performance Advisor already exists on this management station.
Error Title Error Description Solution or Workaround Insufficient disk space on this management station. The installation wizard has detected that sufficient disk space is not available on any of the drives on this management station. There must be at least 8GB of free space available for the installation wizard to proceed. Release the required free disk space on your management station. The installation wizard will exit now. After the required disk space is available, double click PA_Server.
13 Support and other resources Contacting HP For worldwide technical support information, see the HP support website at: http://www.hp.com/support.
http://www.hp.com/support/storagedocsurvey. Thank you for your time and your investment in HP storage products.
Convention Element • Keys that are pressed • Text typed into a GUI element, such as a box Bold text • GUI elements that are clicked or selected, such as menu and list items, buttons, tabs, and check boxes Italic text Text emphasis • File and directory names • System output Monospace text • Code • Commands, their arguments, and argument values Monospace, italic text Monospace, bold text • Code variables • Command variables Emphasized monospace text WARNING! Indicates that failure to follow directio
Support and other resources
A Installing a Loopback Adapter IMPORTANT: The procedures provided here for installing the Loopback Adapter on different Windows versions are directly taken from the Oracle documentation. For the latest information on Loopback Adapter, see the Oracle website: http://download.oracle.com/docs/html/B10130_02/reqs.htm. When you install a Loopback Adapter, it assigns a local IP address for your computer.
Subnet Mask 255.255.0.0 Installing a Loopback Adapter on Windows 2000 Windows 2000 reports on the first network adapter installed. This means that if you install additional network adapters after you install the Loopback Adapter, you need to remove and reinstall the Loopback Adapter. The Loopback Adapter must be the last network adapter installed on the computer. To install a Loopback Adapter on Windows 2000: 1. From the Start menu, select Settings, then Control Panel. 2.
• domainname is the name of the domain. For example: 10.10.10.10 mycomputer.mydomain.com mycomputer 18. Check the network configuration: NOTE: Domain name is optional. a. Open System in the Control Panel, and select the Network Identification tab. In Full computer name, make sure you see the host name and the domain name, for example, sales.us.mycompany.com. b. Click Properties. In Computer name, you must see the host name, and in Full computer name, you must see the host name and domain name.
14. Under the General tab, select Internet Protocol (TCP/IP), and click Properties. 15. In the Properties dialog box, click Use the following IP address and do the following: a. IP Address: Enter a non-routable IP address for the Loopback Adapter. Oracle recommends the following non-routable addresses: • 192.168.x.x (x is any value between 0 and 255) • 10.10.10.10 16. 17. 18. 19. b. Subnet mask: Enter 255.255.255.0. c. d. e. Record the values you entered, which you will need later in this procedure.
4. 5. 6. 7. 8. In The wizard can help you install other hardware window, select Install the hardware that I manually select from a list, and click Next. From the list of hardware types, select the type of hardware you are installing window, select Network adapters, and click Next. In the Select Network Adapter window, do the following: a. Manufacturers: Select Microsoft. b. Network Adapter: Select Microsoft Loopback Adapter. c. Click Next.
Installing a Loopback Adapter
B Starting, stopping, and restarting Windows and UNIX host agent services This section describes the procedures to start, stop, or restart Windows and UNIX host agent and real-time services: IMPORTANT: • When a Windows host agent service is started, stopped, or restarted using the Start > Programs > HP Storage Works > HP StorageWorks P9000 Performance Advisor Host Agent menu, the real-time service is also automatically started, stopped, or restarted.
Stopping host agent services To stop the Windows host agent and real-time services, repeat step 1 mentioned above for starting the Windows host agent and select Stop HP StorageWorks P9000 Performance Advisor Host Agent from the menu that appears.
• To restart the HP StorageWorks P9000 Performance Advisor Realtime Server service, type /opt/ xppa/realtime/xpparealtime restart in the command prompt window.
Starting, stopping, and restarting Windows and UNIX host agent services
Glossary Array Control Processor (ACP) ACP is used in the XP disk arrays prior to the XP24000 Disk Array. With the introduction of the XP24000 Disk Array, the DKA has replaced ACP. The DKA is also applicable for the P9000 disk arrays. ACP handles the transfer of data between the cache and the physical drives held in the DKUs. The ACPs work in pairs, providing a total of eight SCSI buses. Each SCSI bus associated with one ACP is paired with a SCSI bus on the other ACP pair element.
Command View (CV) Replaced by the Command View Advanced Edition Suite Software. Command View AE (CV AE) The Command View Advanced Edition Suite Software replaces the XP Command View Software to manage the XP and P9000 disk arrays. Continuous Access Synchronous (Cnt Ac-S) The Continuous Access Synchronous Software provides remote replication between the disk arrays that belong to the P9000 and the XP families.
Globally unique identifier (GUID) It is a special type of identifier used in the software applications to provide a unique reference number. The value is represented as a 32 hexadecimal character string, such as the {21EC2020-3AEA-1069-A2DD-08002B30309D} and usually stored as a 128 bit integer. Hewlett-Packard Authorization Center (HPAC) The Hewlett-Packard Authorization Center license key website (http:// webkey.external.hp.
RADIUS Vendor Specific Attribute (VSA) The RADIUS VSA is required for authorizing the P9000 Performance Advisor users for the RADIUS authentication. It must have a vendor ID of 11 that is assigned to Hewlett-Packard by IANA and an attribute type of 1. Your system administrator must add a RADIUS VSA to the user profile on the RADIUS server.
Storage Logical Partition (SLPR) NOTE: The SLPR component is applicable only for the XP disk arrays. It does not exist in the P9000 disk arrays. As a result, the SLPR-related data is not displayed in P9000 Performance Advisor for the P9000 disk arrays. The SLPR is a partition of the RAID500 to which the host ports (1 or more) and the CLPRs (1 or more) are assigned. The SLPR0 will always exist (cannot be deleted). Sometimes, the SLPR acronym includes an additional word.
Glossary
Index P C conventions document, 152 text symbols, 153 D Disk space requirements, 21 document conventions, 152 related documentation, 152 documentation HP website, 152 providing feedback, 151 H help obtaining, 151 Host agent Windows, Linux, UNIX, , 43 HP technical support, 151 P9000 Performance Advisor Browser requirements, 43 Coexistence, 43 Firmware requirements, 43 License entitlement, 43 Ports Port 80, Non-default port, 31 R related documentation, 152 Removing P9000 Performance Advisor host agent, 1
W websites HP , 152 HP Subscriber's Choice for Business, 151 product manuals, 152 172