
HP StorageWorks P9000 Performance Advisor Software v5.4 User Guide (T1789-96328, April 2012)


CAUTION:
The data that is purged cannot be recovered. It is permanently deleted from the P9000 Performance
Advisor database. Hence, purge data only when you are absolutely sure that the data is no longer
required. Also, P9000 Performance Advisor activities, such as plotting charts and collecting data
might be impacted when either the manual or auto purge is in progress.
Alternatively, if you want to archive data before purging it, use the archival export functionality. For
more information, see “Archiving data” on page 178.
IMPORTANT:
The current date and time on your management station (where P9000 Performance Advisor is installed)
is considered for deleting the records.
Purging data for XP or P9000 disk array
To purge data from the P9000 Performance Advisor database for an XP or a P9000 disk array:
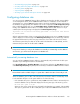
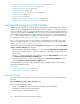
1. Click PA and DB Settings > Database Manager in the left pane.
The Database Manager screen appears. By default, the DB Configuration/Purge is enabled.
2. In the Purge section, select All data for array.
The list for this selection is enabled.
3. From the list, select the XP or the P9000 disk array for which you want to purge data.
4. Click Purge.
A dialog box appears prompting you to confirm the deletion of records.
5. Click Yes to confirm.
P9000 Performance Advisor deletes the configuration and performance data collected till date
for the selected XP or P9000 disk array from the database. Hence, the XP or the P9000 disk array
does not appear in any of the P9000 Performance Advisor screens. To view the array details
again, request update from the host connected to that XP or the P9000 disk array. Then, perform
a configuration collection followed by performance collection for that XP or the P9000 disk array.
For more information, see “Requesting host agent updates” on page 56.
Click Cancel if you want to retain the records.
Purging older data
To purge data older than the specified date from the P9000 Performance Advisor database:
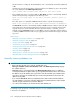
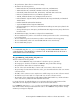
1. Click PA and DB Settings > Database Manager in the left pane.
The Database Manager screen appears. By default, the DB Configuration/Purge is enabled.
2. In the Purge section, select All data older than.
3. Select the date using the calendar and the time from the Hour, Minute, and Seconds lists.
If you do not specify a date and time of your choice, the current date and time are considered
for the purge.
Managing the P9000 Performance Advisor database166