
HP XP P9000 Remote Web Console User Guide

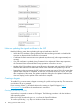
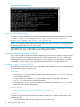
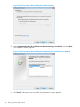

Figure 3 Creating a public key
Acquiring a self-signed certificate
To acquire a self-signed certificate, open the command prompt and execute the following command:
c:\key>c:\openssl\bin\openssl x509 -req -sha256 -days 10000 -in
server.csr -signkey server.key -out server.crt
NOTE: This command uses SHA-256 as a hash algorithm. MD5 or SHA-1 is not recommended
for a hash algorithm due to its low security level.
This creates a server.crt file in the c:\key folder, which is valid for 10,000 days. This is the
signed private key, which is also referred to as a self-signed certificate.
Creating a signed and trusted certificate
If you want to create a signed and trusted certificate, you must create a certificate signing request
(CSR), send that file to a Certificate Authority (CA), and request that the CA issue a signed and
trusted certificate. Each certificate authority has its own procedures and requirements, and there
is generally a cost for doing so. The signed and trusted certificate is the signed Public Key.
Uploading a signed certificate to the SVP
To use SSL-encrypted communication, you must update and upload the private key and the signed
Server Certificate (Public Key) to the SVP.
Prerequisites
• A private key (.key file) has been created. Change the file name to server.key unless the
file is already named that.
• A signed public key certificate (.crt file) has been acquired. Change the file name to
server.crt unless the file is already named that.
• The private key (server.key file) and the signed public key certificate (server.crt file)
are in Base 64-encoded X509 format.
Related information
• Notes on updating the signed certificate to the SVP (page 14)
Procedure
To update and upload both the Private Key and the signed Server Certificate (Public Key) to the
Web server (SVP):
1. Log off all Remote Web Console Web client sessions on the SVP.
16 Setting up Remote Web Console