
HP XP P9000 Remote Web Console User Guide


3 Getting started using Remote Web Console
This topic describes login and restrictions when using Remote Web Console.
For instructions on navigating to storage system information, see Viewing and managing the storage
system (page 75).
Logging in to Remote Web Console
There are two kinds of login for Remote Web Console:
• One-time only initial login by the administrator or super-user who logs in first to create other
user accounts
• Normal login for all other Remote Web Console and storage system users and administrators
Initial super-user login
This login procedure is for the super-user who logs into Remote Web Console for the first time and
sets up the user accounts. The super-user has a built-in ID which includes all permissions, and a
default password.
To log in to Remote Web Console as the super user:
1. Call your local service representative to obtain the superuser ID and default password.
2. In your Web browser, specify the URL for your SVP:
https://IP-address-or-host-name-of-SVP/
3. Log in with the super-user ID and password.
4. To prevent unauthorized use of the superuser account, change the password. Click
Settings→User Management→Change Password.
Normal login
This login procedure is for all users other than the super-user.
NOTE: When connecting to a second storage system, you must start a new Web browser instance
and log in to the system's URL.
To log in to a Remote Web Console:
1. In your Web browser, specify the following URL:
https://IP-address-or-host-name-of-SVP/
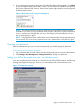
2. The following actions might be required to open the login dialog box, depending on your
environment:
• If a message indicates that the enhanced security configuration is enabled on the computer,
select In the future, do not show this message, and click OK.
• If the SVP is set to support SSL-encrypted communication and security messages appear,
make sure the certificate is correct and follow the instructions in the dialog box.
• If a message indicates that certain Web sites are blocked, follow instructions in Adding
your SVP to the trusted sites zone—for Windows server (page 33).
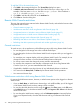
3. Type the user ID and password.
4. Click Login.
5. If the Security Information dialog box appears, click Yes.
32 Getting started using Remote Web Console