HP System Management Homepage 7.
© Copyright 2009, 2012 Hewlett-Packard Development Company, L.P. Legal Notices Confidential computer software. Valid license from HP required for possession, use or copying. Consistent with FAR 12.211 and 12.212, Commercial Computer Software, Computer Software Documentation, and Technical Data for Commercial Items are licensed to the U.S. Government under vendor's standard commercial license. The information contained herein is subject to change without notice.
Contents 1 Product overview........................................................................................6 Product features........................................................................................................................6 HP SIM...................................................................................................................................6 2 Getting started...........................................................................................
UI Timeout...............................................................................................................38 Trust Mode category......................................................................................................38 Configuring Trust Mode.............................................................................................39 Trusted Management Servers category.............................................................................
Custom UI..............................................................................................................................63 Log-based directory................................................................................................................63 Configurable logging..............................................................................................................63 Autostart mode.............................................................................................
1 Product overview HP System Management Homepage (HP SMH) is a web-based interface that consolidates and simplifies single system management for HP servers running the HP-UX, Linux, and Microsoft Windows operating systems.
2 Getting started To get started with HP System Management Homepage (HP SMH), use the following information when configuring HP SMH and setting up users and security properly. To configure HP SMH: • On Linux operating systems, HP SMH is installed with default settings. You can configure the settings using the script /opt/hp/hpsmh/sbin/hpSMHSetup.sh for Itanium systems. • On Windows operating systems, the installation enables you to configure HP SMH settings during installation.
NOTE: HP SMH uses the root certificate, intermediate certificate, and the Certificate Root List (CRL) of the certificate to verify the revocation status of trusted certificate used for SSO. If the certificate is found to be revoked or an error is encountered during verification, HP SMH does not allow the user to access HP SMH through SSO and redirects the user to the login page.
1. Navigate to https://hostname:2381/. The first time you browse to this URI, the Security Alert dialog box appears, prompting you to indicate whether to trust the server. If you do not import the certificate, the Security Alert appears every time you browse to HP SMH. For more information about procedures on changing the configuration variables, see the HP System Management Homepage Installation Guide on the HP Technical Documentation Web site at http://h18013.www1.hp.
Administrator on Windows and root on Linux have administrator access on HP SMH. 4. 5. Enter the password that is recognized by the operating system. Click Sign In. The System Management Homepage appears. Starting HP SMH from HP SIM To start HP SMH by signing in to HP SIM with a Web browser: 1. Navigate to https://hostname:50000/. The first time you browse to this link, the Security Alert dialog box appears, asking if you want to trust the server.
5. Enter the following product name and the port number information. Add the exceptions listed in the following table to the firewall protection: Table 1 Firewall exceptions 6. 7. Product Port Number HP SMH Insecure Port: 2301 HP SMH Secure Port: 2381 Click OK to save your settings and close the Add a Port dialog box. Click OK to save your settings and close the Windows Firewall dialog box. Linux Configuring firewalls varies, depending on the version of Linux installed.
:FORWARD ACCEPT [0:0] :OUTPUT ACCEPT [0:0] :RH-Firewall-1-INPUT - [0:0] -A INPUT -j RH-Firewall-1-INPUT -A FORWARD -j RH-Firewall-1-INPUT -A RH-Firewall-1-INPUT -i lo -j ACCEPT -A RH-Firewall-1-INPUT -p icmp --icmp-type any -j ACCEPT -A RH-Firewall-1-INPUT -p 50 -j ACCEPT -A RH-Firewall-1-INPUT -p 51 -j ACCEPT -A RH-Firewall-1-INPUT -m state --state ESTABLISHED,RELATED -j ACCEPT -A RH-Firewall-1-INPUT -m state --state NEW -m tcp -p tcp --dport 80 -j ACCEPT -A RH-Firewall-1-INPUT -m state --state NEW -m tcp
Configuring timeout settings for HP-UX Two HP SMH timeout settings can be configured: • SMH service timeout Sets the amount of time, in minutes, before the HP SMH server stops. • SMH session timeout Sets the amount of time, in minutes, before an HP SMH GUI session stops. NOTE: Selecting the Session never expires check box avoids HP SMH session timeouts by sending a background request every three minutes. This option, when selected, also prevents HP SMH service timeouts.
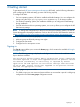
3. Restart the HP SMH service. Automatically importing certificates The Automatically Import Management Server Certificate feature enables you to automatically import the HP SIM certificate when accessing the HP SMH from an HP SIM system. NOTE: Your login must have administrative access to HP SMH to automatically import the HP SIM certificate. 1 2 User Name. The user must be part of a user group accepted by HP SMH. Password. The user name and password must match a valid user. 3 4 Sign In.
Signing out You can sign out of HP SMH, using either of the following options: • In the HP SMH header, click Sign Out. The HP System Management Homepage Sign in page appears. • Close every instance of the Web browser used to sign in to HP SMH.
3 Scenarios IP Binding You can use IP Binding for example when a system has multiple IP addresses and you want to limit the access to HP SMH to particular networks or subnets like: • For infrastructure (IPv4 and IPv6) • Multiple subnets • Security • Bandwidth For more information, see “IP Binding category” (page 31).
4 Navigating the software The HP System Management Homepage (HP SMH) displays all HP Web-enabled System Management Software that provides information. In addition, HP SMH displays various categories (in boxes) that have icons defining the status of the items. The HP SMH main page is divided into two major areas: the header and the standard container. • Header Frame The header frame is constantly visible regardless of the page you are viewing and contains the following four subareas: ◦ Master header.
Data Source Indicates which source is populating management data. For instance, WBEM for HP Insight Management WBEM Providers or SNMP for HP Insight Management Agents. If no source is installed, no data string will appear. – Bread crumbs. The area under the main title that is divided into four parts. – First level menu item – Legend. A link that, when clicked, displays a tooltip box listing all possible statuses of webapps. – Refresh. A link that reloads the header and information areas. – Time.
◦ Help ◦ Webapps The data frame shows the status for all HP Web-enabled System Management Software and utilities on the system. Information areas Depending on your operating system (Linux or Windows), the following information areas appear in the header or data frames: • HP SMH Pages ◦ Signing In ◦ The Home Page ◦ The Settings Page ◦ The Tasks Page ◦ The Tools Page (HP-UX only) ◦ The Logs Page ◦ The Installed Webapps Page ◦ The Support Page ◦ The Help Page ◦ Current User.
◦ Number of columns. The number of boxes or columns presented in each line in the list view mode is defined by the display resolution setting. For example, if your resolution is set at 800x600, only three boxes are presented in a line, while in greater resolutions, the number of boxes visible is four. ◦ Notes. Notes are sections placed on the right side and used in most pages. These notes inform you how to use the controls and what kind of values is expected. ◦ Icon view.
◦ Dynamic Lists in Pages. A dynamically created list of elements appears for each item you want to add or remove to a page and are available for the following pages: ◦ – IP Binding – IP Restricted Login – Trust Mode – Kerberos Authentication – User Groups Legend: This link displays a tooltip box that lists the status of the installed webapps. Table 2 Status icons Icon Status Critical Major Minor Warning Normal Disabled Unknown Informational • Management Processor.
Table 3 Icon View (continued) Icon Description installed or no critical, major, minor or warning items, the Component Status Summary displays no items. Generic Icon The generic icon is provided when a webapp does not have an icon. System Management Homepage Illustrates sections related to the System Management Homepage. Security Options Provides links that enable you to configure HP SMH settings.
Table 3 Icon View (continued) Icon Description Timeouts Configures the values of timeout for SMH. Two timeouts can be configured: Session timeout and UI timeout. Trusted Management Servers Configures the certificates that are stored in the server and allows you to add or remove certificates. User Groups Allows an authorized user to configure which group of users has access to HP SMH and their respective access level.
HP SMH pages include: 24 • “Signing in” (page 7) • “The Home page” (page 25) • “The Settings page” (page 26) • “The Tasks page” (page 50) • “The Tools page (HP-UX only)” (page 51) • “The Logs page” (page 52) • “The Installed Webapps page (Windows and Linux only)” (page 55) • “The Support page” (page 56) • The Help page Navigating the software
5 The Home page The Home page provides the system, subsystem, and status views of the server. The Home page displays groupings of systems and their status. The information on the Home page is provided by the integrated agents or management utilities. For Linux and Windows operating systems, the Home page includes information provided by integrated version control, server, and storage agents.
6 The Settings page The Settings page contains links to the settings and configuration pages of the HP System Management Homepage (HP SMH) and other integrated management tools found on the Tools page. SNMP webagent box Provides links that enable you to configure HP Web-enabled System Management Software agents. • SMH Data Source category (Windows and Linux only) Sets options for HP SMH Data Source.
Guide, available on the HP Technical Documentation website at http://h18013.www1.hp.com/ products/servers/management/agents/documentation.html. To configure the SNMP Configuration, complete the following steps: 1. Select Settings from the menu. 2. In the SNMP Webagent box, click the SNMP Configuration link . UI Options category (Windows and Linux only) The UI Options page enables you to display inline help icons. To configure the UI Options, complete the following steps: 1. Select Settings from the menu.
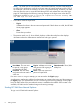
1 Presentation Mode 2 Enables you to set the default presentation mode by selecting from a list. The Presentation Mode has two options: List View and Icon View. Box Ordering Determines the order that the boxes are shown. If you order by name, the items appear alphabetically. If you order by status, items appear from worst (critical) to best (normal). 3 Box Item Ordering 4 Determines the order that items in boxes are shown. If you order by name, the items appear alphabetically.
1 Presentation Mode 2 Enables you to set the default presentation mode by selecting from a list. The Presentation Mode has two options: List View and Icon View. Box Ordering 3 Box Item Ordering 4 Determines the order that items in boxes are shown. If you order by name, the items appear alphabetically. If you order by status, items appear from worst (critical), to best (normal). Apply Save page data. Determines the order that the boxes are shown.
• “Trusted Management Servers category” (page 41) • “Kerberos Authentication category (Windows only)” (page 41) • “User Groups category” (page 44) • “Handling (proper) of the HP SMH certificate revocation” (page 47) • “Detecting and handling memory leak at runtime (Windows only)” (page 67) To access Security, select Settings from the menu, and then click the Security link in the System Management Homepage box.
3. 4. 5. Click the Anonymous/Local Access link. Under Anonymous Access, select the box beside Allow Anonymous users access to unsecured pages. Click Apply to apply your settings. To disable anonymous access: 1. Select Settings from the menu. 2. In the System Management Homepage box, click the Security link. 3. Click the Anonymous/Local Access link. 4. Under Anonymous Access, remove the check from the box beside Allow Anonymous users access to unsecured pages. 5. Click Apply to apply your settings.
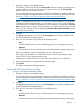
1 Enable Binding 2 When checked, indicates that binding will be used. Subnet Address 3 Valid address. Netmask Valid netmask. 4 Add 5 Adds the combined IP and Netmask address to the list. Check All 6 Check/uncheck all items in the list of addresses. Checkbox 7 Remove 8 Remove all checked items from the list. Apply Save all items in the address list. Multiple addresses/names. To configure IP Binding: 1. Select Settings from the menu. 2.
For Linux and Windows, you can set a restricted address at installation. From all operating systems, administrators can set a restricted address from the IP Restricted login page. Note the following: • If an IP address is restricted, it is restricted even if it is also listed in the permitted box. • If IP addresses are in the permitted list, only those IP addresses can sign in, except for localhost.
3. 4. 5. 6. Click the IP Restricted Login link. Select the check box beside the IP addresses you want to remove. Click Remove. Click Apply to apply the configurations. Local Server Certificate category The Local Server Certificate link enables you to use certificates that are not generated by HP. 1 Organization (O) 2 The name of the organization. Organizational Unit (OU). 3 The name of the unit within the organization requesting the certificate.
that was used with the previous self-signed certificate. This private key is randomly generated at startup when no key file exists. To create a certificate: 1. Select Settings from the menu. 2. In the System Management Homepage box, click the Security link. 3. Click the Local Server Certificate link. 4. Replace the default values in the Organization or Organizational Unit fields in the Create PKCS #10 Data box with your values, up to 64 characters.
1 Enable Port 2301 2 Sets Port 2301 as enabled or disabed. Enables Autostart mode. Sets Port 2301 as enabled or disabed. 3 Apply Record the option into the XML configuration file. To enable or disable Port 2301, complete the following steps: 1. Select Settings from the menu. 2. In the System Management Homepage box, click the Security link. 3. Click the Port 2301 and Autostart link. 4. To enable Port 2301, check Port 2301 check box. To disable Port 2301, clear the Port 2301 check box. 5.
To disable Port 2301, complete the following steps: 1. Select Settings from the menu. 2. In the System Management Homepage box, click the Security link. 3. Click the Port 2301 link. 4. In the Configuration box, clear the Enable Port 2301 check box. 5. Click Apply. To enable Port 2301, complete the following steps: 1. Select Settings from the menu 2. In the System Management Homepage box, click the Security link. 3. Click the Port 2301 link. 4. In the Configuration box, select the Enable Port 2301 check box.
Session Timeout To change the value for Session timeout, complete the following steps: 1. Select Settings from the menu 2. In the System Management Homepage box, click the Security link. 3. Click the Timeouts link. 4. In the Session timeout (minutes) textbox, enter a value between 1 and 60 minutes in the case of Windows and Linux. 5. Click Apply. UI Timeout To change the value for UI timeout, complete the following steps: 1. Select Settings from the menu 2.
verifies the digital signature before allowing access. If you do not want to enable remote configuration changes, leave Trust by Certificate selected, and leave the list of trusted systems empty by not importing certificates. 6 Add the server name to the list. Server Certificate Name Enable All Checks all listings in the register's checkboxes. This is the default behavior on Linux Itanium. 2 3 HP strongly recommends using this option because it is more secure.
You must have administrative authority to access this directory. To trust by certificate: 1. Select Settings from the menu. 2. In the System Management Homepage box, click the Security link . 3. Click the Trust Mode link. 4. In the Secure Trust Modes box, click the Trust by Certificate radio button. Choosing this option sets up the HP SMH to accept Secure Task Executions and Single Sign On requests that are signed by a HP SIM with a Trusted Certificate. 5. Click Apply. To trust by name: 1.
Trusted Management Servers category Certificates establish the trust relationship between HP SIM or Insight Manager 7 and HP SMH. The Trusted Management Servers link enables you to manage your certificates in the Trusted Certificates List. Note the following: To import a certificate to the trusted certificates list: 1. Select Settings from the menu. 2. In the System Management Homepage box, click the Security link. 3. Click the Trusted Management Servers link. 4.
The process only occurs when the user initially logs in to a Kerberos realm and tries to perform the first access to a Kerberos-secured service. 1. The user logs in to the system (client) using his or her domain username and password. 2. The user's password is hashed, and this hash becomes the user's secret key. 3. When the user tries to access a service, a message informs the AS that the user wants to access that service. 4. If the user is in the AS database, two messages are sent back to the client: a.
For example, when the clock skew among the machines is too large, the following log message is written: Thu Jun 25 16:55:09 2009] [error] client 2001:db8:c18:1:b8ca:fcdf:d49d:b5c6] mod_spnego: Kerberos SSO (QueryContextAttributes) failed; SSPI: The function requested is not supported\r\n(-2146893054). The following levels of user authorizations are available: • Administrator Users with Administrator access can view all information provided through HP SMH.
3. 4. 5. Click the Kerberos Authorization link. In the Kerberos Configuration area, select the box beside Enable Kerberos Support. In the Group Name textbox, enter a name in the group@REALM format or REALM\groupname. Only alphanumeric and underline values are permitted. The use of special characters such as ~ ' ! # $ % ^ & * ( ) + = / " : ' < > ? , | ; are not permitted. 6. 7. Click the Operator radio button beside Type. Click Add. The values entered are added as a new line in the list table.
system groups are added, the operating system administrator can add operating system users into these operating system groups. Each HP SMH access level can be assigned up to five operating system groups. The HP SMH installation enables you to assign the operating system groups to HP SMH. HP SMH will not allow adding an operating system group if the specified operating system group is not defined in the operating system.
3 information provided through HP SMH. The default user group, Administrators for Windows operating systems and root for Linux, always has administrative access. Operator Checks all checkboxes in the listings. Users with Operator access can view and set most information provided through HP SMH. Some web applications limit access to the most critical information to administrators only. Administrator Group To add an Administrator Group: 1. Select Settings from the menu. 2.
6. Click Add. The values entered are added as a new line in the list table. You can continue to add up to five Operator groups by following steps 4 through 6. 7. 8. Select the check box beside the Group Names in the dynamic list you want to add to SMH. Click Apply. To remove an Operator Group: 1. Select Settings from the menu. 2. In the System Management Homepage box, click the Security link. 3. Click the User Groups link. 4.
HP SMH uses the root certificate, intermediate certificate, and the Certificate Root List (CRL) of the certificate to verify the revocation status of trusted certificate used for SSO. If the certificate is found to be revoked or an error is encountered during verification, HP SMH does not allow the user to access HP SMH through SSO and redirects the user to the login page.
Add Custom Menu (HP-UX only) To add a custom menu to HP SMH (HP-UX only): 1. Select Settings→Menus→Add Custom Menu. 2. For Type, specify whether the menu is a command execution, an X application launch, or a link to another Web site or Web application. 3. For Page, specify the page HP SMH pages that the menu should be under. For example, you can specify Home, Tasks, Settings, Tools, or Logs. 4. For Category, specify a category (box) for the menu to be placed under.
7 The Tasks page The Tasks page displays links to routine tasks provided by participating HP Web-enabled System Management Software. If no tasks are provided by HP Web-enabled System Management Software, the Tasks page is not visible.
8 The Tools page (HP-UX only) The Tools page displays links to system management tools provided by participating HP Web-enabled System Management Software. For HP-UX, the Tools page provides an entry point into management tools that are analogous to the System Administration Manager (SAM) main page, also known as the SAM Functional Area Launcher (or FAL). For HP-UX this also includes categories and menus for several X-based management applications.
9 The Logs page At a minimum, the Logs page provides the following log categories: • System Management Homepage Log • Httpd Error Log (Windows and Linux) Logs contained in the installed HP Web-enabled System Management Software appear on this page. For example, if the HP Version Control Agent is installed, a link to the Version Control Agent log appears on the Logs page.
The Httpd Error Log is available on HP-UX directly but is visible in Windows and Linux by adding the httpd-error-log tag in the smhpd.xml file. You must have administrative access to HP SMH to access the Httpd Error Log. For HP SMH 3.
Table 5 Locale names of supported languages (continued) Language Linux locale name Windows locale name Spanish es_ES.UTF-8 spanish French fr_FR.UTF-8 french Italian it_IT.UTF-8 italian Korean ko_KR.UTF-8 korean Simplified Chinese zh_CN.UTF-8 chinese-simplified Traditional Chinese zh_TW.UTF-8 chinese-traditional The following table contains the suffixes of the log_messages.
10 The Installed Webapps page (Windows and Linux only) The Installed Webapps page contains a list of installed Webapps in the HP System Management Homepage (HP SMH). It contains links to the following HP Web-enabled System Management Software: Integrated Agents Lists Webapps names. Participants are agents that contribute information contained in HP SMH. If no HP Web-enabled System Management Software is installed that provides this information, an informative message appears.
11 The Support page The Support page provides information about HP Essentials Software and instructions on how to obtain guidance from HP Support and official forums. This page also provides the following links for help outside the HP System Management Homepage server domain. • Insight Essentials Software Information • Integrity Essentials Software Information • Support Links In HP-UX, the support link opens the HP Support Center (HPSC) home page.
1 Search terms 2 Webapp to search Enables you to enter search criteria. 3 Search Validates search field and chosen webapp. The Help page provides links for the following: • System Management Homepage Help Contains information about the HP SMH infrastructure and its configuration and log pages. The remaining entries link to help systems associated with the webapps installed on the system (those that provide a help system). • Credits Displays information regarding open source licensing and credits.
12 Command Line Interface configuration The Command Line Interface (CLI) provides users with administrative rights access to set these values through the command line. You can use the CLI to modify configuration options, including the required security checks that allow the configuration options to be changed. NOTE: --kerberos, --user-kerberos, --operator-kerberos, --admin-kerberos, --max-threads and --win32-disable-acceptex options are only available on Windows operating systems.
The following command configures the local user privileges: smhconfig -l|--localaccess-type[=] administrator | anonymous IP Restricted Logins IP addresses can be explicitly permitted or restricted based on user type. If there are IP addresses in the permitted list, only those IP addresses are allowed login access. If there are no IP addresses in the permitted list, login access is granted to any IP address not in the restricted list.
Trust Modes The HP SMH trusts HP SIM or HP Insight Manager 7 (IM 7) secure task execution requests and single sign on requests with various levels of security, ranging from trust all to only trust HP SIM or HP Insight Manager 7 with trusted certificates: • Trust All This command sets up the http server to accept all secure task execution requests and single sign on requests from any HP SIM or HP Insight Manager 7 7 server: smhconfig -t|--trustmode[=] TrustByAll • Trust By Name This command sets up the HP
NOTE: Win32DisableAcceptEX is only available on Windows operating systems. Enable/disable SSL v2 By default the HP SMH has SSL v2 disabled. Use the following switch to re-enable SSL v2: smhconfig -s|--disable-sslv2[=] True | False where value False enables SSL v2 and value True disables SSL v2 Execute the following command to restart the HP SMH service smhconfig -r. Log Rotations (Windows and Linux only) Log files can become large and unmanageable.
UI Timeout The UI timeout value represents the maximum amount of time in seconds that the HP SMH user interface (UI) waits for data requested from webapps. The UI timeout can be set in the range of 10 seconds to 3600 seconds. Use the following command used to set the UI Timeout in seconds: smhconfig - B|--ui-timeout[=] NUM where, NUM is the value (in seconds) between the range 10 seconds to 3600 seconds. The default UI Timeout value set is 120 seconds.
Custom UI Enabling custom UI enables you to customize the sign-in and header images as well as adding a small text in the sign-in page. See the HP SMH README.txt in the hpsmh/data/htdocs/ custom_ui directory in the HP SMH install path.
Icon view Icon view allows you to set the default view mode to show icons (True) like a desktop File Manager appearance or to show the traditional list (False) that displays items in boxes. smhconfig -n|--iconview[=] True | False Box Order Box order defines the ordering method used to display the boxes. You can choose name, which places the boxes in alphabetical order, or you can choose status, which displays the boxes from the worst status (critical) to the best status (normal).
User Groups User Groups are a set of policies to access and modify HP SMH functionalities. Only valid existing operating system groups can be added to the group list. To add groups into HP SMH user types, complete the following: Administrators Users with Administrator access can view and set all information provided throughout the HP SMH. The default user group (Administrators for Microsoft operating systems and root for Linux) always has administrative access.
users Command Line Log Reader The command line log reading tool provides the users with a command line tool for reading the SMH log messages without using the UI. The command is: smhlogreader [options] where, the [options] are: -h|--help, displays the help message. --version, displays the HP SMH version. -f|--file FILE, FILE represents a path to a file. --from FROM, FROM: to display a range of messages, this option describes the ID of the first message.
The following command displays a list of messages in the range selected by the user. smhlogreader --from VALUE --to VALUE For example, to display messages the recent five messages, the user should use the following command: smhlogreader --from 1 --to 5 • File-based command line log reading The smhlogreader CLI allows the user to use a properly-formatted log file as an input. The following command allows the user to use a properly-formatted log file as an input and also backs up the log files.
Modify the PATH_TO_CAFILES HP SMH verifies the revocation status of the trusted certificate used for SSO against the root certificate, intermediate certificate, and the Certificate Revocation List (CRL) of the certificate. If the certificate is found to be revoked or if an error is encountered during verification, HP SMH logs a critical error as: Trusted certificate used for SSO is either revoked or HP SMH failed to verify it against CRL.
13 Troubleshooting topics NOTE: If noted, a topic might only apply to the HP-UX, Linux, or Windows operating system. 13.1 Access Problems 13.13.1.1 13.13.1.2 13.13.1.3 SMH Documentation Unclear on Treatment of securetty. The HP System Management Homepage (HP SMH) does not use /etc/securetty. See login(1) for details on /etc/securetty. After entering a hostname on Linux, HP SMH does not start. Hostnames that are 64 characters or longer in length are not supported on Linux.
There are two possible solutions in order to be sure the HP SMH shortcut asks for credentials. Solution 1 1. Select Tools Internet Options 2. Choose the Advanced tab. 3. Under Settings Browsing, deselect Reuse windows for launching shortcuts (when tabbed browsing is off). 4. Click OK. Solution 2 1. Select Tools Internet Options 2. Under the General tab, look for Tabs: Change how webpages are displayed in tabs. Click Settings. 3.
13.13.2.7 When I browse to https://ipaddress:2381 on a local machine or a remote machine running Windows 2003, I don't see the Sign in screen. Internet Explorer 6.0 on Windows 2003 sometimes causes only the Account Sign in text in a blue bar to appear, instead of the entire Sign in page. This issue occurs when browsing on a local system or a remote system. To resolve the issue, enable Javascript support and add this site to the Trusted sites list. 13.3 Installation Problems 13.13.3.1 13.13.3.
Choose one of two ways to avoid security warnings when browsing with IPv6 addresses: 13.13.4.2 • Use a DNS name backed by IPv6 addresses. • Add the literal IPv6 address to the Local intranet site or Trusted sites of Internet Explorer 7 without the port number. For example, add http://[ 2001:db8:c18:1:250:8bff:fee2:4ed8] and https://[ 2001:db8:c18:1:250:8bff:fee2:4ed8] without adding the port number.
2. 3. 4. 5. 6. 13.13.5.2 Click HP System Management Homepage Properties. Click the Log On tab. Deselect Allow service to interact with desktop. Click Apply and then click OK. Restart the HP System Management Homepage service. I gave a user group defined by Windows, such as Backup Operators, Administrator, Operator and User , privileges through the HP SMH User Groups settings page. However, users in that group cannot sign in or do not have the correct privileges in HP SMH.
13.13.5.8 By default, new accounts created in Windows operating systems are set to user must change the password at next sign in. Deselect this option so the account can be used to sign in to HP SMH. When I use Internet Explorer 6.0 in Windows and browse through the management server to a system that was discovered by IP address, I cannot sign in to HP SMH. If anonymous access is enabled, I get through anonymously but the user name is incorrect. or When I use Internet Explorer 6.
NOTE: You might need to change the Microsoft Internet Information Server (IIS) configuration after you rename a system. This is a security feature added by Microsoft security patch MS01-055 for Internet Explorer 5.5 or 6.0 that prevents systems with improper name syntax from setting cookie names. Domains that use cookies must use only alphanumeric characters (or .) in the domain name and the system name.
If the CA returns the certificate data in X.509 format, rename the X.509 certificate file as cert.pem and place it into the \hp\sslshare directory. When HP SMH is restarted, this certificate is used. 13.13.6.3 13.13.6.4 13.13.6.5 13.13.6.6 Why is my PKCS #7 cert data not accepted? When using a Mozilla browser, there can be problems when cutting and pasting cert request and reply data using Notepad or other editors. To avoid these problems, use Mozilla to open certificate reply files from your CA.
13.13.7.2 Why can't I install HP SMH on my system? The HP SMH install action requires a Java version that requires at least 256 colors to load. NOTE: 13.13.7.3 13.13.7.4 13.13.7.5 13.13.7.6 This applies to Windows only. Why do I get an error indicating the page cannot be displayed when I click the Management Processor link? The administrator for the management processor has configured the Web server on the management processor to use a port other than port 80.
14 Service and support Support for HP SMH is provided as an adjunct to support of the underlying hardware. The HP Support pages provide you with a variety of product, service, and support-related resources for HP SMH. • Access HP SMH on the Software Depot home. Go to http://www.hp.com/go/softwaredepot and select Security and manageability. Look for the HP System Management Homepage link. The support for Linux Integrity is found by selecting the Linux link on Software Depot home.
Support and other resources Information to collect before contacting HP Be sure to have the following information available before you contact HP: • Software product name • Hardware product model number • Operating system type and version • Applicable error message • Third-party hardware or software • Technical support registration number (if applicable) How to contact HP Use the following methods to contact HP technical support: • In the United States, see the Customer Service / Contact HP Uni
HP authorized resellers For the name of the nearest HP authorized reseller, see the following sources: • In the United States, see the HP U.S. service locator web site: http://www.hp.com/service_locator • In other locations, see the Contact HP worldwide web site: http://welcome.hp.com/country/us/en/wwcontact.html Documentation feedback HP welcomes your feedback. To make comments and suggestions about product documentation, send a message to: docsfeedback@hp.
www.hp.com/go/hpux-core-docs, select HP-UX System Administration for the latest documents and for previous versions of the documents, select either HP-UX 11i v1 or HP-UX 11i v2. Also, for Linux and Windows operating system releases, the user guide is available at the HP SMH web page at http://h18013.www1.hp.com/products/servers/management/agents/ documentation.html. • Next generation single-system management on HP-UX 11i v2 (B.11.23) This white paper introduces HP SMH and its various plug-ins.
Enter The name of a keyboard key. Note that Return and Enter both refer to the same key. A sequence such as Ctrl+A indicates that you must hold down the key labeled Ctrl while pressing the A key. term Defined use of an important word or phrase. variable The name of an environment variable, for example PATH or errno. value A value that you may replace in a command or function, or information in a display that represents several possible values. An element used in a markup language.
A HP SMH file locations Table 10 HP SMH file locations Description HP SMH Root Windows Linux SystemDrive\hp\hpsmh /opt/hp/hpsmh HP-UX /opt/hpsmh The root of the HP SMH installation. HP SMH Executable SystemDrive\hp\hpsmh\bin\hpsmhd.exe /opt/hp/hpsmh/sbin/hpsmhd /opt/hpsmh/lbin The HP SMH binary. A webapp can use detection of this file's presence to verify that HP SMH is installed on the system. Certificate and Key files The certificate and private key files used by HP SMH.
Table 10 HP SMH file locations (continued) Description Help Root The root where help files are placed. Webapp XML files The root where webapp XML configuration files are placed.
B HP SMH Ciphers Ciphers used in HP SMH This appendix provides a list of all the Ciphers used in the HP SMH product. Table 11 Ciphers used in HP SMH Cipher SSLProtocol Syntax SSLProtocol [+|-]protocol ... Description Directive used in HP SMH Description Configure usable SSL protocol flavors SSLProtocol all -SSLv2 Enable SSLv3 and TLSv1, but not SSLv2. NOTE: All includes SSLv3, TLSv1, and SSLv2.
Glossary Accounts for Users & Groups tool (ugweb) The HP-UX Accounts for Users and Groups (ugweb) tool is used to manage user accounts and group accounts on the local system. This tool can also be used to manage user accounts on a NIS system. The ugweb tool can be launched from the HP-UX System Administration Manager (SAM) tool or from HP SMH. AS See Kerberos Authentication Server. CA See certificate authority.
performance management, and workload management enable systems administrators to pick the value added software required to deliver complete lifecycle management of their hardware assets. To obtain more information about HP SIM, go to http://www.hp.com/go/hpsim. HP Version Control Agent (VCA) An Insight Management Agent that is installed on a system to enable the customer to see the HP software installed on that server.
ticket. The session key for the TGT is encrypted using the user's long-term key, so the password is needed to decrypt it from the AS' response to the user. Kernel Configuration tool (kcweb) The HP-UX Kernel Configuration (kcweb) tool is used to manage kernel tunables, modules and alarms. The Kernel Configuration tool can be launched from the HP-UX System Administration Manager (SAM) tool or from HP SMH MIT Massachusetts Institute of Technology. multihomed Multiple names set to a certificate.
Secure Sockets Layer (SSL) A standard protocol layer that lies between HTTP and TCP and provides privacy and message integrity between a client and server. A common use of SSL is to provide authentication of the server, so the client can be assured it is communicating with the system that the system claims to be. It is application protocol independent. Secure Task Execution (STE) Secure execution of a task from a managed system.
Web-Based Enterprise Management (WBEM) 90 Glossary Is a platform and resource independent DMTF (Distributed Management Task Force) standard that defines both a common model (for example, description) and protocol (for example, interface) for monitoring and controlling a diverse set of resources. The HP WBEM Services for HP-UX products is the HP-UX implementation of the DMTF (Distributed Management Task Force) WBEM standard.
Index C O certificates trust mode, 26 trusted management server certificates, 26 ciphers HP SMH, 85 CLI configuration HP SMH, 58 credits HP SMH, 56 overview getting started, 7 HP SMH, 6 D reference troubleshooting, 78 resources, 80 documentation, 80 E error log, 52 examples scenarios, 16 F features, 80 file locations HP SMH, 83 G getting started sign in, 7 H home HP SMH, 25 HP SMH ciphers, 85 L languages HP SMH, 52 logs error log, 52 HP SMH, 52 SAM log, 52 System Management Homepage log, 52 M ma
W webapps Integrated Agents, 55 Other Agents, 55 92 Index