
Deploying HP SIM 6.x or greater on MSCS clusters on Windows 2003 with SQL Server 2005

34
b.
Enter the password in the
Password
field.
c.
The
Domain
field displays the user domain used to log into the system.
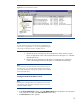
18.
Click
Next
. The
Custom Install
–
Summary
window appears.
Note:
The
Incompatible H
P SIM Plug
-
in Version Detected
window appears. PMP
and VMM are not bundled with HP SIM 5.2. This window displays the
version of the plug
-
in that must be manually updated.
19.
Click
Install
. The installation of HP SIM 5.2 and its dependent services are initiated.
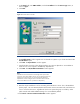
a.
A new
Welcome to the Pegasus WMI Mapper V2.1 Setup Wizard
window appears.
i.
Click
Next
. The
End
-
User License Agreement
window appears.
ii.
Select
I accept the terms in the License Agreement
.
iii.
Select
Typical
. The
Ready to Install
window appears.
iv.
Click
Next
. The
Choose Setup Type
window appears.
v.
Click
Install
to proceed t
o the
Installing Pegasus WMI Mapper v2.0 window.
Note:
A progress bar indicating files are being copied appears during the
installation of this service. WMI Mapper is installed on
C:
\
Program
Files
\
The Open Group
\
WMI Mapper
. At the end, the
Completing the
P
egasus WMI Mapper v2.0 Setup Wizard
window appears.
vi.
Click
Finish
to exit the WMI Mapper setup wizard.
b.
A new
Welcome to the HP Systems Insight Manager Setup Wizard
window appears
with the destination automatically selected.
i.
Click
Next
. The
Ready to Insta
ll
window appears.
ii.
Click
Install
. The
Installing
window appears.
Note:
A progress bar indicating files are being copied appears during the
installation, which might take a few minutes.
Note:
It might take a few more minutes when the
Initializing HP Systems Insight
Manager
window appears. After initialization is complete, the
Completing
the HP Insight Manager Setup Wizard
window appears.
iii.
Click
Finish
to close the
Setup
HP Systems Insight Ma
nager Wizard
window.
c.
A new
Remote Support Pack Installation
window appears.
i.
Click
Next
to proceed with default path
c:
\
Program Files
\
hp
located in
the
Please specify where you would like the Remote Support Pack component
installed
window.
ii.
Click
Yes
in the
Confirmation installation directory
windows.