
Deploying HP SIM 6.x on MSCS Clusters on Windows 2008 with SQL Server 2005 White Paper


22
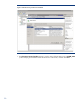
d.
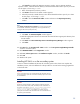
Enter the name of the Microsoft SQL Server 2005 Enterprise Edition instance that you created. For
this paper, HP
-
SIM
-
SQLSVR
\
HP_SIM_INSTANCE is used.
Note:
If the credentials specified c
annot be validated, a message appears, stating
You are not able to continue with the installation
until the account information is validated
.
Note:
Be sure to close any application, such as Microsoft SQL Server Enterprise
Edition Manager that connects to t
he Microsoft SQL Server 2005 Enterprise
Edition instance being referenced here (
HP
-
SIM
-
SQLSVR
\
HP_SIM_INSTANCE
in this paper). Otherwise, this step might
hang
.
Note
:
.
Default port for SQL is 1433. If
Named instance
of SQL server is used, then
dynamic port nu
mber should be given in port field for the SQL server
.
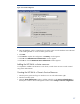
11.
In the
Select Installation Type window
, select
Custom
, and then click
Next
.
12.
Click
Custom
. The
Custom Install
-
Software Selection
window appears.
Not
e:
The
Custom Install
option enables you to specify in
stalling on the desired
shared disks (F: and I: in this paper)
.
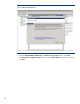
13.
Click
Next
. The
Service Account Credentials
window appears.
The
Username
field displays the
user name that is logged in.
Enter the password in the
Password
field.
The
Domain
field displays
the
user domain used to log in
to the system.
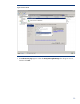
14.
Click
Next
. The
Custom Install
-
Summary
window appears.
15.
Click
Install
. The installation of HP SIM 6.x and its dependent services is initiated.
a,
A new
Welcome to the OpenSSH Services for HP Systems Insight Manager
Setup Wizard
window appears.
Note:
Read the welcome message, which reminds you to close other applications
.
i.
Click
Next
. The
Select Destination Location
window appears.
ii.
Specify the desired directory to be on the local drive of the current system.
In this paper, the
default
C:
\
Program Files
\
OpenSSH
.
iii.
Click
Next
. The
OpenSSH Service Log on as User
window appears.
The
Username
field displays the user name that is logged in.
Enter the password in the
Password
field.
The
Domain
field displays
the user domain used to log into the system.